Showing posts with label modular building. Show all posts

Friday, June 30, 2023

I made Thomas Guerts Warehouse Modular Building out of Lego compatible bricks


In 2021, Thomas Guerts submitted his idea for a Warehouse Modular building to Lego ideas, but sadly it never garnered sufficient votes to see this project made into reality.


 I'm not sure if Thomas ever made the physical model or whether the warehouse was simply a 3D render.  I checked his instagram @elteebricks but never saw it there.

Since he didn't make it, I thought I would give it a try.  I bought a lot of dark red masonry bricks for the warehouse walls.  Everything else was scrounged from my spare brick parts bin.  As you can see,  the warehouse I made has some differences from the original model, yet I'm still trying to maintain the overall design of Thomas Guerts vision.

The first thing you will notice is the baseplate.  I have extended the baseplate and tiled it so that it can accommodate a transport truck.  The size of the baseplate is 32 studs wide by 48 studs deep.  I added a small tree for decoration outside.  I might add a little planter along the right side in future.

Thomas depicts an orange forklift in his warehouse.  I have that same forklift in my collection but decided to use this smaller green one, although I can't quite remember whether it came from a Wange set or some other set.

The rollup garage doors go up and down smoothly.  I'm just missing the handle piece on the right hand side door.   The adjacent office is only a single storey, whereas Thomas mentioned that his model has a second floor that is a canteen for the truck drivers.  I plan to introduce the second floor in the near future.
I'm missing the downpipe that runs next to the office wall.  Need to make tat for my set.

I don't have any markings on the pavement as yet, and I'm missing the overhead lights above the garage doors, but I just made them last night, so I will put them on soon.

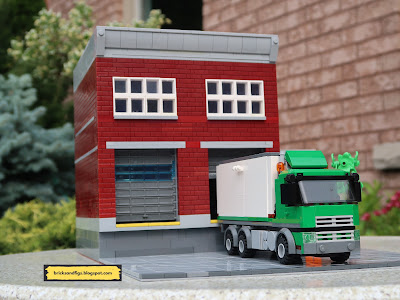
Here's a delivery truck parked in front of the doors for scale.  When you use bricks from different suppliers and brands, you run the risk of brick colours not matching as evidenced by the masonry bricks. 

I made the side wall of the warehouse a pop out wall following Thomas Guerts design.

Here's the view from the office side.  As mentioned earlier, I have provisioned for a future second floor.  The roof can be replaced with a break room stacked on top.  Access to the second floor will be from inside the warehouse via stairs I have yet to put in.  The staircase will lead to the doorway shown above.

I decided to use masonry bricks for the office too, although I might change that in future.  Mine is just a brick wall whereas Thomas' office has windows along the side.


I put a back door into my warehouse but it's a long drop for anyone who steps out.   I made a continuous line of windows along the back, which is different from the Thomas warehouse.

Inside the office, I furnished it with a counter and computer terminal, a trash bin, a chair and a small filing cabinet with a radio on top.   There's a door that leads to the warehouse as well as a window.


The roof of the warehouse comes off to display the interior.  The floor is fully tiled and there are two shelves made form technic bricks along the back wall.  One shelf is 5 studs wide and the other is 3 studs wide.  I had to add extra bracing for the garage door tracks.

I made sure the height of the tracks didn't prohibit the forklift from driving around inside.


With the wall removed, you can see inside the warehouse just like the Thomas Guerts design.  


Here's another shot of the inside of the warehouse.


A closer look at the two loading bays.

I just realized I'm missing the HVAC unit from my rooftop.  Need to make one of those.


Thanks for looking at my custom warehouse modular building based on Thomas Guerts design.  Hope you liked it, Bye!

Monday, April 10, 2023

I completely rebuilt the JMBricklayer Coffee Shop


Hi brick fans!  I'm back with another MOC, this time I've rebuilt the JMBricklayer Coffee shop 21102.  I reviewed the original set here on my other blog Its-Not-Lego.

I placed the original completed Coffee Shop in my not Lego city just to see how it looks.  Um, yeah let's see what we can do.

Ok, here's the newly revised Coffee Shop which I have basically rebuilt from the ground up.  The first thing you will notice is the raised baseplate on a standard 16x32 stud footprint.   This meant that I had to completely destroy the original folding baseplate that let you open the interior for display.

Next you will notice the large and colourful tree, which was originally located inside has been moved to the outside.  

The front door has been replaced and the height of the building has been significantly lowered to reflect the minifig scale.  Flanking the entrance door on either side are some potted plants that used to sit in the previous and now defunct plant stand.

Here's the side profile, where you can better see how the sloped roof has been reconfigured and relocated to the rear of the coffee shop.  I've used whitish bricks for the walls from a number of alt Lego brands, so unfortunately their colours don't always match.

The original masonry bricks have been salvaged and will be reused in a future building.

Yeah, the white bricks look really bad here, sorry.


Moving to the rear of the shop, it has been completely revamped with glass instead of brick.   You will notice that the slanted roof now has new window glass which was not in the original set.


Just another view of the back.

With the new windows, one can see the seating area.


I've reconfigured the roof and it is now comprised of three sections.  The white roof sits directly over the front of the coffee shop.  The new widened roof still features the original skylight, but now it has been centered into the roof and the previously exposed studs are now covered.

The black sloping roof was redesigned to come off, yet still hold the dark nougat roof panel securely in place.  The angle of the slope has not changed too much.

The dark nougat roof panel has been widened to 16 studs in width and sports glass panes in all the windows as previously mentioned.


Looking down into the seating area, with roof removed.


With all roof panels removed, here is the full view of the coffee shop interior.  I really had to scrounge through my spare parts to find all the dark nougat tiles that I used for the flooring.  I had to get a bit creative in laying out the tiles based on what was available, (mostly 2x2 and 1x2 tiles), but also I also had to judiciously use the tiles with the single stud to mount my tables and chairs.

The entire coffee station was preserved and moved into the new building layout.  The only thing that didn't make it was the upper shelf where the sign is currently sitting.
Betty the barista is back behind the counter.   I've added a lot more minifigures to the coffee shop to fill up the extra space.

The clock and the record player have found their way back into the coffee shop.  There's a new cabinet for baked goods that didn't exist before.

Here's another view of the coffee shop looking out the front.  I've offset the front door so that the traffic flow comes naturally into the aisle.

Looking towards the rear of the coffee shop.  The laddered element was a bit of architectural detail I wanted to preserve from the original shop.  Before it was on the exterior but I moved it inside to help define the seating area from the serving area.

I replaced the legacy long table with three smaller tables with accompanying chairs in the seating area.

I managed to save two of the three pieces of wall art in the new shop, but unfortunately couldn't find space for the OG air conditioner.

Oh, before I forget, I want to mention the Coffe Home shop sign.  As you know the spelling is incorrect and it would be naturally expected that I remove or replace the sign with the correct wording.  

But then it occurred to me that I would be placing the coffee shop with all of my other Japanese shops, and I thought what if the shopkeeper didn't have a proper command of the english language and inadvertently spelt the sign wrong.  

I've actually seen some gibberish English signage on some storefronts in my past trips to Japan and China.  So, instead of replacing the signage, I thought I would keep it exactly as it was, just to acknowledge that maybe there was some kind of language barrier.  I think that in the end, it kind of gives the shop some extra character that is unique and differentiates it from my other buildings.

I hope you've enjoyed the tour of the rebuilt JMBricklayer Coffee Shop.  Let me know what you think of the redesign.  Do you like the new version or prefer the original design?  Let me know in the comments below!

Last pic with the revamped Coffee shop nestled amidst my other Japanese themed buildings.


Don't forget you can get the JMBricklayer Coffee shop 21102 (in it's original form, of course) at the JMBricklayer shop or their Amazon store.  And don't forget to use my code ITSNOTLEGO15 to save an extra 15% off their online store purchases (non sale items only).

Thanks and have a great day!  Bye!

Thursday, March 16, 2023

Changes to my Custom 7-11/KFC modular building in 2023

Hello brick fans!  Let's take a look at another one of my MOCs, this one being a modular building consisting of a 7-11 convenience store with an upstairs after school learning centre, and an adjoining KFC fried chicken pop up shop.

The last time I made changes to this building was way back in 2019 and then later I  integrated the 7-11 and KFC shops onto a single base plate.  Both of these shops have gone through a number of modifications from their humble beginnings.


In this latest change, I've put the buildings on raised base plates and changed the sidewalk colour from dark gray to light gray.  

In order to include a bike share, I placed the KFC as far back as possible and raised it up for visibility.

There is a mailbox, an ATM, a garbage bin, a vending machine, a map of the city, and a bike-sharing station equipped with three bike slots.

The overhead signage for the 7-11 and KFC are from stickers that I bought .

The second floor over the 7-11 is an after school space for kids to do extra activities.

The staircase is used to reach the second floor.


Service door to the 7-11 is located in the back.  Kids can park their bikes and scooters under the staircase.

Here's some pics of the 7-11 interior.


Now, a few pics of the KFC ...

The colonel is outside promoting his famous fried chicken.

Inside is a small fryer, a service counter and condiments dispenser.

Some buckets and boxes are within easy reach of the cashier.  A glass partition protects customers from the cooking area.

Isn't it coincidental that Colonel Sanders looked like Stan Lee when he was younger? Maybe his real name was Colonel Standers!


Kiddies can practice their academic and artistic skills here.


Physical activity and socialization is also encouraged.


That concludes our tour of the 7-11/KFC/Kidscamp modular building.  

It has become increasingly difficult to find the original Hsanhe sets on Aliexpress, which served as the foundation for my customised buildings.  

You might find some similar buildings using the search term "Street View" on Aliexpress.


Thanks for looking!  Bye!