Hey brick fans, welcome back to Bricks and Figs! Today I'll be reviewing the Briksmax LED light kit for the Lego Boutique Hotel. As you can see from the picture above, the hotel looks amazing with all of the interior and exterior lighting.
Briksmax provided me with this awesome light kit to review so I wanted to share with you some behind the scenes shots of what goes into lighting up a modular building. Check out their huge assortment of light kits on the
Briksmax website.
Power Supply
If you've never lit up a Lego set, you might be wondering where the power comes from.
Briksmax provides a USB plug and battery pack (3 batteries required, but not included) to power all the lights in the kit. If you don't want to use the double A battery pack, you can attach the USB plug directly into a USB power source.
The boutique hotel has an unused area in the corner, so I took the opportunity to make a small cubby to hold the provided battery pack and one of two first floor expansion boards. This isn't required by Briksmax, but I thought it would make all the wires look less messy.
Hotel Lobby, Art Gallery and Outdoor Bar
On the lower level I used a total of three 6 port expansion boards:
1. for the streetlamp, hotel lobby ceiling and the upper floors of the hotel.
2. for the room keys light and front entrance lights
3. for the adjoining art gallery and outdoor bar lighting
I placed one expansion board under the stairwell inside the first floor and the other sits outside behind the art gallery. The boutique hotel came with a dumpster behind the art gallery, but I decided to remove it from my set so that I could accommodate the battery pack and expansion board.
Briksmax provides step by step instructions in the provided manuals, but I decided to freestyle my lighting runs. In the pic above, I used my own 1x2 technic hole brick to feed the connecting wires from the power supply into an expansion port inside the building. I did this to avoid crimping the wires under the bricks.
At this junction, power is distributed three ways:
1. Feed wire to the El cubo Art gallery expansion board and hotel main floor lighting expansion board (see the powers supply pic).
2. Feed wire to the wireless contact point between the first and second floor (see pic above). I deviated from the instructions by placing all of my wireless contact pads for each floor in the hotel stairwell. The wireless connectors supplies all of the power to light each floor of the hotel.
3. Exterior street lamp connection.
Briksmax provides a light-up streetlamp to replace the standard one that comes with the hotel. The wiring for the street light is connected to the expansion board under the stairwell.
The wireless contact pad provides power to the art gallery ceiling light and it's dedicated expansion board.
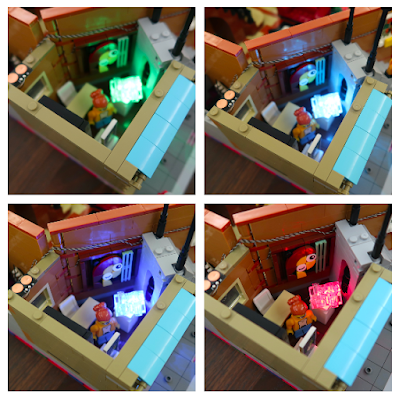
See how the colour changing LED light transforms the static sculpture into a vibrant work of art.
The lighting for the El Cubo sign is a bonus add-on by Briksmax.

Here's the ceiling light strip for the art gallery ceiling. All the wires to light the outdoor bar terminate at the expansion board pictured above.

Here's the underside of the first floor ceiling. The wireless connector feeds power to the light strip and then upwards to the next floor.
Hotel Second Floor
In their lighting kit, Briksmax provides LED lights for the desk lamp and bedside lamps (see orange circles), but I chose not to apply them, since my focus is just having the general interior lit up from the ceiling lights.
It's not pretty but here is the ceiling lighting for the second floor of the hotel. Power from the wireless connector goes to an expansion board that connects the main LED light strip and three other LED dot lights. In addition to the light strip, I put a dot light in the stairwell, the small bedroom and in the entrance to the larger bedroom. A wire feed will forward the power to the third floor. I used my own circular gray pieces to hold the wires in place, but it's probably a cleaner look if you hide the wires under the long white plate pieces as per the Briksmax instructions.
Hotel Third Floor
The third floor wireless connector will power the ceiling lights and the light in the spire on the roof.
Briksmax provides led lights for the TV and bedside tables but again I chose not to use them opting only to use ceiling lighting.
For the third floor, I've placed dot lights on the ceiling bathroom, in the ceiling rotunda and in the stairwell, and the larger strip light all terminated to the expansion board. The spire light on the rooftop also feeds down into the same expansion board.
The orange pointer shows you where the LED light is situated.
Summary
So here is a complete list of all the Briksmax components I used to light up the boutique hotel modular building.
- battery pack
- usb plug
- 5 expansion boards
- 4 strip lights
- 13 dot lights
- 1 colour changing dot light
- 1 light standard
- 4 sets of wireless connector pin/pads
Briksmax provides some substitute Lego parts to use as well. I also supplemented these parts with my own to make it a bit more custom, but you can achieve the same results by just following the Briksmax instructions. I can make use of the unused lighting parts in future building block sets.
As you can see, there's not a lot of exposed wires showing for the viewable areas.
Here's a few more shots in the dark around the hotel.
I didn't have any defective parts in my kit but if you did, Briksmax will send you free replacement parts if required. I've used other LED light kits before Briksmax, but find that they give me the most flexibility in choosing what I want to install. Their instructions are easy to follow as well.
If you missed my Briksmax lighting kit unboxing post, you can find it
here.
Well, that's it, hope this post helped you to decide whether Briksmax is the right kit for your Lego lighting needs. Bye for now!


