Welcome to Bricks and Figs. This is the place to see all the latest brick sets and my growing collection of mini figures. This blog also focuses on showing you custom lighting kits, and my latest MOCs and MODs using whatever bricks and blocks I have on hand.
A couple of weeks ago I built a Lego compatible Strip Club for my new collection of Sexy girl minifigures that I bought from Aliexpress.
Right after I finished building it, I realized it was too small and lacking a number of necessary items. I like the look of the building but needed to improve it somehow. I had two options, I could either build up or build out.
If I added a third floor to the strip club, it would make it stand out amongst all of the other smaller shops on my Japan street. Recall that I'm trying to create an unassuming building that kind of one doesn't notice when looking at all of the other buildings.
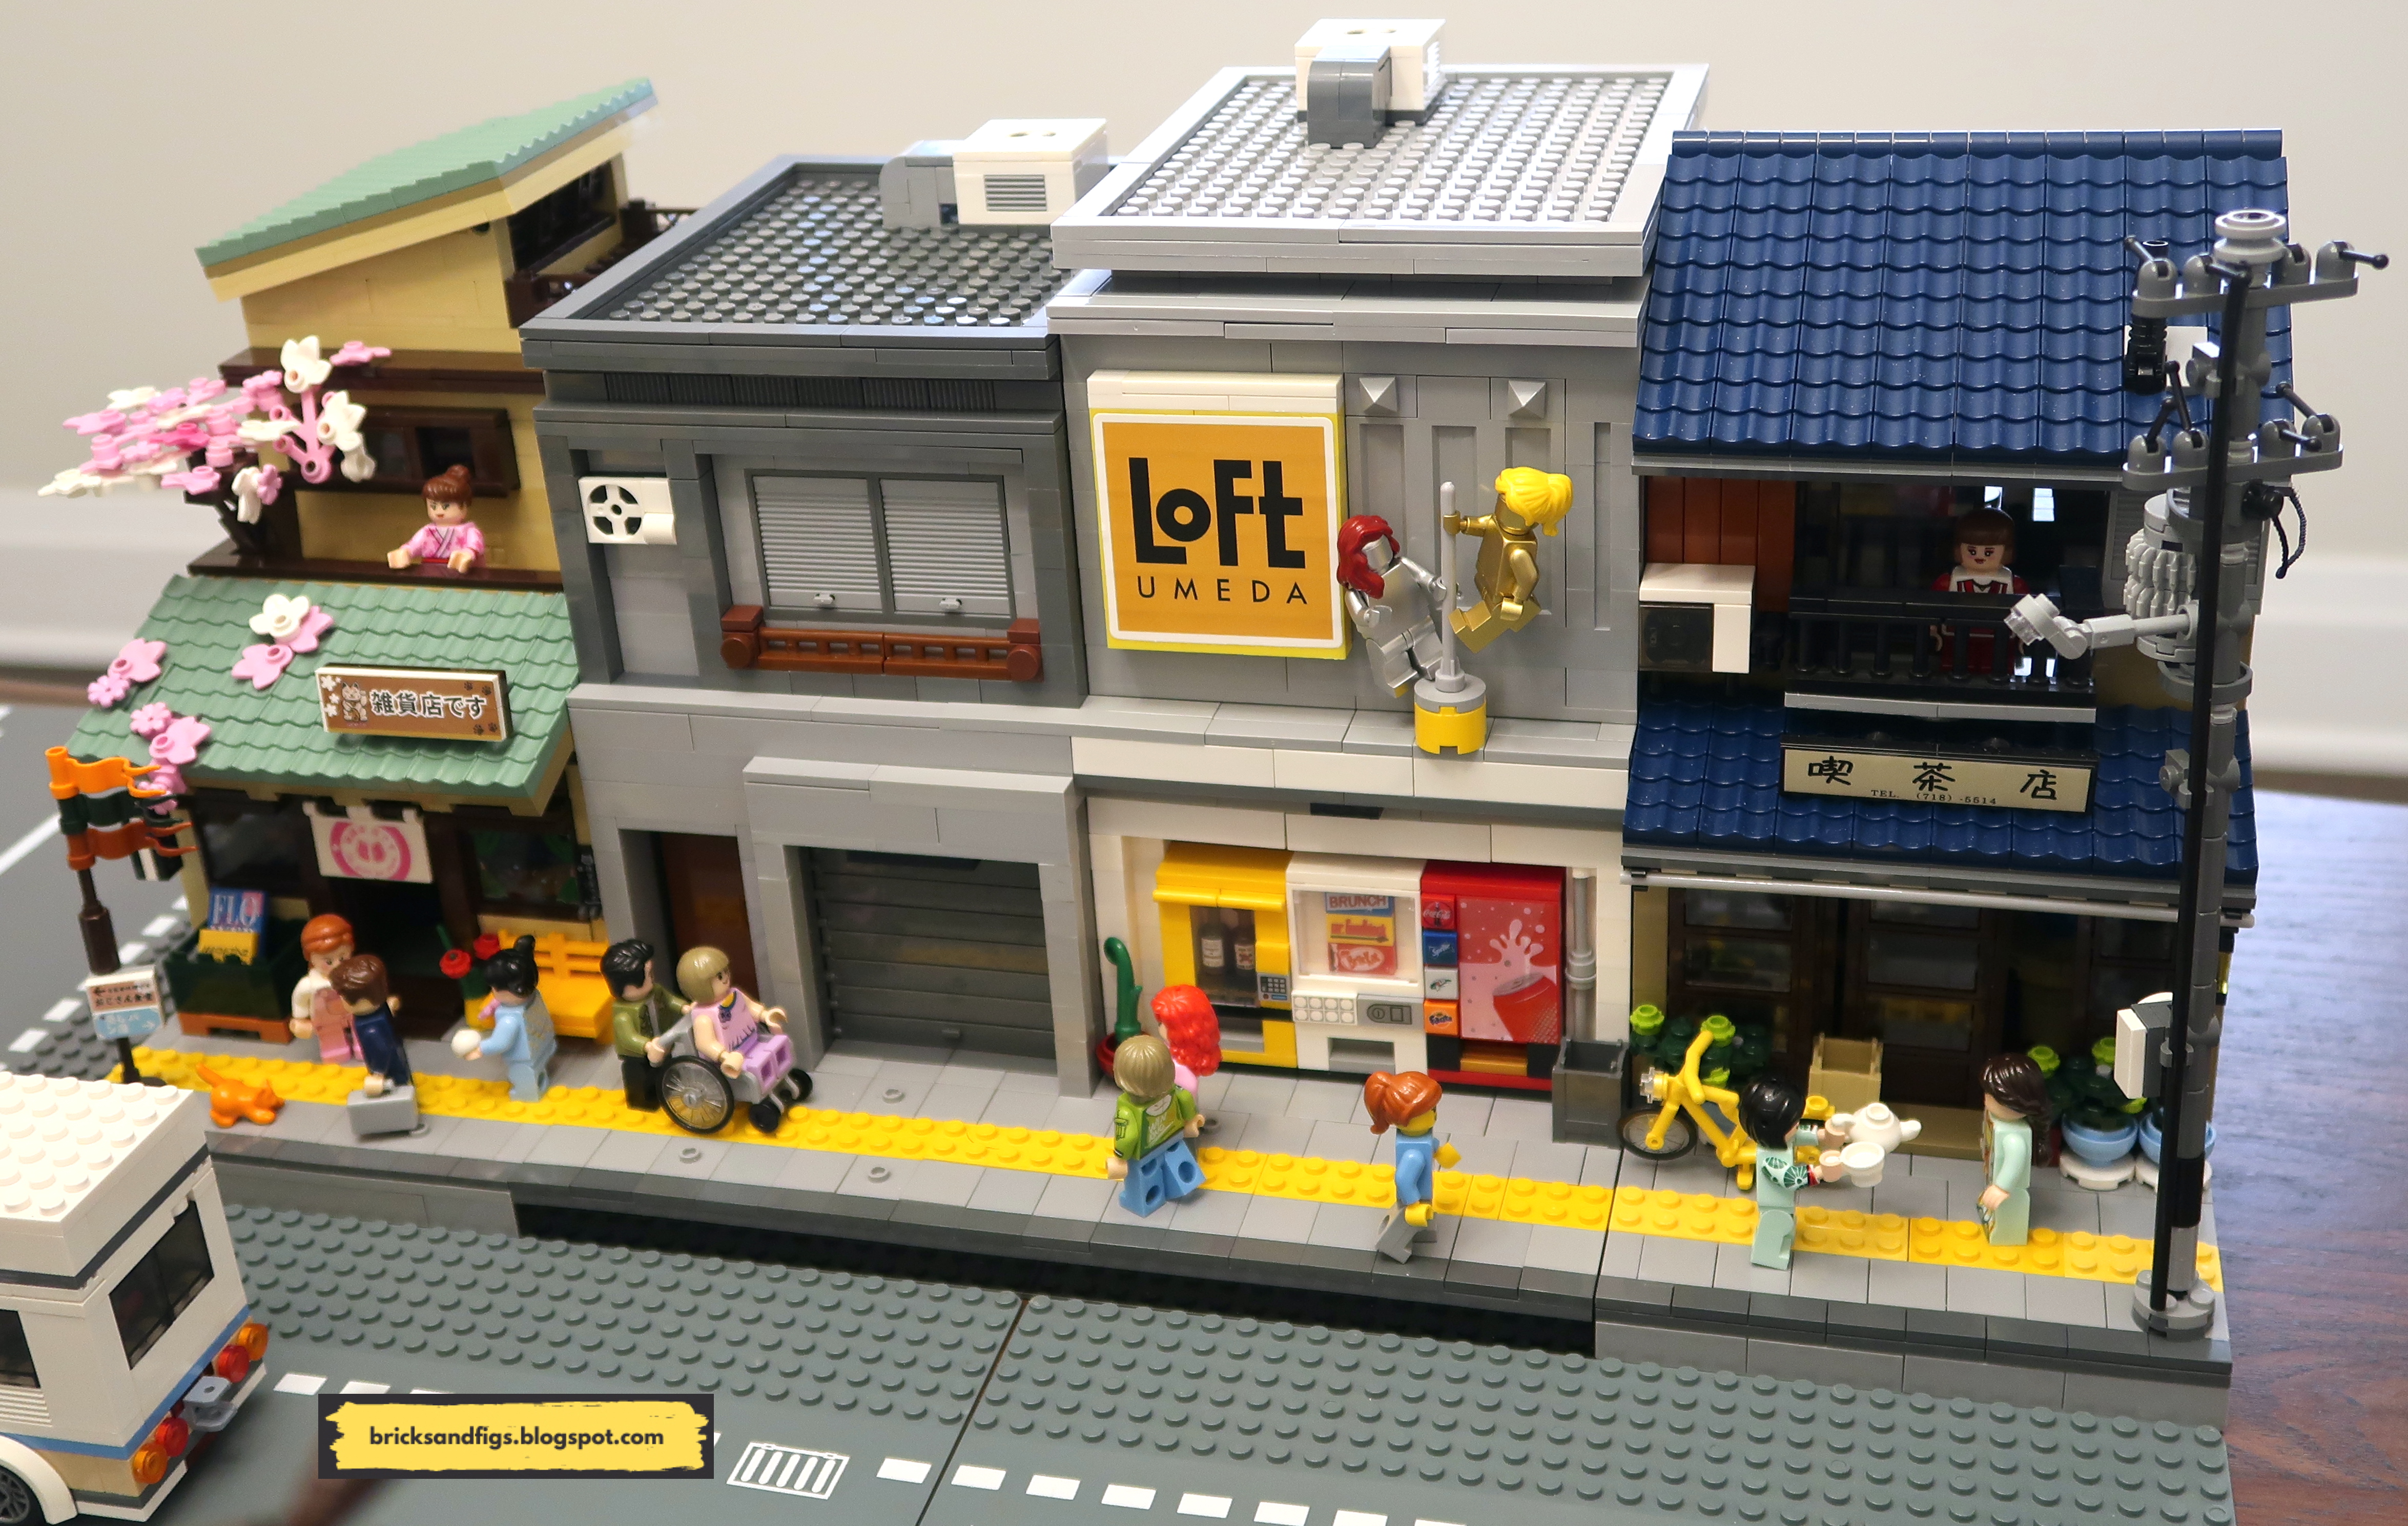
So what I decided to do was expand sideways and make the club 32 studs wide instead of 16 studs wide. So the original building still stands, it just kind of took over the building next to it.
And here it is, the new and improved Strip club! The back story is that the building next door used to be some kind of warehouse and it's been empty for many years. The owner of the strip club first took over the old garage and now he wants to also take the old warehouse and combine the two buildings.
The storefront to the warehouse was replaced with vending machines, which are quite common on the streets of Japan.
To expand the strip club, the owner decided to remove the wall between the two buildings, so that the exterior looks like two separate buildings, but internally, they are one space.
For a quick build, a lot of corrugated 5x6 panels were used to the clad the outside of the strip club. Other than a couple of waste bins, there's not a whole lot going on in the back.
In addition to the expansion, lighting was also added to the building. There are 5 different light strands that all connect to one USB plug. Each light strand has different lights on it. Two of the strands have colourful lights that flash on and off. Then there are two strands that have chains of warm white led lights. Lastly, there is a single light on it's own strand. Each light strand has a different length, making it a confusing mess of wires. I'll elaborate more about the lighting later.
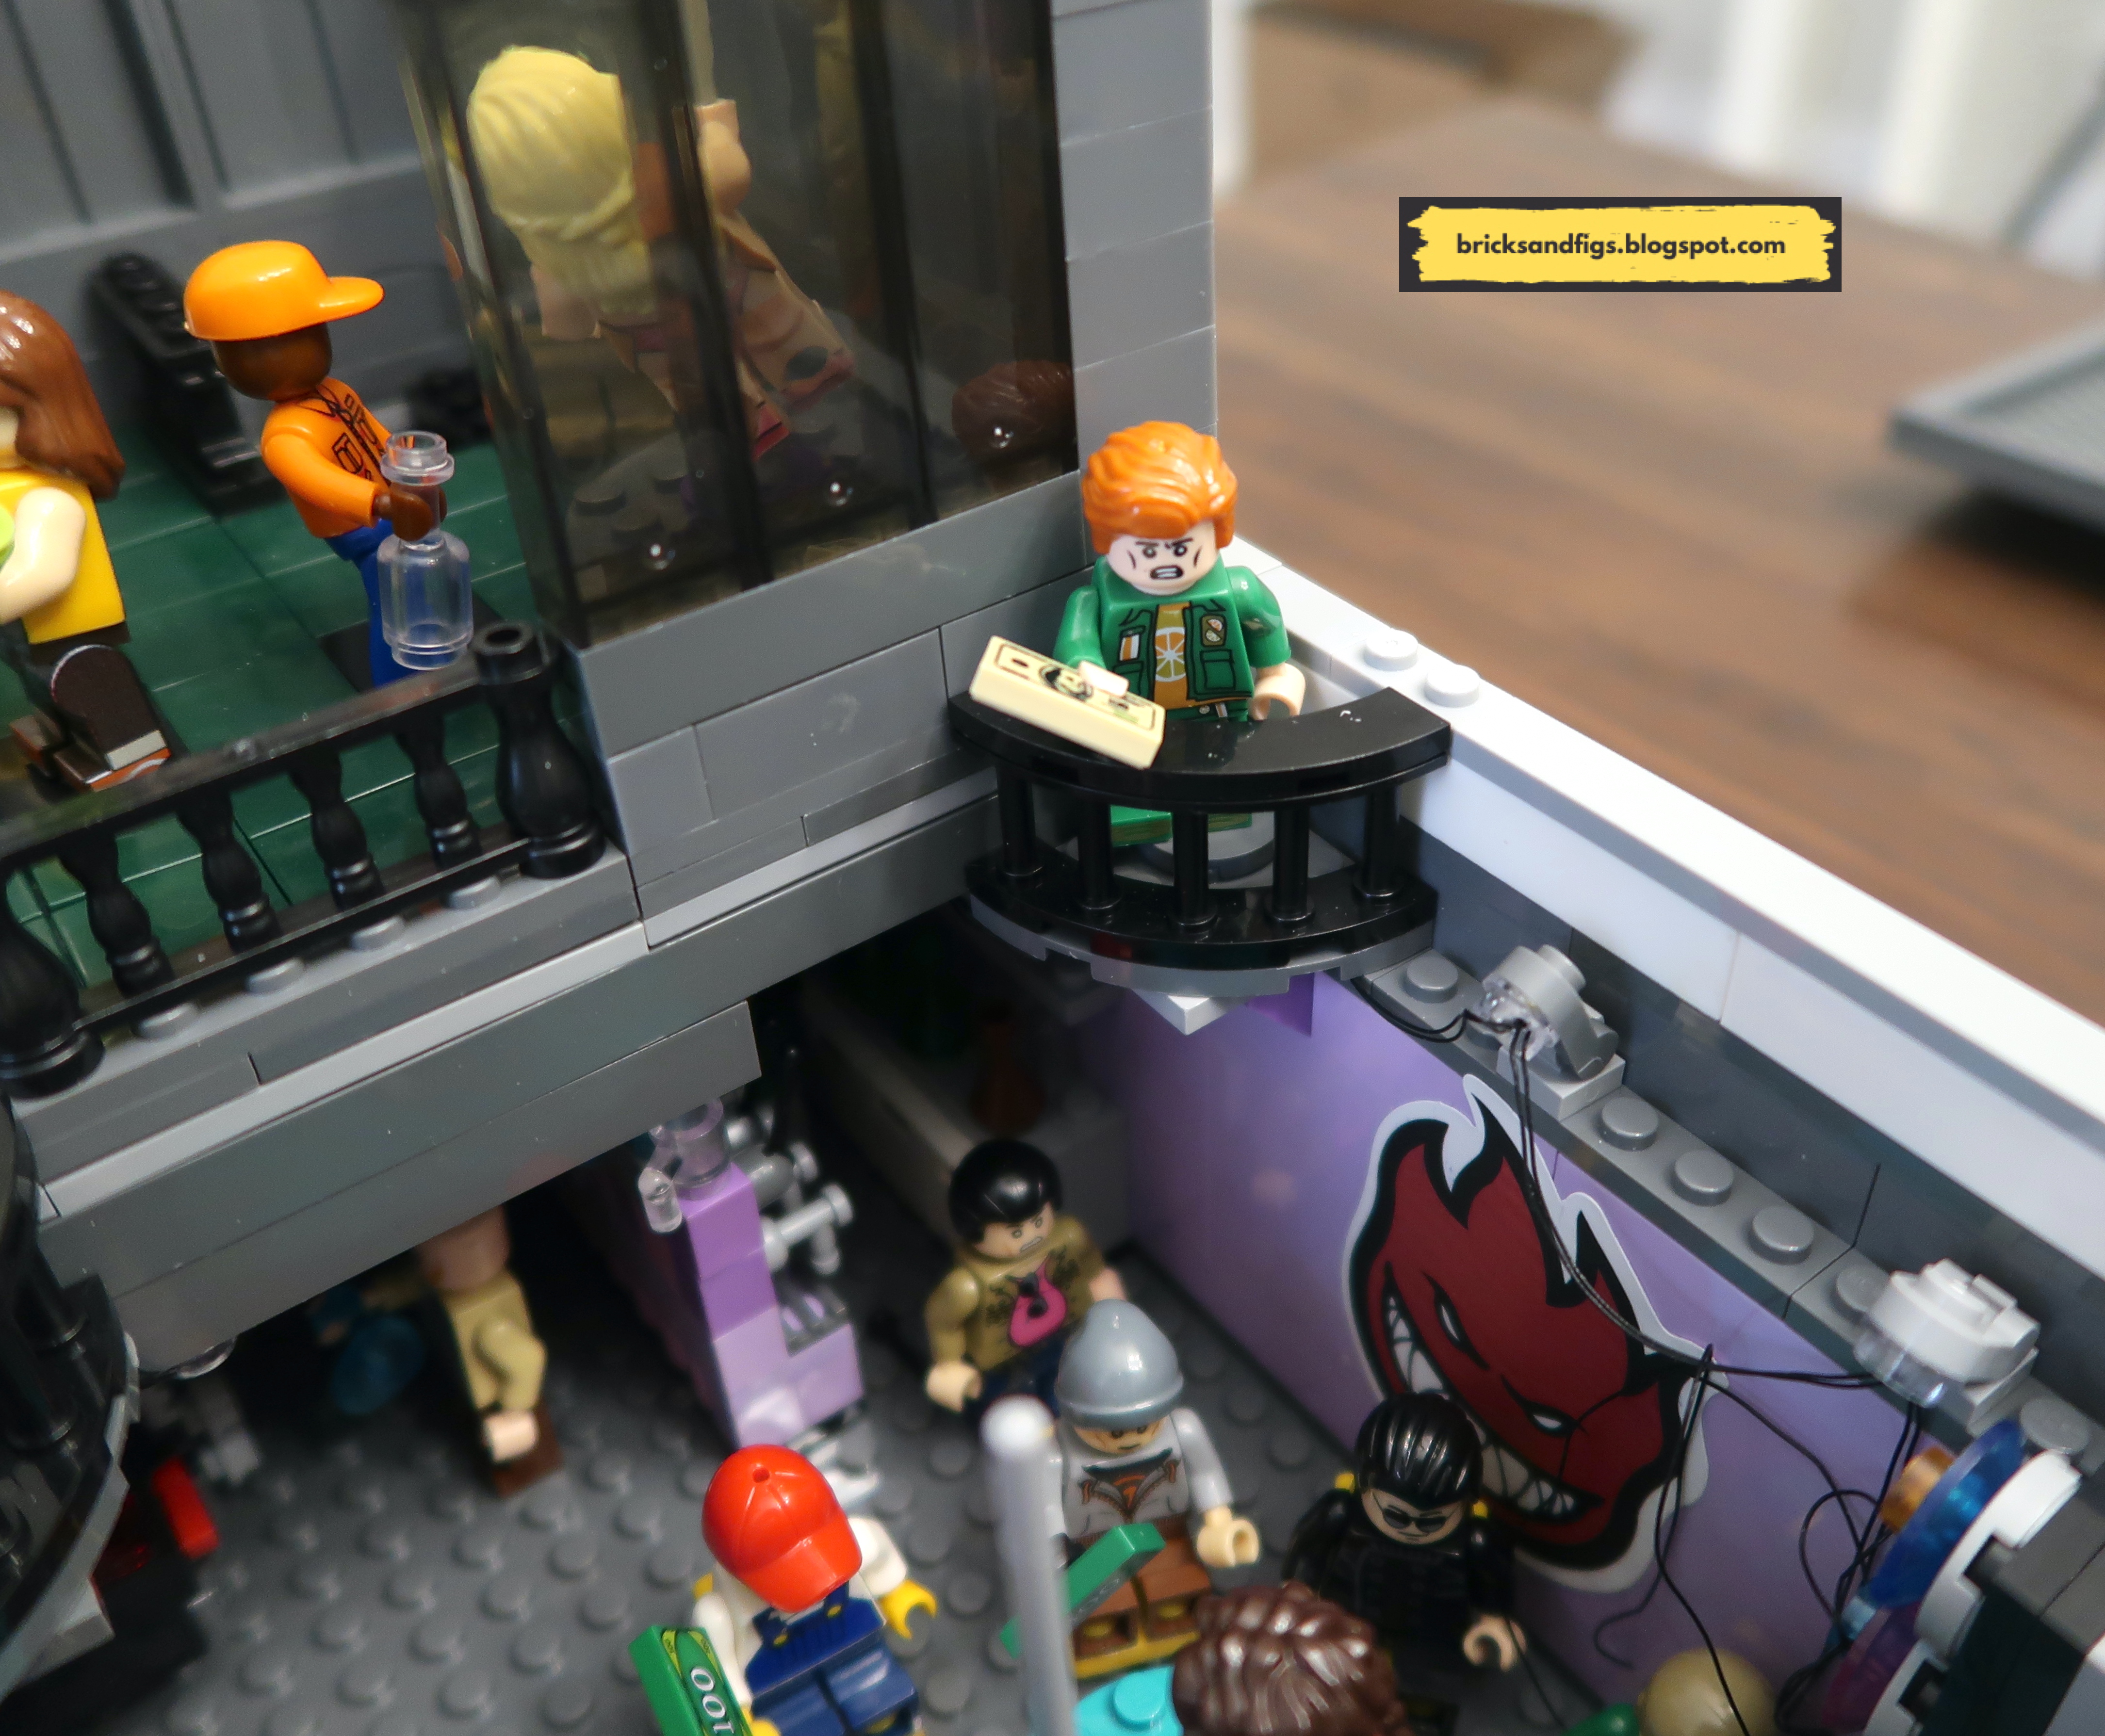
Going back to the front, the second floor is all panels and it's here that there is an indication about the purpose of the building. Possibly, the strip club could be called the Loft. Next to the sign, a gold figure and a silver figure share a stripper's pole. I didn't want a giant stripper sign or flashing lights outside.
On the rooftop of the newer building, it gets the same ventilation unit as the one next door. The roof panel can be removed from the dark gray building, but not on the light gray building. Instead the whole second floor can be removed to reveal the inside.
You'll noticed the missing wall on the the second floor of the warehouse.
That's because the second floor of the first building now opens up into the warehouse. The interior stays pretty much the same, except for the removal of the wall. Access to the second floor is via the existing staircase.
The two dancing stages are still in the same locations, however there is now a glass panel behind the larger of the two stages. The second floor of the original building gets a new speaker system and accent lighting.
The main stage that used to be in the older building has now been upgraded. The interior now boasts a larger stage with lots of seating for the patrons. The dingy gray walls have been replaced with an inviting lavender colour and lots of large graphics. Don't mind all of the wiring, it's for all the lighting and there's a lot of it.
Some of the little corner balconies on the second floor provide an excellent view of the main stage.
On each floor of the strip club, there are guys whose job is to make sure that everyone is on their best behaviour.
Lighting for the second floor is provided by wires that come up the staircase opening. Luckily, there's enough slack in the wires, that I can removed the second floor without pulling out all of the wires for the lighting.
Here's how the layout looks for the strip club now.
A much bigger bar with lots of alcohol. There are four spigots for different draft beers. I figured since the walls are lavender, might as well make the bar the same colour.
Earlier, I showed you what the back of the strip club looks like, now let's add some juice and see if the set looks better.
I added some accent lighting to the front of the building, over the garage door and above the vending machines.
I wanted to add some lighting effect for the second floor but the wiring would make it difficult to remove the upper walls, so nope.
The second floor of the OG building with the lights on.
Here's the main stage all lit up. The back blue and red grid panels are also from the Pantasy DJ set. There are flashing lights on both back panels as well as the front facing speakers.
Perimeter lighting is provided by thoese warm LED light strings I mentioned earlier. I put the lights on pivoting brick pieces, so that the direction of the lights can be adjusted.
I also put some of the lights under the beams near the bar and the DJ station.
The lighting was probably the most challenging to install because these lights were not meant for this building. They were originally an LED light kit for a holiday christmas train. I think I originally bought the lights because I thought I could use them to light up the Blade Runner Spinner.
I love the way everything came together even though, the lights were a nightmare to install. I changed the lighting so many times in trying to make everything fit.
I still have the light brick attached to the ceiling of the second floor.
The garage door still opens, so people outside can see all the action inside.
The DJ station can even rotate 180 degrees to bring the party outside.
Here's the video for your viewing pleasure:
I've placed the strip club in between two of the Cada Japanese themed modular buildings, the Kitty Grocery Store and the Japanese Tea shop. I've modified both of those buildings too.
I hope you have enjoyed the tour of my custom strip club! Thanks for looking, bye for now!


No comments:
Post a Comment