Welcome to Bricks and Figs. This is the place to see all the latest brick sets and my growing collection of mini figures. This blog also focuses on showing you may latest MOCs and MODs using whatever bricks and blocks I have on hand.
A couple of weeks ago I built a Lego compatible Strip Club for my new collection of Sexy girl minifigures that I bought from Aliexpress.
Right after I finished building it, I realized it was too small and lacking a number of necessary items. I like the look of the building but needed to improve it somehow. I had two options, I could either build up or build out.
If I added a third floor to the strip club, it would make it stand out amongst all of the other smaller shops on my Japan street. Recall that I'm trying to create an unassuming building that kind of one doesn't notice when looking at all of the other buildings.
So what I decided to do was expand sideways and make the club 32 studs wide instead of 16 studs wide. So the original building still stands, it just kind of took over the building next to it.
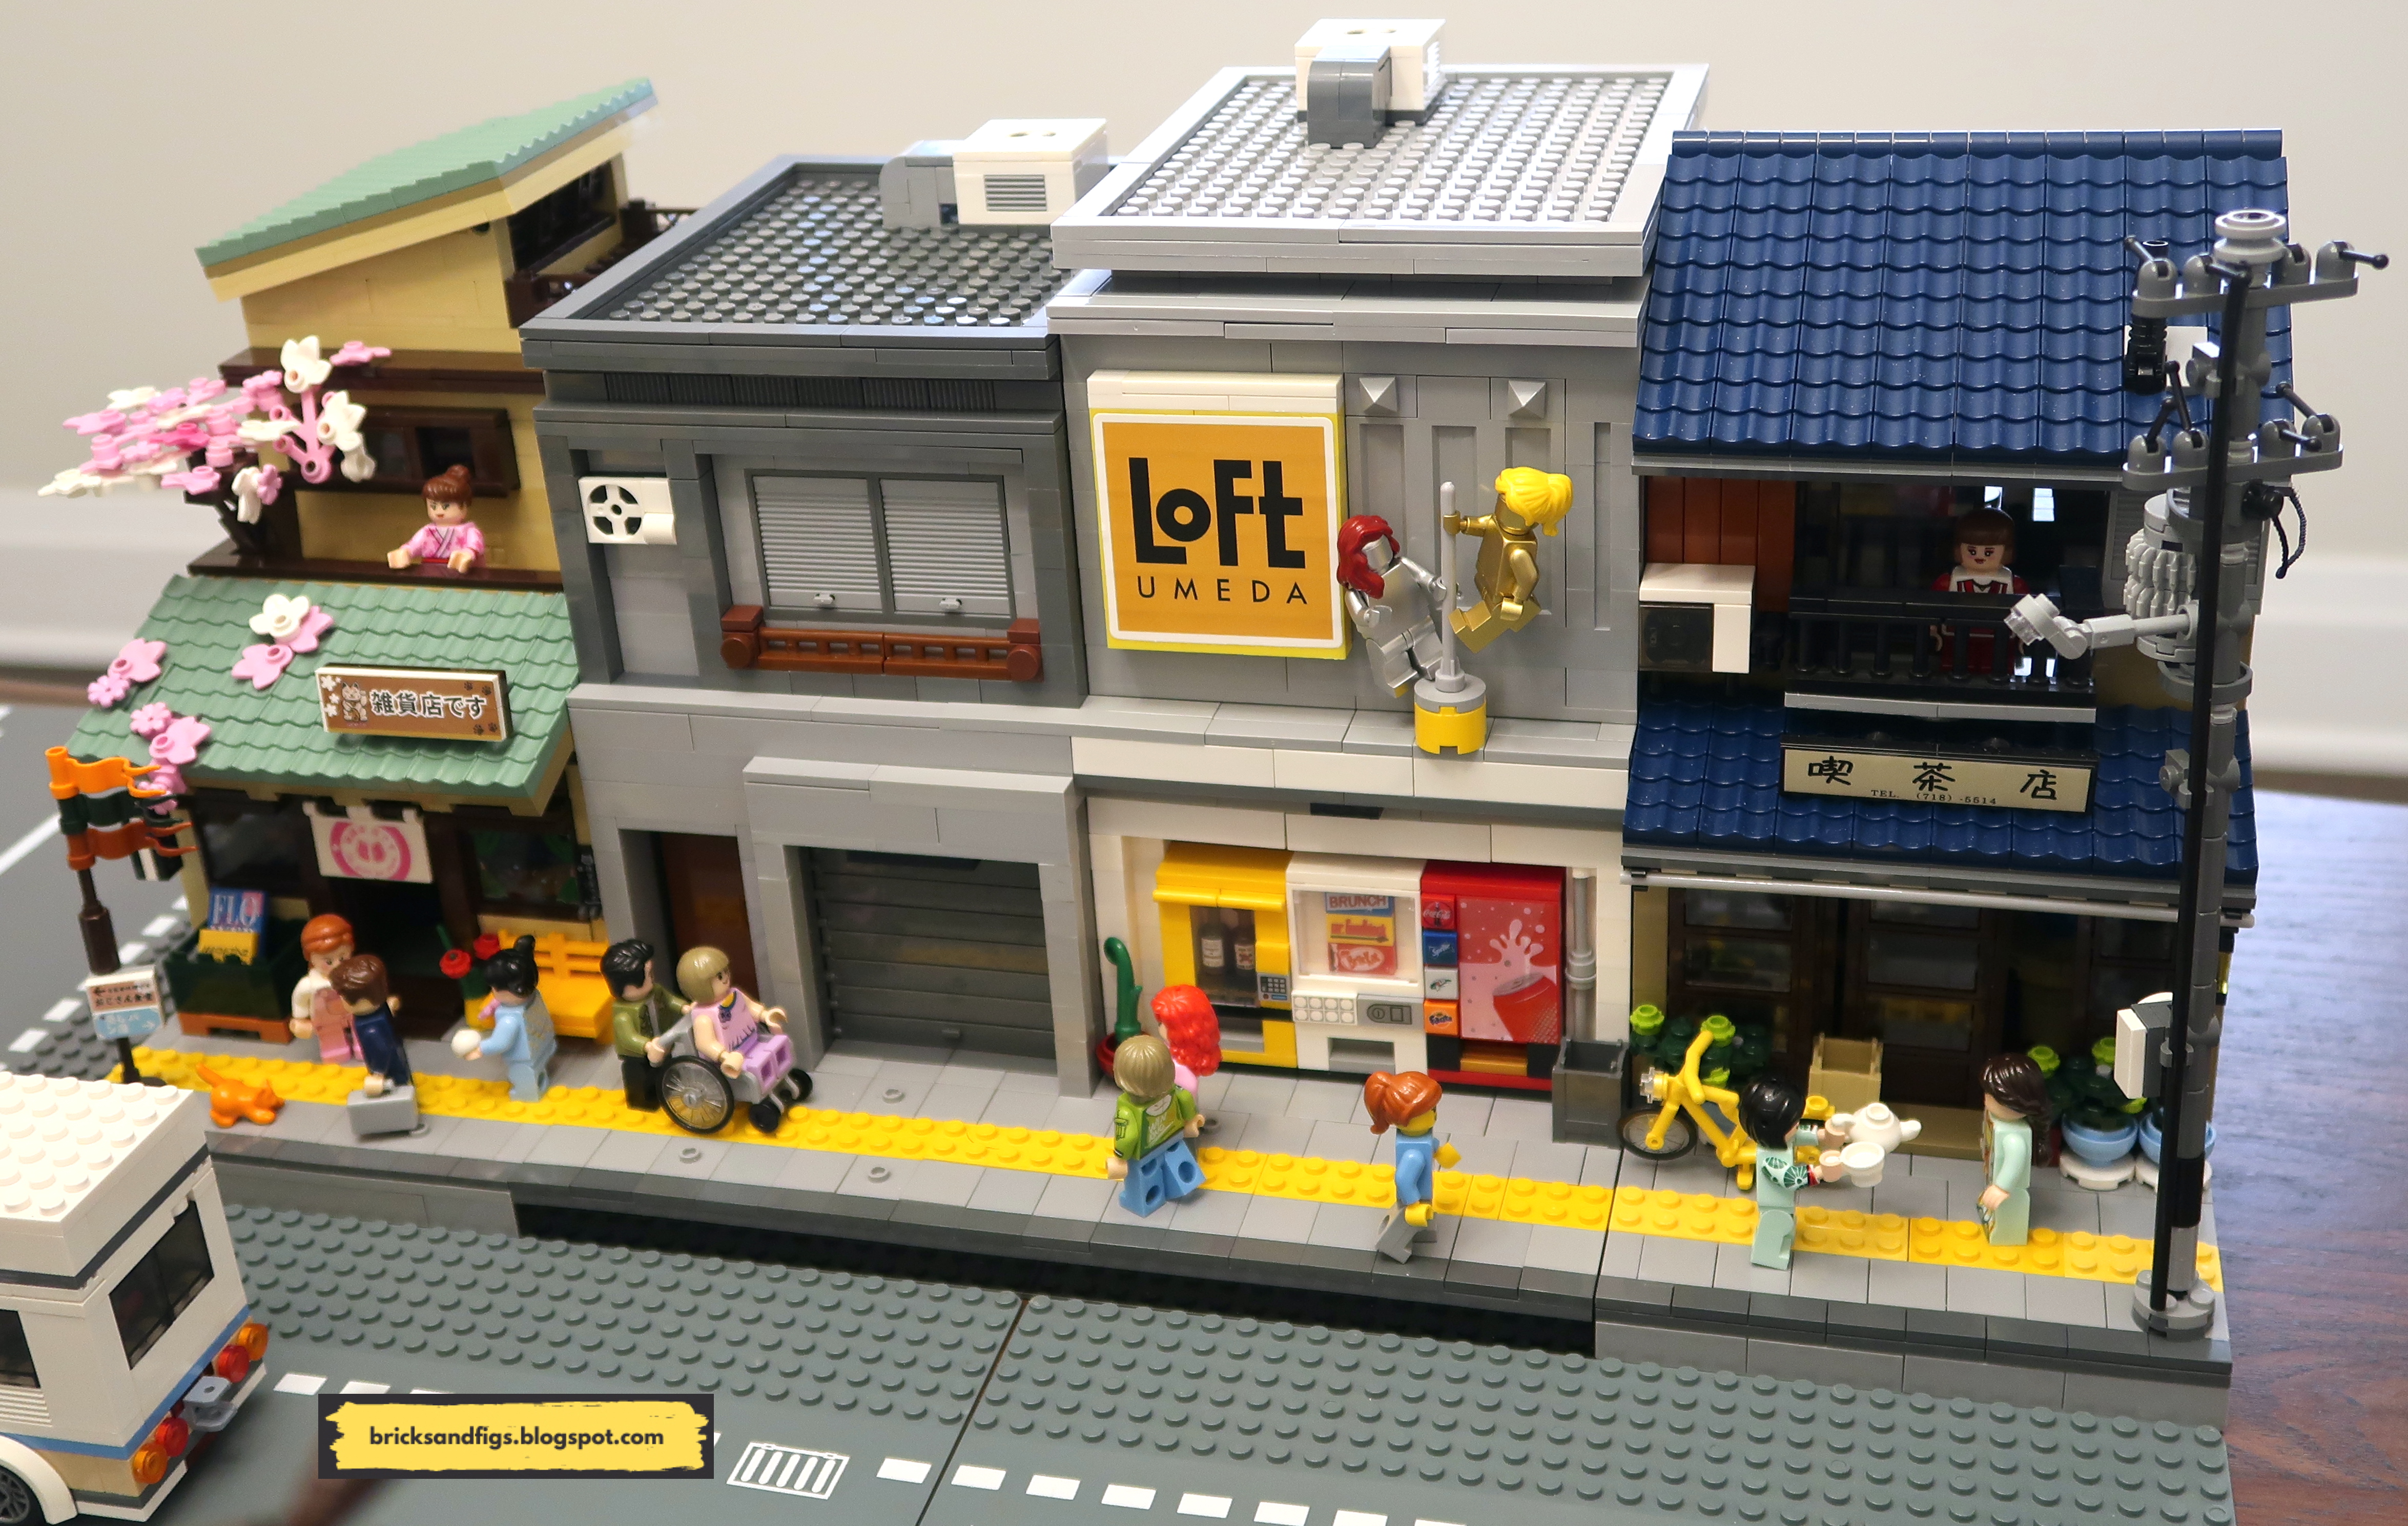
And here it is, the new and improved Strip club! The back story is that the building next door used to be some kind of warehouse and it's been empty for many years. The owner of the strip club first took over the old garage and now he wants to also take the old warehouse and combine the two buildings.
The storefront to the warehouse was replaced with vending machines, which are quite common on the streets of Japan.
To expand the strip club, the owner decided to remove the wall between the two buildings, so that the exterior looks like two separate buildings, but internally, they are one space.
For a quick build, a lot of corrugated 5x6 panels were used to the clad the outside of the strip club. Other than a couple of waste bins, there's not a whole lot going on in the back.
In addition to the expansion, lighting was also added to the building. There are 5 different light strands that all connect to one USB plug. Each light strand has different lights on it. Two of the strands have colourful lights that flash on and off. Then there are two strands that have chains of warm white led lights. Lastly, there is a single light on it's own strand. Each light strand has a different length, making it a confusing mess of wires. I'll elaborate more about the lighting later.
Going back to the front, the second floor is all panels and it's here that there is an indication about the purpose of the building. Possibly, the strip club could be called the Loft. Next to the sign, a gold figure and a silver figure share a stripper's pole. I didn't want a giant stripper sign or flashing lights outside.
On the rooftop of the newer building, it gets the same ventilation unit as the one next door. The roof panel can be removed from the dark gray building, but not on the light gray building. Instead the whole second floor can be removed to reveal the inside.
You'll noticed the missing wall on the the second floor of the warehouse.
That's because the second floor of the first building now opens up into the warehouse. The interior stays pretty much the same, except for the removal of the wall. Access to the second floor is via the existing staircase.
The two dancing stages are still in the same locations, however there is now a glass panel behind the larger of the two stages. The second floor of the original building gets a new speaker system and accent lighting.
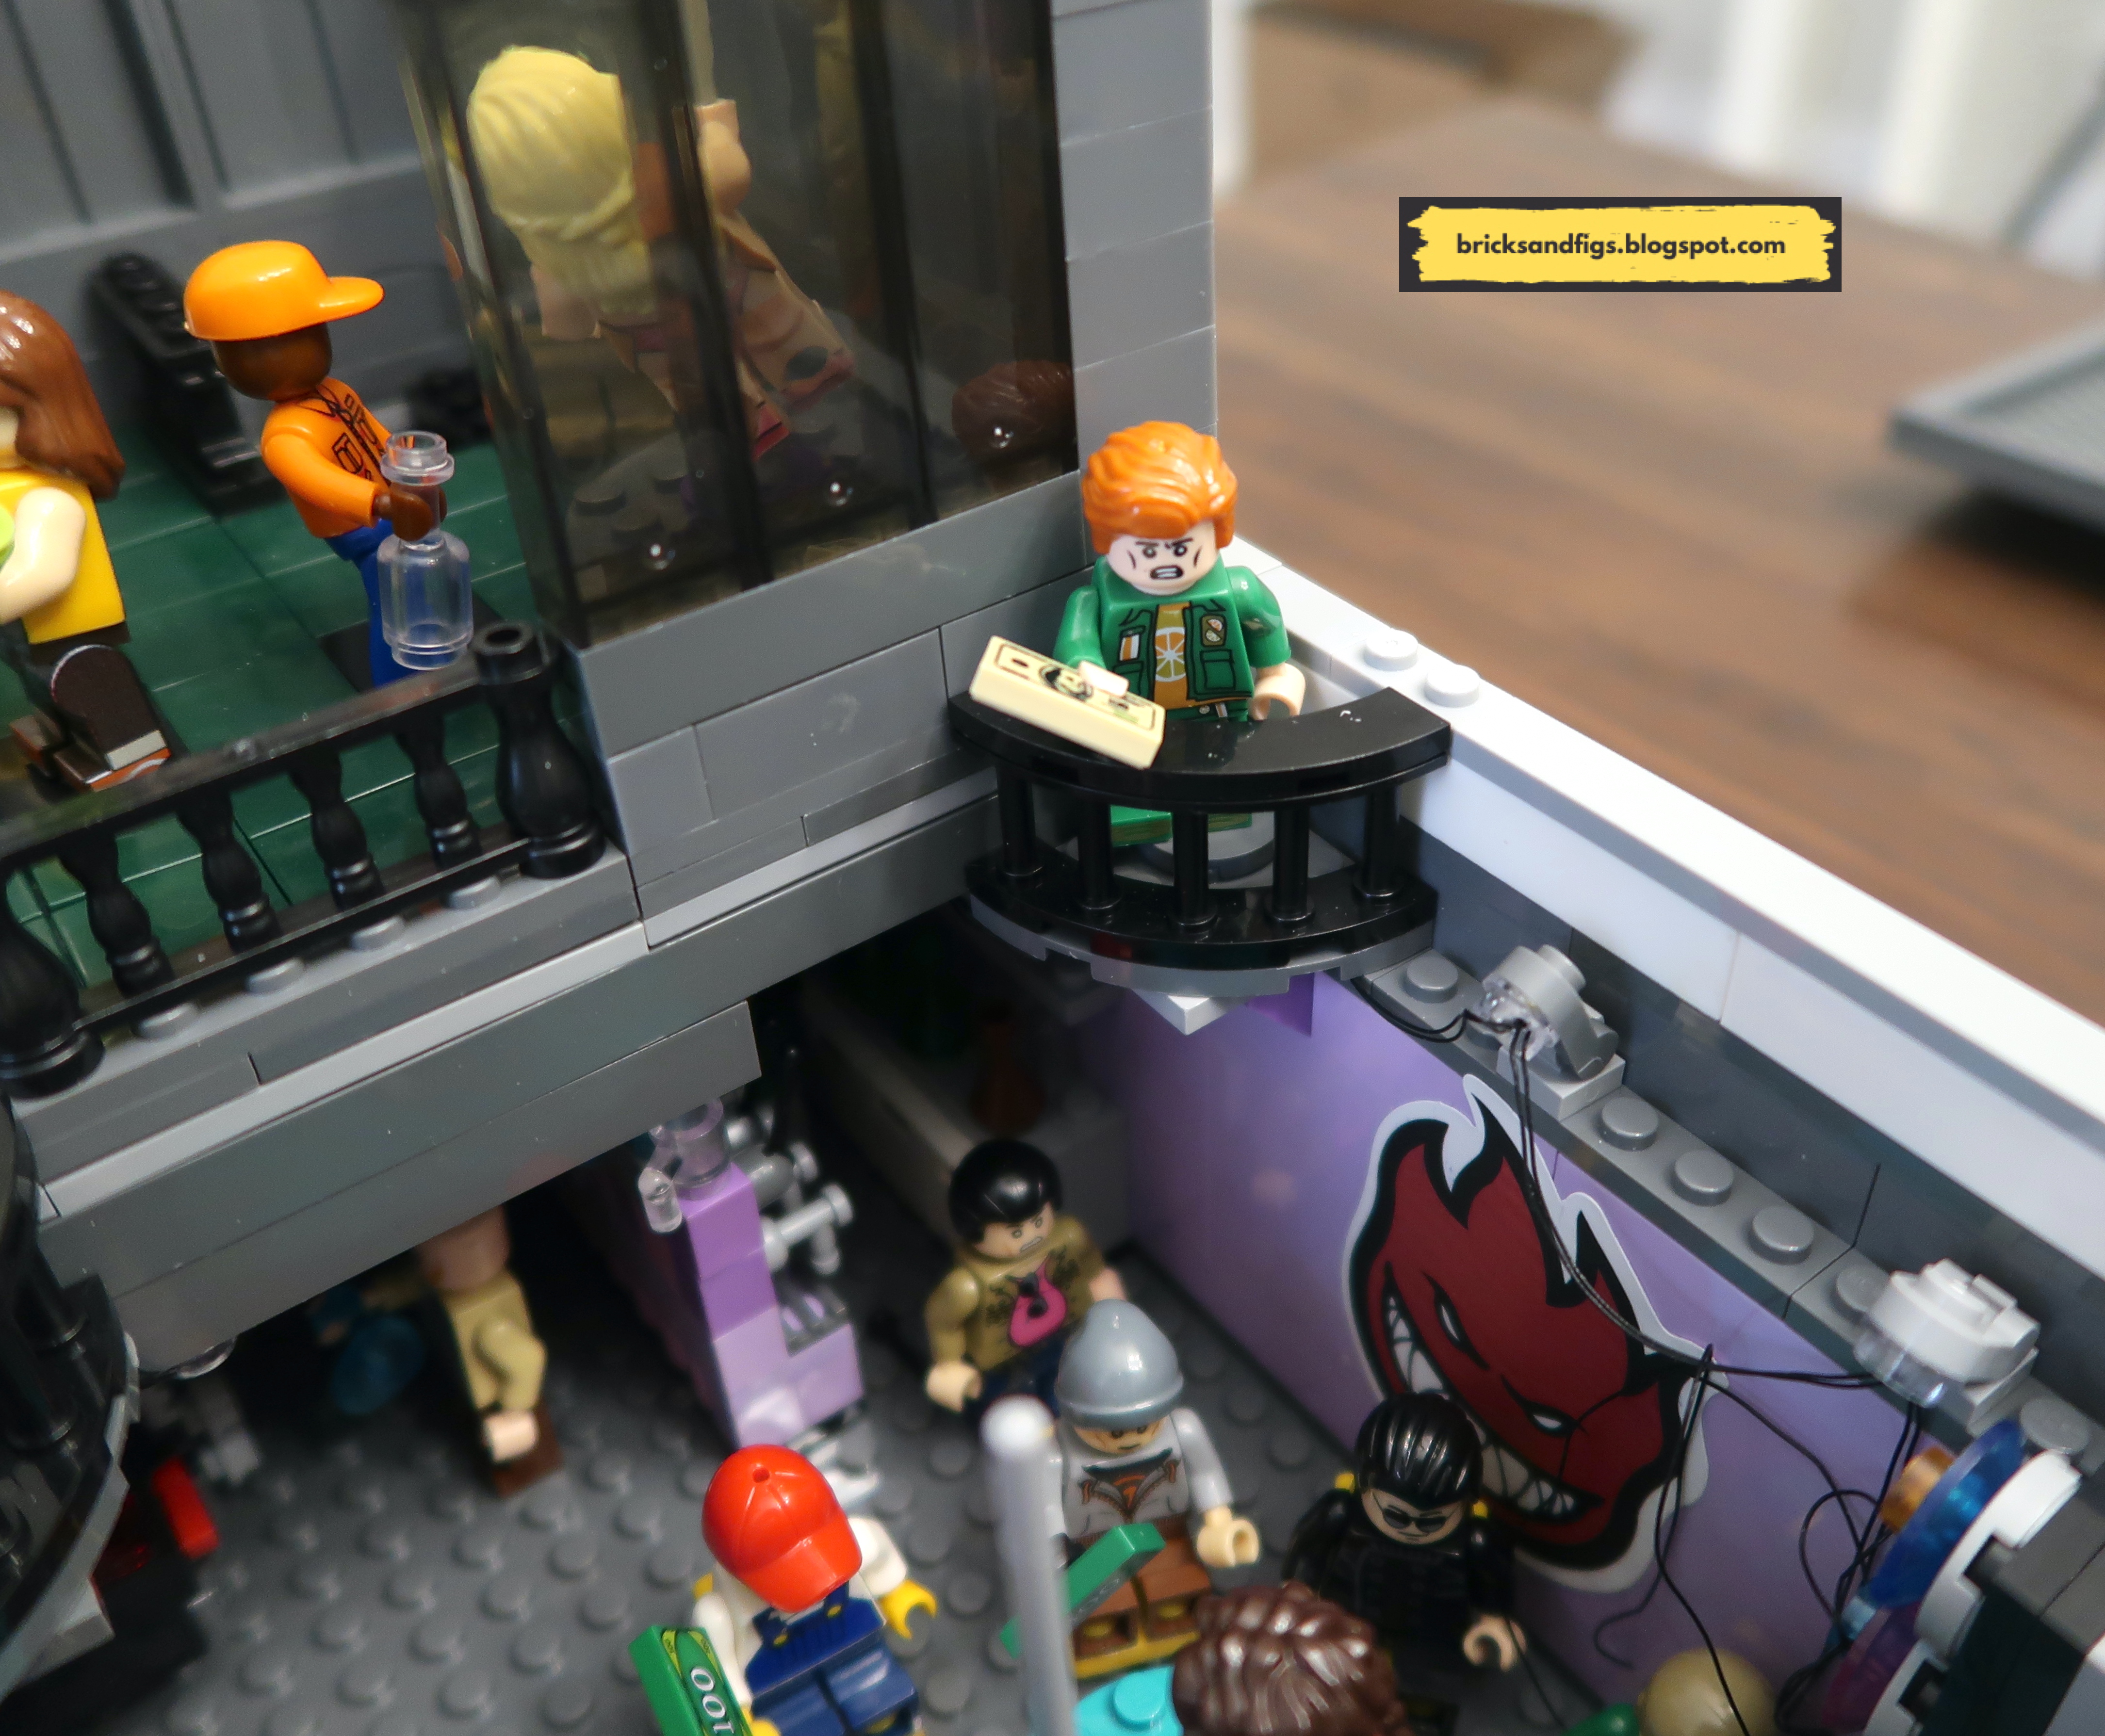
The main stage that used to be in the older building has now been upgraded. The interior now boasts a larger stage with lots of seating for the patrons. The dingy gray walls have been replaced with an inviting lavender colour and lots of large graphics. Don't mind all of the wiring, it's for all the lighting and there's a lot of it.
Some of the little corner balconies on the second floor provide an excellent view of the main stage.
On each floor of the strip club, there are guys whose job is to make sure that everyone is on their best behaviour.
Lighting for the second floor is provided by wires that come up the staircase opening. Luckily, there's enough slack in the wires, that I can removed the second floor without pulling out all of the wires for the lighting.
Here's how the layout looks for the strip club now.
A much bigger bar with lots of alcohol. There are four spigots for different draft beers. I figured since the walls are lavender, might as well make the bar the same colour.
Earlier, I showed you what the back of the strip club looks like, now let's add some juice and see if the set looks better.
I added some accent lighting to the front of the building, over the garage door and above the vending machines.
I wanted to add some lighting effect for the second floor but the wiring would make it difficult to remove the upper walls, so nope.
The second floor of the OG building with the lights on.
Here's the main stage all lit up. The back blue and red grid panels are also from the Pantasy DJ set. There are flashing lights on both back panels as well as the front facing speakers.
Perimeter lighting is provided by thoese warm LED light strings I mentioned earlier. I put the lights on pivoting brick pieces, so that the direction of the lights can be adjusted.
I also put some of the lights under the beams near the bar and the DJ station.
The lighting was probably the most challenging to install because these lights were not meant for this building. They were originally an LED light kit for a holiday christmas train. I think I originally bought the lights because I thought I could use them to light up the Blade Runner Spinner.
I love the way everything came together even though, the lights were a nightmare to install. I changed the lighting so many times in trying to make everything fit.
I still have the light brick attached to the ceiling of the second floor.
The garage door still opens, so people outside can see all the action inside.
The DJ station can even rotate 180 degrees to bring the party outside.
Here's the video for your viewing pleasure:
I've placed the strip club in between two of the Cada Japanese themed modular buildings, the Kitty Grocery Store and the Japanese Tea shop. I've modified both of those buildings too.
I hope you have enjoyed the tour of my custom strip club! Thanks for looking, bye for now!
Hey brick fans! Earlier this month I picked up some rather risque minifigures from Aliexpress for cheap. Some of them look like characters from anime and others like exotic dancers. I think someone on Reddit suggested that they belonged in a nightclub, and that sounded like a good idea. I just needed to make a modular building, but I wanted an understated building, not a flashy club with neon lights and such.
I planned on having the building sit on my Japan street, so I wanted to make a Japanese themed building.
In the Japanese anime called Initial D, there is a nondescript garage next door to the Fujiwara Tofu shop. Since I already made my own custom Tofu shop, I somewhat modelled my new building after that.
Here's my version of it. It sits on a 16x32 baseplate and has two floors.
I think it looks pretty good sandwiched between my custom crab and seafood shop and the Fujiwara Tofu shop buildings.
I had a ton of these corrugated panels in my brick stash, so I figured I'd use them here to make the building look more industrial.
I don't have much going on around back, with only a back door and a case of empty bottles to break up the monotony.
I quite like this ventilation unit on the roof, I don't remember where I copied the design from.
Being a modular building, the roof comes off and so does the second floor. I've made a preliminary interior for both floors but that may change in the near future.
On the underside of the roof, I've installed a light brick that gives off a blue light.
Here is the second floor interior. It has a main stage with stripper pole and a smaller stage in the opposite corner. I have a bunch of these old dark green tiles so I decided to cover the floor with them. Maybe I should have washed them first because they look pretty grungy. Access to the second floor is from the stairwell. I'll probably add an extra railing so that tipsy patrons don't fall down the stairs. I've placed a few of the exotic dancer minifigures here. Looks like the construction guys just got off work.
It's a pretty tight squeeze on the main floor because of the garage door and the staircase. The same dingy green floor tiles can be found here too.
There is another stage with pole here too with another dancer and some of her fans. I added some extra minifigures as servers.
This is the makeshift bar setup by the back door. It's really cramped so I have to figure out how to expand the bar.
During the day the building doesn't look like much but after hours, things start to get lively. The main floor is also lit up by a light brick.
I updated some of the faces and hairpieces of the exotic dancers, so they look a bit different now.
And here are some serving staff figures I made.
In addition to the exotic dancers, I made a few extra unsavoury characters to populate the building. They could be either patrons or the "help".
So after I made my dance club building, I realized I needed some wow factor for inside the club. I have this old set sitting around and it started life as the Pantasy DJ booth. I've decided to repurpose it to make it the main stage. I added some flashing lights but the light string is really messy. I think the lights are for a Holiday train building block set that I don't have. Don't ask me how I ended up with the light string.
There's more I want to add to the dance club, like a DJ booth for real. And maybe a few tables and chairs for the patrons. Except I don't have enough room in the current building. Does it mean I have to already expand the build that I just finished? Arggh! I guess we will have to see what I can come up with later.
Let me know what you think of my unassuming strip/dance club! Thanks for looking, bye!
Hey there, fellow brick enthusiasts! How's everything going? Today, I'm thrilled to unveil my latest project: a complete overhaul of the Cada Japanese Kitty Grocery Store C66015W.
Intro
The Cada Grocery store marks the newest addition to a series of Japanese-themed shops by Cada, totaling five buildings, or six if we count the Cada licensed Initial D Fujiwara Tofu Shop set C61031W.
The initial trio of buildings, expertly crafted by exesandbox, were a joy to assemble and showcase. You can check out his designs on his instagram page. I've personally constructed all three and shared my thoughts on each:
However, the subsequent two Japanese shops were a tad smaller and lacked the finesse of the first three. The fourth, dubbed the Japanese Canteen, felt a bit lackluster with its sparse and puzzling interior. That one ranked lowest among the five for me. You can read my review of it here:
Finally, we have the Japanese Grocery Store. While the original rendition was quaint, I felt it could use some enhancements. If you're curious to see its original form before my modifications, check out the review here:
Now, with that backstory in mind, let's dive into the revamped version of the set. Firstly, despite its name, the grocery store doesn't stock any actual food items, leading me to believe it's more of a thrift shop. It's filled with odds and ends like dishes, mugs, and handbags. I've endeavored to utilize as much from the original set as possible while incorporating additional items from my collection.
One of the primary modifications I've made to each of my modded buildings is placing them on raised baseplates. This not only reinforces the base for easier handling but also allows for the addition of a sidewalk to the front of the set. I've standardized all buildings to fit onto a 16x32 stud baseplate. Initially, this set was about 17 or 18 studs wide and 20 studs deep.
As seen in the pictures, I've extended the building's depth, providing ample space for the main floor thrift shop.
The second floor, originally a tea room with a koi fish pond, lacked sufficient headroom. It seemed odd to have a pond on the second floor, so I've maintained similar dimensions while ensuring enough height for a minifigure to stand comfortably.
In my redesign, the second floor now serves as Kitty's bedroom, the shop owner, accessible via a new staircase I've added. While I considered expanding the second-floor space, I lacked enough tan bricks in my stash. Instead, I've created a new patio or terrace in front, accessible from the bedroom.
I've made several adjustments to the exterior as well, including removing the sliding door and downsizing the sakura tree while relocating it to the upstairs patio.
The roof remains largely unchanged, housing a fixed roof in place of the original movable awning.
While remaining faithful to the original design, I've made slight modifications to enhance its aesthetic appeal. I've centered the front doorway, removed the plant stand, and relocated the sign post.
On the second floor, I've retained the original window while adding a new door to the patio.
With the sakura tree on the left side, I've reversed the location of the leaves and flower petals and moved the sign accordingly.
I've transformed the new thrift store into a modular building, allowing for easy roof removal and floor separation.
Removing the roof reveals a simple bedroom, consisting of a bed and chest with tiled sand green floors and a staircase with railings for safety.
The entire second floor can be detached from the main floor, showcasing the revised layout of the thrift shop, now featuring the staircase at the back and a door under the stairwell.
I've relocated the checkout counter to the back and preserved the wall shelves and turquoise chair, adding a few more items to fill out the shelves. Note to self: cash register needs a computer screen.
Pictured above is a new shelf that is a copy of the one that came with the set. Also added a few more items to fill out the shelf.
Here's the original shelf which I have moved to the other side of the shop. Whatever is shown above the front door was preserved from the original set.
The floors on the main level also sport sand green tiles, complementing the large sticker on the floor.
And that's a wrap on all the modifications! I hope you've enjoyed this tour of the newly designed Japanese thrift store! I've also started modifying the Japanese Canteen, though I haven't finished the interior yet. Stay tuned for updates on the blog.
Feel free to drop your comments below. Thanks for tuning in!