Tuesday, September 12, 2023

Testing the Kyglaring LED Light Kit for the Lego Palace Cinema 10232

 Hi brick fans, welcome back to bricksandfigs.blogspot.com.  Last month, I finally found a light kit to illuminate my Lepin Palace Cinema.  The brand is known as Kyglaring.  It's a brand I'm not accustomed to, as all of my other light kits are from Briksmax and Lightailing.

The kit arrived superfast, like within a week and I did an unboxing blog post which you can find here.  Now before I install it into my Palace Cinema modular building, I want to check the quality of the kit and test out each of it's components.

So let's open up some of the packages and make sure everything works.

First, you'll need to get some fresh triple A batteries and put them into the battery pack.  I've left off the battery pack cover so you can see how the batteries are arranged.  Next, plug the USB connector into the battery pack.  

Take one of the expansion boards that come with the set and connect the USB connector to one of the ports on the board.   This will be your base testing configuration.  From here you will plug each of the lighting kit's components into each port of the expansion board.

This kit for the Palace Cinema contains some light strips, probably for the interior.


Here are some led accent lights.

As I was testing the lights, I found a non working port on one of the expansion boards.

These colour changing led light strips will be placed on the first floor exterior I think.

The Palace Cinema sign light features blinking led lights.  There are some light kits that don't feature the blinking lights, but this was one of my must have features.

There are two colour changing spotlights that will replace the existing parts.  

Finally, there's the streetlamp that gets lit up.

My observation about the Kyglaring lighting components are as follows:  
- the wires feel flimsier than the ones you get from Briksmax
- the ports and port connectors are a tight fit and sometimes they are hard to pull out
- the brick parts they give you are just generic bricks, Briksmax gives you actual Lego replacement parts
- the lighting seems to be ok, especially the colour changing ones

Pertaining to price, the Kyglaring set is about 20-30% cheaper than Briksmax. 

Regarding the faulty port on one of the expansion boards, fortunately I didn't have to use that port so not an issue for me.

Hope this will help you to decide whether to buy LED lighting kits from Kyglaring.com.   Let me know what you think,  bye for now!

Thursday, August 24, 2023

Random Medieval Soldier Lego Compatible Minifigures Set from Temu


I was browsing through the building blocks category on Temu a couple of weeks ago and I saw this set of 12 medieval themed Lego style minifigures for around $9 CDN.  That works to about 0.75 cents per minifigure.

Here's how the medieval soldiers came in their packages from Temu.  They are unbranded and the packages don't have any set numbers on them.

The minifigures come packaged two per bag and you have to attach the hair, arms, hands and capes yourself.


Of the 12 minifigures, 6 are wearing a gray chainmail outfit and the other 6 are wearing a blue crested tunic.  All 12 of them come with a hard plastic cape in either black or red.  Each minifigure comes with a sword as well.  There are actually two females in this corps of medieval soldiers, which is something unique to this set.  You'll notice that every minifigure has a unique face, no two are alike.

Some bonus items in this set include 3 shields with dragon crests, a black cowl for one of the minifigures, and two dogs.  If you look closely, you can see that the two dogs come from different molds.

Overall the brick quality was excellent and everything fit together well.  The prints on the torsos were great too, except their wasn't any back or arm printing on them.  I especially liked the hard plastic capes instead of the flimsy fabric ones you normally get with these soldier sets.  The only improvement I would like to see on this set is if they all came with shields and extra helmets.


I'll most likely add these minifigures to my Lego compatible medieval buildings to enhance their displays.


Friday, June 30, 2023

I made Thomas Guerts Warehouse Modular Building out of Lego compatible bricks


In 2021, Thomas Guerts submitted his idea for a Warehouse Modular building to Lego ideas, but sadly it never garnered sufficient votes to see this project made into reality.


 I'm not sure if Thomas ever made the physical model or whether the warehouse was simply a 3D render.  I checked his instagram @elteebricks but never saw it there.

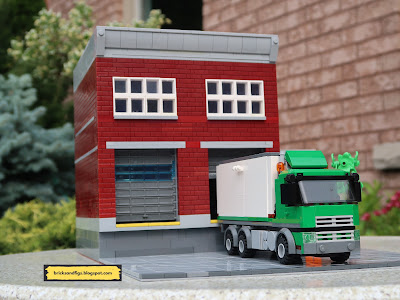
Since he didn't make it, I thought I would give it a try.  I bought a lot of dark red masonry bricks for the warehouse walls.  Everything else was scrounged from my spare brick parts bin.  As you can see,  the warehouse I made has some differences from the original model, yet I'm still trying to maintain the overall design of Thomas Guerts vision.

The first thing you will notice is the baseplate.  I have extended the baseplate and tiled it so that it can accommodate a transport truck.  The size of the baseplate is 32 studs wide by 48 studs deep.  I added a small tree for decoration outside.  I might add a little planter along the right side in future.

Thomas depicts an orange forklift in his warehouse.  I have that same forklift in my collection but decided to use this smaller green one, although I can't quite remember whether it came from a Wange set or some other set.

The rollup garage doors go up and down smoothly.  I'm just missing the handle piece on the right hand side door.   The adjacent office is only a single storey, whereas Thomas mentioned that his model has a second floor that is a canteen for the truck drivers.  I plan to introduce the second floor in the near future.
I'm missing the downpipe that runs next to the office wall.  Need to make tat for my set.

I don't have any markings on the pavement as yet, and I'm missing the overhead lights above the garage doors, but I just made them last night, so I will put them on soon.

Here's a delivery truck parked in front of the doors for scale.  When you use bricks from different suppliers and brands, you run the risk of brick colours not matching as evidenced by the masonry bricks. 

I made the side wall of the warehouse a pop out wall following Thomas Guerts design.

Here's the view from the office side.  As mentioned earlier, I have provisioned for a future second floor.  The roof can be replaced with a break room stacked on top.  Access to the second floor will be from inside the warehouse via stairs I have yet to put in.  The staircase will lead to the doorway shown above.

I decided to use masonry bricks for the office too, although I might change that in future.  Mine is just a brick wall whereas Thomas' office has windows along the side.


I put a back door into my warehouse but it's a long drop for anyone who steps out.   I made a continuous line of windows along the back, which is different from the Thomas warehouse.

Inside the office, I furnished it with a counter and computer terminal, a trash bin, a chair and a small filing cabinet with a radio on top.   There's a door that leads to the warehouse as well as a window.


The roof of the warehouse comes off to display the interior.  The floor is fully tiled and there are two shelves made form technic bricks along the back wall.  One shelf is 5 studs wide and the other is 3 studs wide.  I had to add extra bracing for the garage door tracks.

I made sure the height of the tracks didn't prohibit the forklift from driving around inside.


With the wall removed, you can see inside the warehouse just like the Thomas Guerts design.  


Here's another shot of the inside of the warehouse.


A closer look at the two loading bays.

I just realized I'm missing the HVAC unit from my rooftop.  Need to make one of those.


Thanks for looking at my custom warehouse modular building based on Thomas Guerts design.  Hope you liked it, Bye!