Thursday, June 9, 2022

Cada C66006 Steamed Bun Shop Set Review (not Lego)

Hello brick fans and welcome back to bricksandfigs.blogspot.com, my little space on the web where I review Lego and non Lego brick sets, mini figures and share pictures of my MOC builds.

Today, I'll be reviewing the Cada C66006 Steamed Bun Shop.  The Japanese style building is a design of Tong Xin Jun (ExeSandbox).  It's a small two storey building, and is comprised of 1108 pieces.  The set comes with an instruction manual, a sticker sheet, a brick separator and a USB powered light string.  Please note, that this set does not include any minifigures, however I have included one of my own minifigures for display purposes.


Thanks so much to AFOBRICK.com for providing this set for me to review!  Details on how you can get this set from them at the end of this post.


The Cada bun shop was well wrapped and it arrived in great condition.  Thanks AFOBRICK!

Here's everything I got in this set, in addition to the instruction manual.  There are 7 bags of parts for Step 1, and another 7 bags of parts for Step 2.  There's a few other bags of additional parts.


The instructions were adequate, but I sometimes found it hard to differentiate between clear and light gray pieces, and the same for dark brown vs. black pieces. Below are a few pics that I took during the build process.


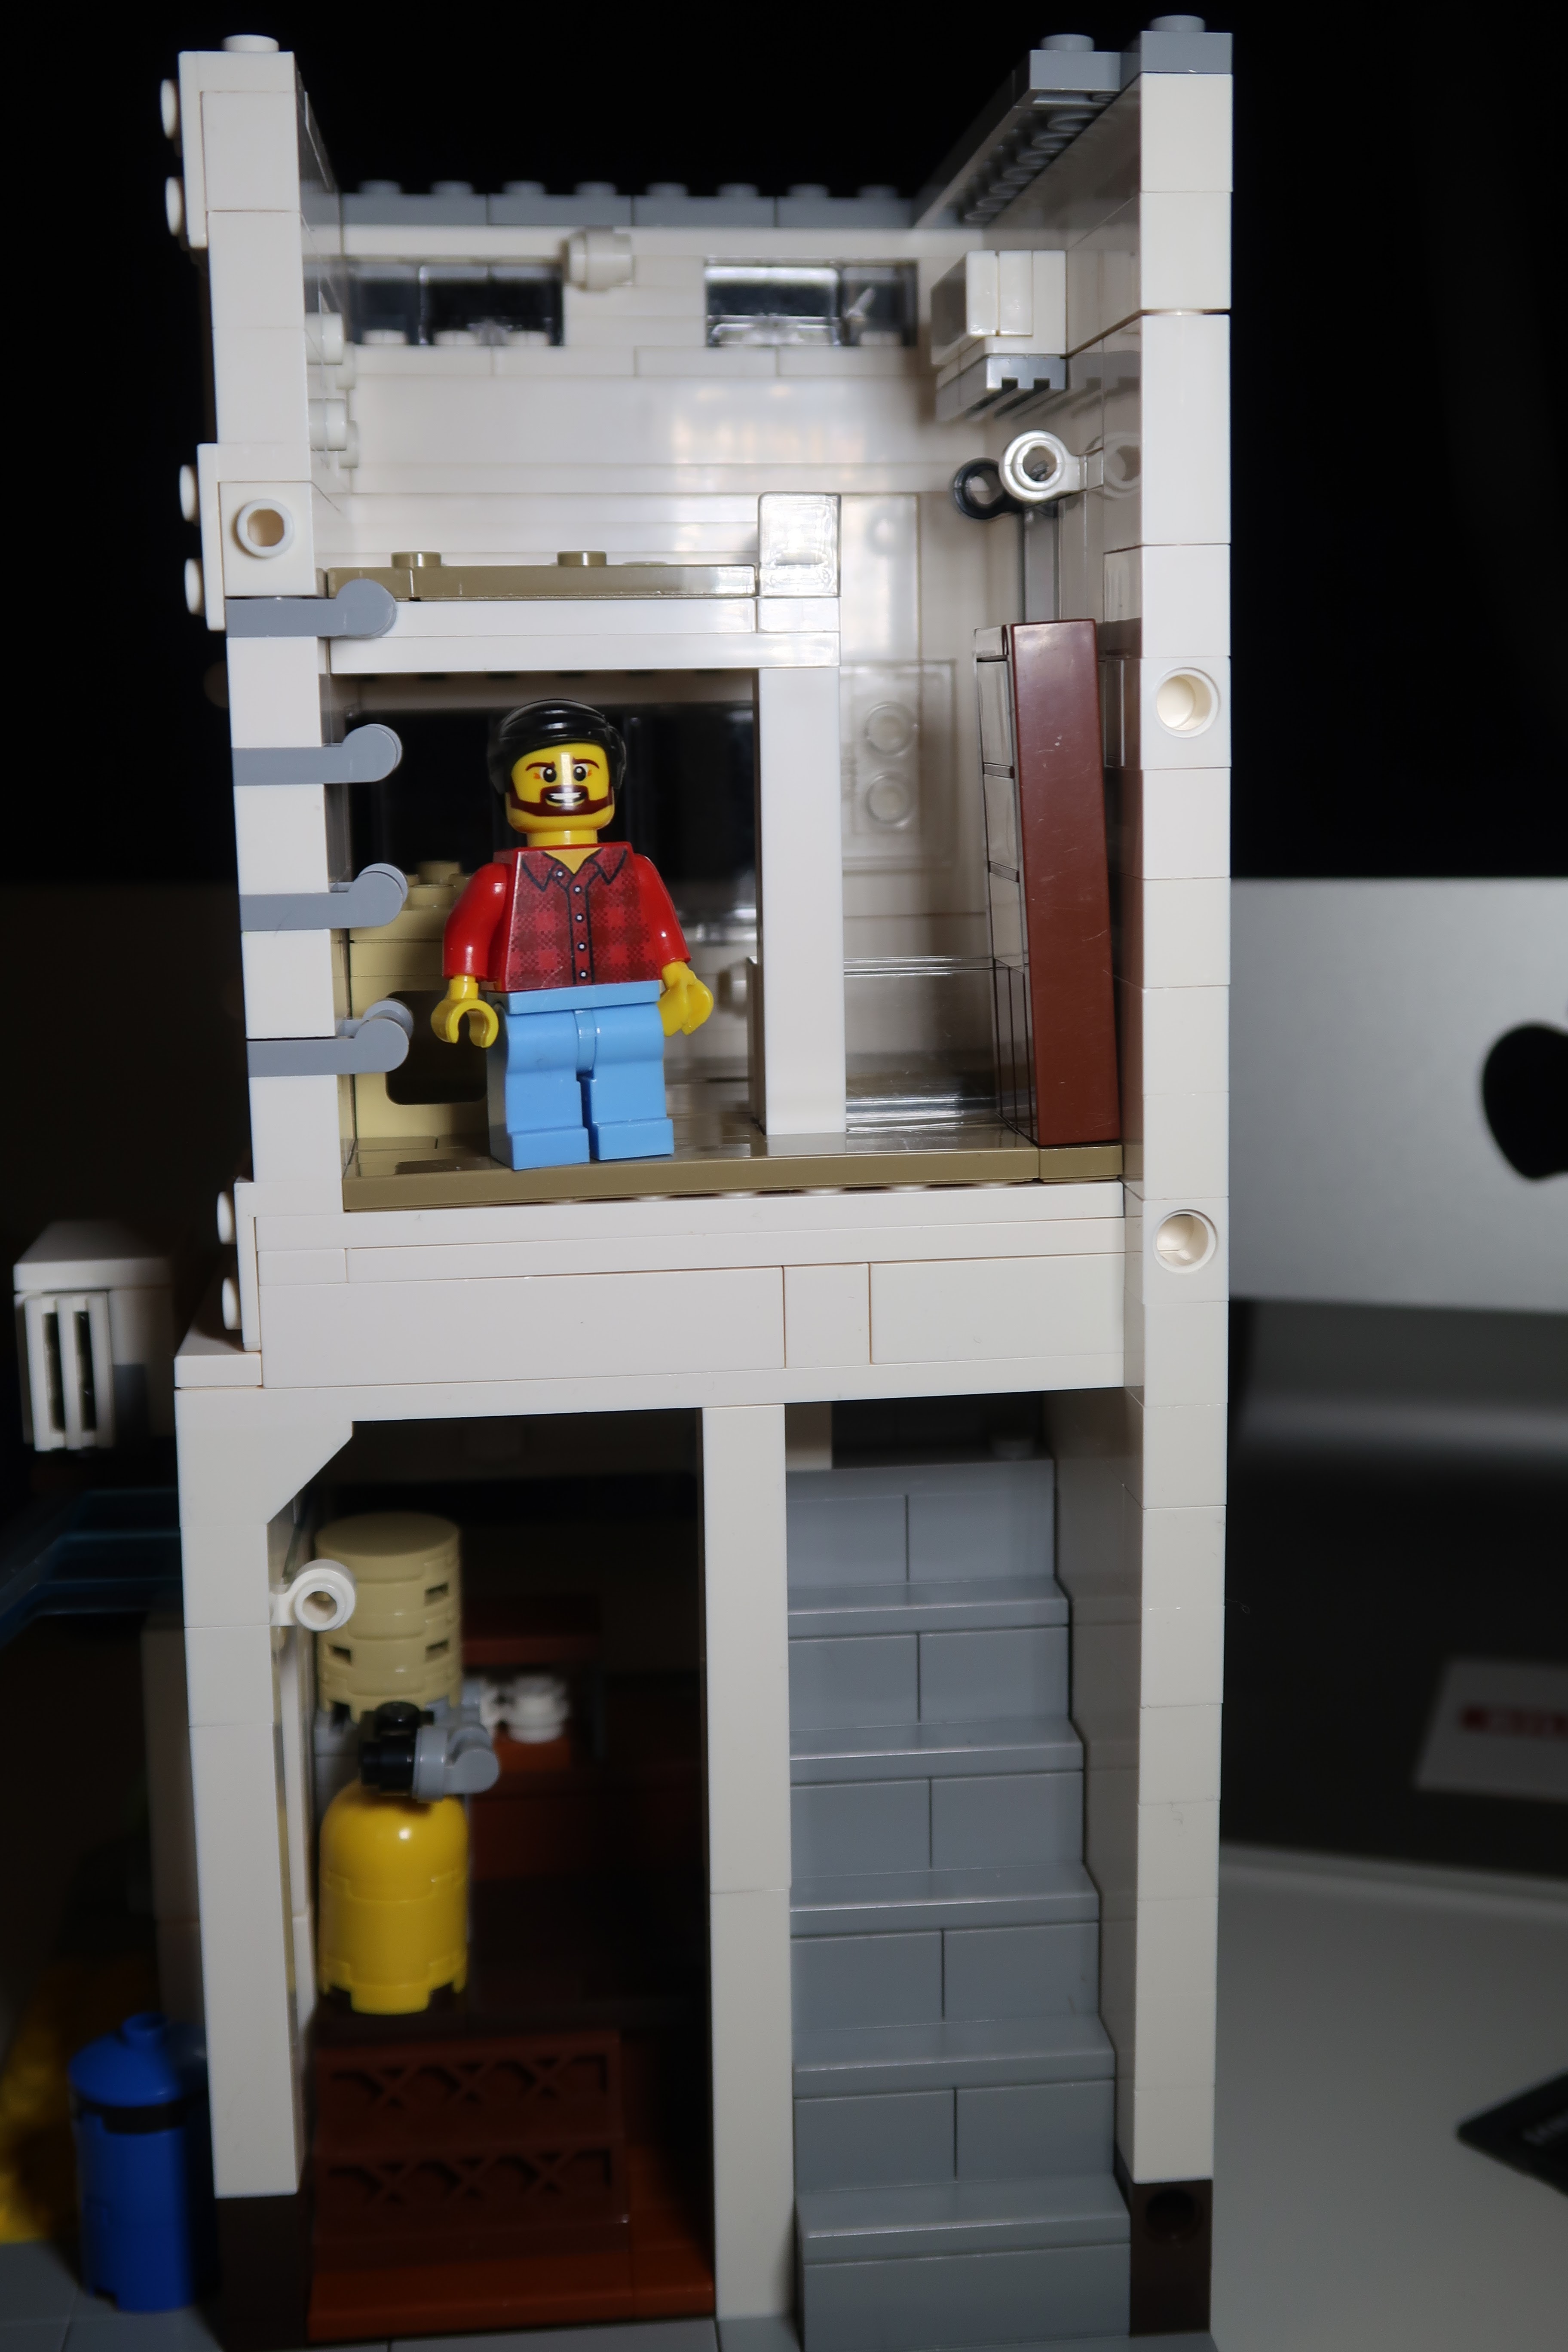
People were asking if the Cada Bun Shop was minifigure scale, so I took a few pics during the build and posted them in my earlier blog post which you can find here

Buns for sale at the counter.  Just want to point out that brick quality and clutch is excellent.  You really can't tell that you aren't building with Lego bricks.

Makings of the vending machine.  I haven't put on the stickers yet for the little bottles inside the vending machine.

Here's the completed storefront.   Actually, it's more like a stall with the seating in front.   One of the changes I would make is to put the building on a full 16x32 stud baseplate, and then set the building back a few more studs, so that the accessories like the sign and the pipe don't impede either the patrons seating at the counter or pedestrians who might be walking past.

Although I can't read what all the signage is about, they give a very authentic feel to the Japanese bun shop.  The stickers were not too hard to apply.

Here's the backside of the shop. The stairs to the second floor are pretty steep.  On the second floor, is space for a cabinet, a desk and stool, with ladder access to the sleeping loft (bedding not shown).  On the wall is an air conditioner unit.  

By adding the back wall, the shop has a much more completed look.  The electrical pole, the ducting, the wall mounted ventilation unit, all add to the cool details of this building.   The designer did a great job here, I must admit.  With a deeper baseplate, one could even add a few extra trash bins or some boxes.  That's something I might do in the future to modify the bun shop.

The rear wall of the bun shop is hinged so that you can access the interior, however unlike other modular buildings, you can't separate the first and second floors from each other.


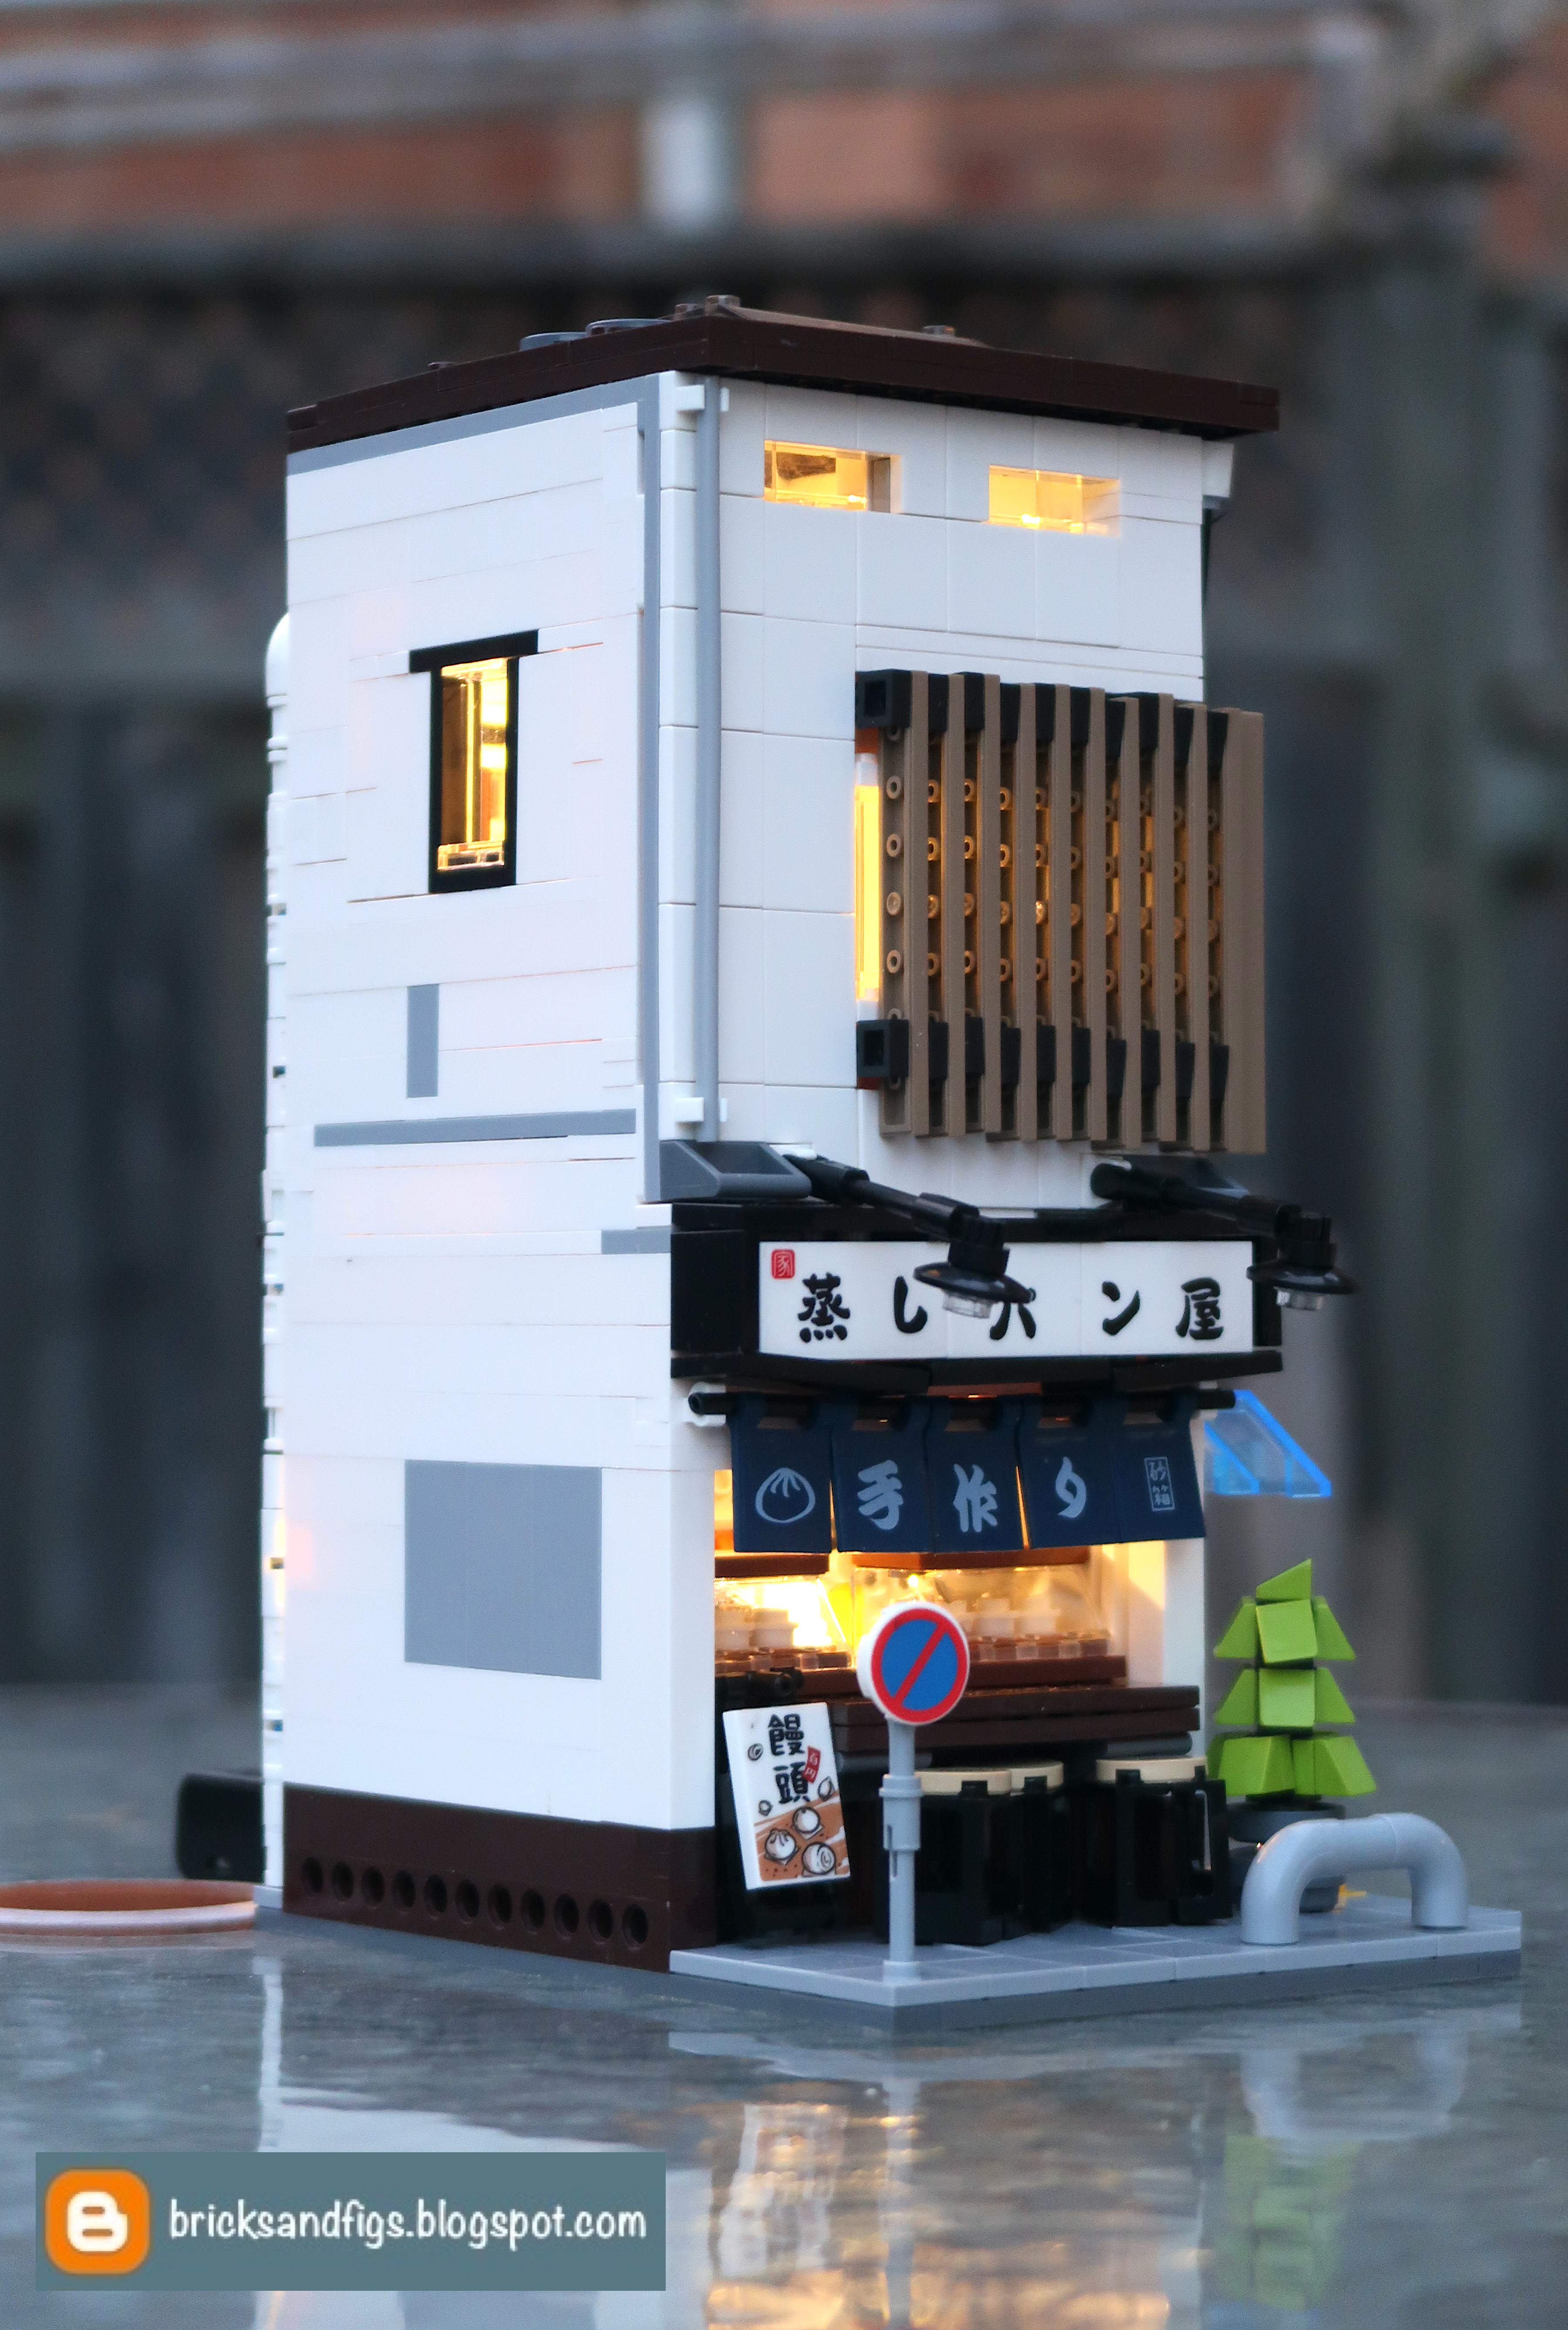
Check out the finished model.  The first thing that catches my eyes are the wooden slats over the windows, so cool.  Then there's the foliage growing near the roof.  The plastic piping needs to flex a little more, right now it pushes on  the electric pole so that it doesn't quite stay upright.  There's even a small light that extends off the electric pole.

With the drink vending machine built into the side of the bun shop, it doesn't take up too much room.  I like the awning over the vending machine too. 

With the provided USB powered LED light, you can make the interior glow!  Looks awesome, doesn't it?  The manual instructs you to weave the LED light wire all through the shop during the building process, but I just shoved the lighting in as an afterthought and it still looks great.  

Please note that I have used my own battery pack which has a USB port to which I can attach the light.  That's not provided with the set, but it would have been nice if Cada had included one.

The bun shop looks amazing all lit up.

Here's how I fed the LED light wire into the back.  You can see the battery pack to which I attached the USB plug and switch into.  Cool, right?

I forgot to mention that there's a skylight on the roof of the building.

So to wrap up, here are some of the extra pieces that I had left over.  I might not have added everything as per the instructions because sometimes I gloss over things.  But it didn't affect the final result.

The furniture that I built but didn't put into the second floor includes a desk with computer monitor and tower, a small stool, a futon bed and a small nightstand with light and potted plant. 

For my rating I give this building 5 out of 5 stars, despite the stickers and the smaller base plate.  Once built, the bun shop just looks amazing and even more so with the LED lighting that comes with the set.  To improve this set, I would use a larger base plate and add one or two minifigures, like a shopkeeper and a customer.


This was my first time building a Cada brand set and I thought that the quality and clutch of the bricks was first rate.  I would love to build more Cada buildings in the future and have them added to my modular building collection.


For those who are interested in acquiring the Cada C66006 Steamed Bun Shop, you can find it at AFOBRICK.com.  They are a newer seller of Lego compatible brick sets.  Feel free to check them out, if you like.   Click on the picture below to take you to Cada bun shop on the AFOBRICK website.

For a limited time only, get a further discount by using code ITSNOTLEGO at checkout for extra savings.  Don't know how long the discount code will last.

Also on Aliexpress, find it using the term Japanese Streetview.


Thanks for sticking to the end of this long post.  Hope you enjoyed all the pictures and the review of the Cada C66006 Steamed Bun Shop.  Let me know how I can improve my content or what not in the comments below.   See ya!


Monday, June 6, 2022

Is the Cada C66006 Steamed Bun Shop Minifig scale?

Hey brick fans, welcome back to BricksandFigs.blogspot.com!

Today we will be answering that nagging question about whether the Cada C66006 Japanese themed steamed bun shop is minifig scale or not.   

First off, I'd like to thank AFOBRICK.com for generously providing me this set to review.  AFOBRICK.com is a new seller of alternate Lego sets and they carry all the latest brands such as Mould King, Cada and more.  The name of the store is derived from the words A Fan Of Brick, hence AFOBRICK.  

The unique Steamed Bun shop was designed by Tong Xin Jun whose alias is ExeSandbox.  I'll be doing a separate post where I'll show you the build pictures of the completed set.  For this post though, I wanted to see how minifigure friendly the bun shop actually is.


I decided to do a test build, ie with none of the stickers or lights that come with the kit.  I put together the first floor in about 3 hours, taking my time to familiarise myself with the instructions (I'll talk more about those in my next post).

Here's the steamed bun building with only the main floor constructed.  I've introduced our minifigure guy who will give you a tour and give you a sense of scale and proportion.

The Cada bun shop is approximately 11 studs high.  When I make my building MOCs, I usually aim for a height of about 9 or 10 studs in height for my main floors. I think the designer added an extra stud layer to give the building more strength and stability.  I will leave it at 11 studs high for now and see how it looks next to my other modular buildings.  Otherwise, I might reduce the main floor height by one stud.

Here's our minifigure guy in front of the vending machine.  It's just a tad taller than I would like, but I think the potted plant and the blue garbage bin are perfect scale for my minifigure.  I've got a couple of other vending machines from my other modular buildings that are more minifig scale.  I think I could sub them in at some point down the road.  The vending machine from the Happy Build Coco Colo truck would be a good size.


Where one notices the greatest disparity in scale and size is the height of the counter and the stools.  The top of the counter is might be a bit too high.  No problems with the scale of the sign board and freestanding sign.

I noticed that this was a similar issue with the Sembo branded Japanese stalls, where the Shaved Ice shop and Takoyaki stall also had super high counters.


I would try to lower the height of the counter to make it minifigure waist level and replace the stools with smaller ones.  That would allow people to see the buns on display more clearly.  Right now, I feel like they are partially obstructed by the signage above.


There's two steps up to the platform where the kitchen is.  I would probably remove the step up and give the bun master more headroom and maybe some overhead shelving.  I don't like where the bun steamers are so high, that they might topple over.

One might think that the stairs to the second floor are super steep, but I've visited some shops in Japan where the steep stairs are a reality.  I've got no issue with the staircase at the moment, although my minifigure friend might disagree.

So that's the quick tour of the Cada Steamed Bun shop.  Let me know if you think it's minifig scale or not?  Would you make the same changes that I've suggested or would you leave everything as is?  Feel free to leave your comments below.

In my next post, I'll do a proper build complete with stickers and lights, and second floor too!

If this building interests you, you can find it on the AFOBRICK.com website.  I think their price is pretty competitive with other sellers and they offer free shipping too.
And if you use my code ITSNOTLEGO at checkout, they will give you another 5% discount.   I get a tiny commission from any sale, and you get a better price!


That's all for now, bye!

Tuesday, January 25, 2022

First Project in 2022: Lighting the not Lego Blade Runner Spinner MOC C5177

Hi alt brick fans, hope you are all doing well!  

I've got another project on the table, this time it's lighting this not Lego Blade Runner Spinner MOC C5177.   The lighting I'll be using was generously provided by Lightailing.com.


The Blade Runner Spinner has always been a favourite model of mine, it just looks very futuristic.  The building block set featured is C5177 which you can get off Aliexpress. It's a copy of the Rebrickable version by designer MOMatteo79.

Here are some images of the spinner I found on the internet.  Whenever you see it, the lights are always on, so for my model, I wanted to recreate that effect.


I already have the model of the spinner already, but I didn't want to tear it apart in case my lighting project didn't work out as planned.  I also wanted to keep one around to use as a reference.  


So I bought another one from >Aliexpress .  It comes with seven bags of parts and an instruction manual.


Here's some sample pages from the manual.


These are all the parts for the Blade Runner spinner moc.  I figured it would be an easier task of integrating the lighting as I built the model from scratch, rather than taking apart the old model.


Lightailing.com has lighting kits for almost every Lego set on the market, but they didn't have one for this moc set.  When I inquired about what parts I would need to light the spinner, Lightailing was really helpful and they promptly researched it and came up with everything I would need.  

Here's what Lightailing sent me:  LED lights in various colours, white, blue, red and yellow, expansion boards and connecting cables, two types of power supplies (battery and USB plugs) and a multi-function board that makes the lights blink on and off.  With all these accessories, it would be up to me to figure out how to put everything together and make it work the way I wanted.


Two packs of 15cm white LED lights (3 lights per pack).


Three packs of 15cm blue LED lights (3 lights per pack).


Three packs of 15cm red LED lights (3 pieces per pack).


Two packs of 15cm yellow LED lights (3 pieces per pack).


One pack of 6 port expansion boards (3 pieces per pack).


One pack of 8 port expansion boards (3 pieces per pack).


Two packs of 5cm connecting cables (3 pieces per pack).


Two packs of 15 cm connecting cables (3 pieces per pack).

Two packs of USB cables (1 piece per pack).


One AAA battery pack and one multi-function board.


The multi-function board is approx 1 inch square and has one input port (power) and two output ports (for alternating the blinking lights).  The black knob is used to control blinking speed and the black lever controls the blink rate.

This was the first test of the led lighting which I attached to the underside of the spinner.

I fed the wires up into the passenger compartment and ran them out the rear of the spinner.

Next step was adding side marker lights and the center head lights.  So there are a total of 6 LED lights at the front of the vehicle. At this point I began to realize that I might need to create a cavity in the trunk of the spinner for all the wiring and expansion boards.

Testing out the flashing rear side marker lights.

Attached a couple more lights underneath, so there are a total of 6 flashing LED lights here.


Here's a close up of the roof lights.  The yellow lights are non blinking, but the center white light and the red and blue lights are blinking.  Seven lights in total on the roof.

Let's see if we can jam all this stuff into the trunk! I have one expansion board for the non blinking front lights, two expansion board for the alternating blinking lights, and one expansion board for the remainder of the non blinking lights in the rear, plus all the connecting cables.

Tried to tidy up all the wiring.  Here's a video I posted on Youtube.


Another Youtube video I made.

All of the LED lighting used was from the brand BriksMax, which you can get at Lightailing.com.  Unlike some other branded kits where they have a USB plug on every light, the Lightailing ones plug into an expansion board, which makes it really easy to chain lights together like I did in this model.  I found the LED lights, cables and expansion boards very easy to use and they were very high quality.  

For my spinner, I have a choice of power supply options, I can either use the the USB connector which you can plug into an optional USB hub, or you can use the battery pack if you don't have a USB power source nearby.  Please leave your comments or questions below!   Bye for now!