Friday, June 8, 2018

Pogo PG8113 Fruit and Vegetable Minifigures Review


Hey minifigure fans, welcome back to BricksandFigs.blogspot.com!  I ordered this Pogo set of minifigures from Ebay about 2 months ago and they finally arrived in my mailbox today.

The set is Pogo's PG8113 8 piece Fruit and Vegetable minifigures.  Let's take a closer look!


Here's what I got in the mail today, each minifigure is individually packaged with a free baseplate.  The minifigure arms, hands and legs were already attached to the torso, so I just had to put the heads and costumes on the minifigures.  Pogo uses a different plastic than Lego minifigures because these ones feel really light.

I should warn you now that the heads are really really tight to put onto the body.  And the fruit and vegetable costumes that go onto the head are also very tight.  If you want to pull off the costume or head, you need to grasp the body, otherwise the body will come off the legs.  Now let's review each minifigure in detail.  Oh I should mention that although the set is PG8113, you can reference each minifigure by their corresponding Pogo number which I will list below.

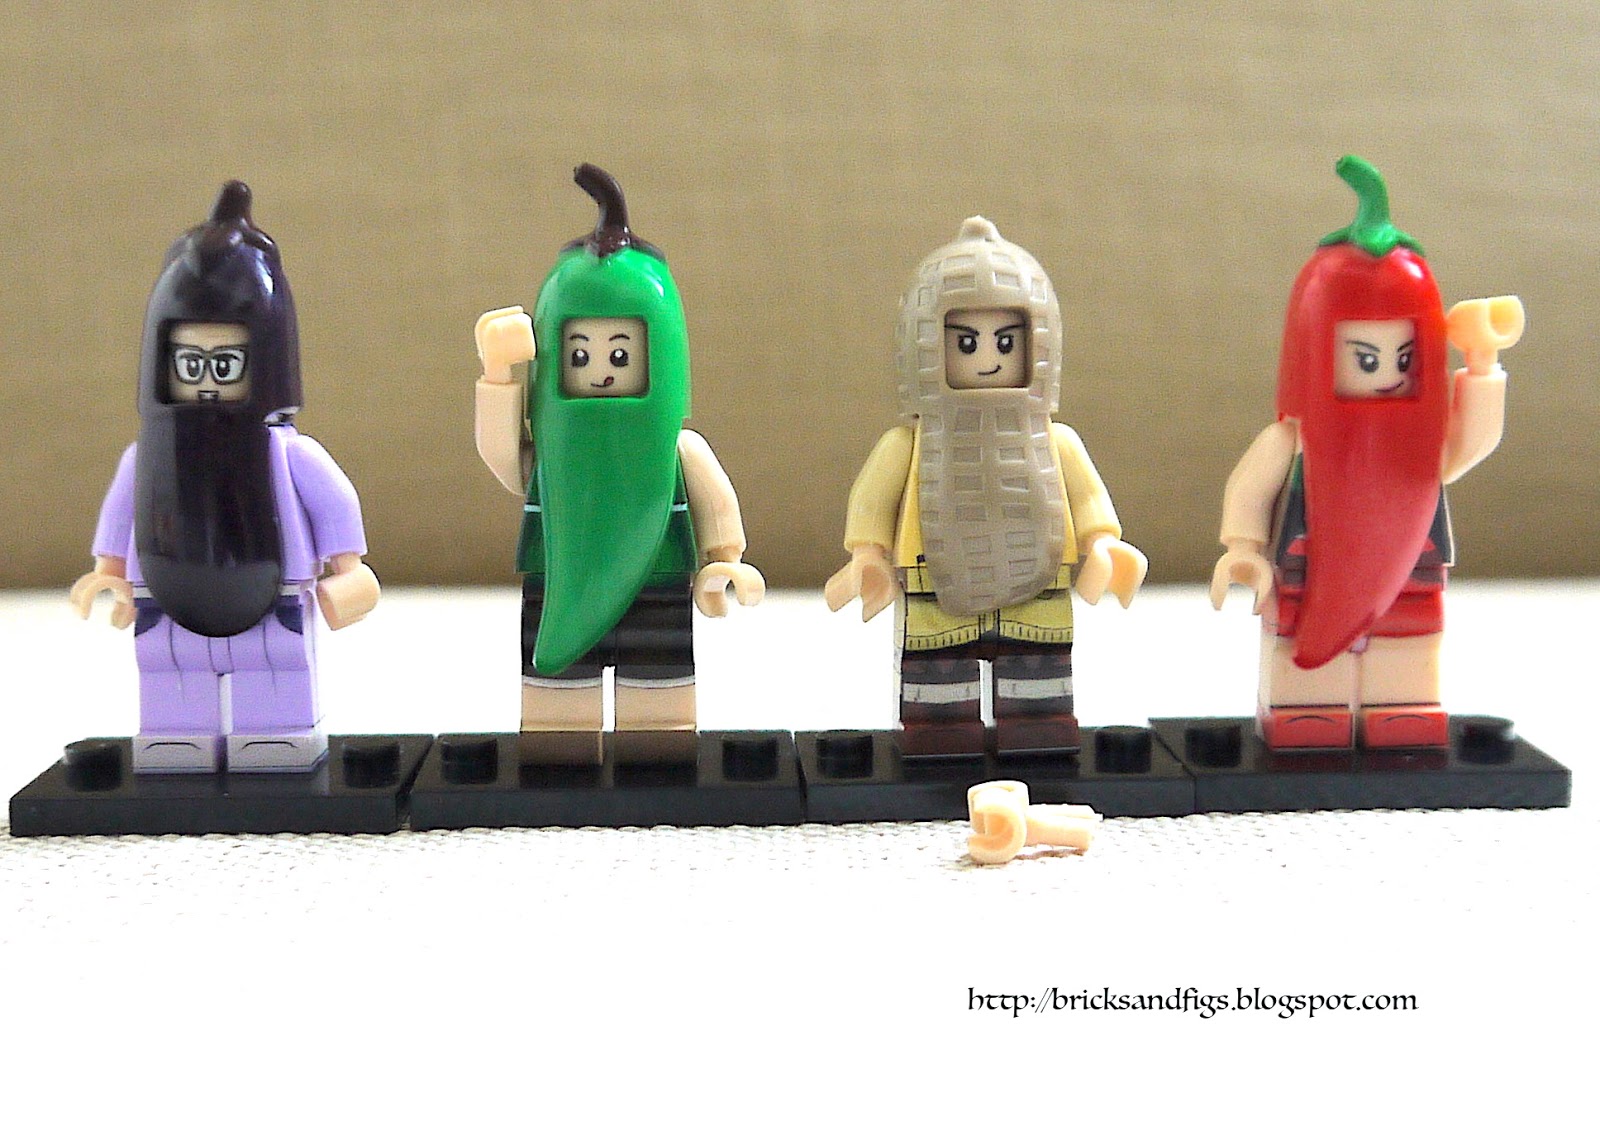
Here's Egpplant dude PG1231.  He's got a slightly curved deep purple eggplant costume over his lilac coloured suit.

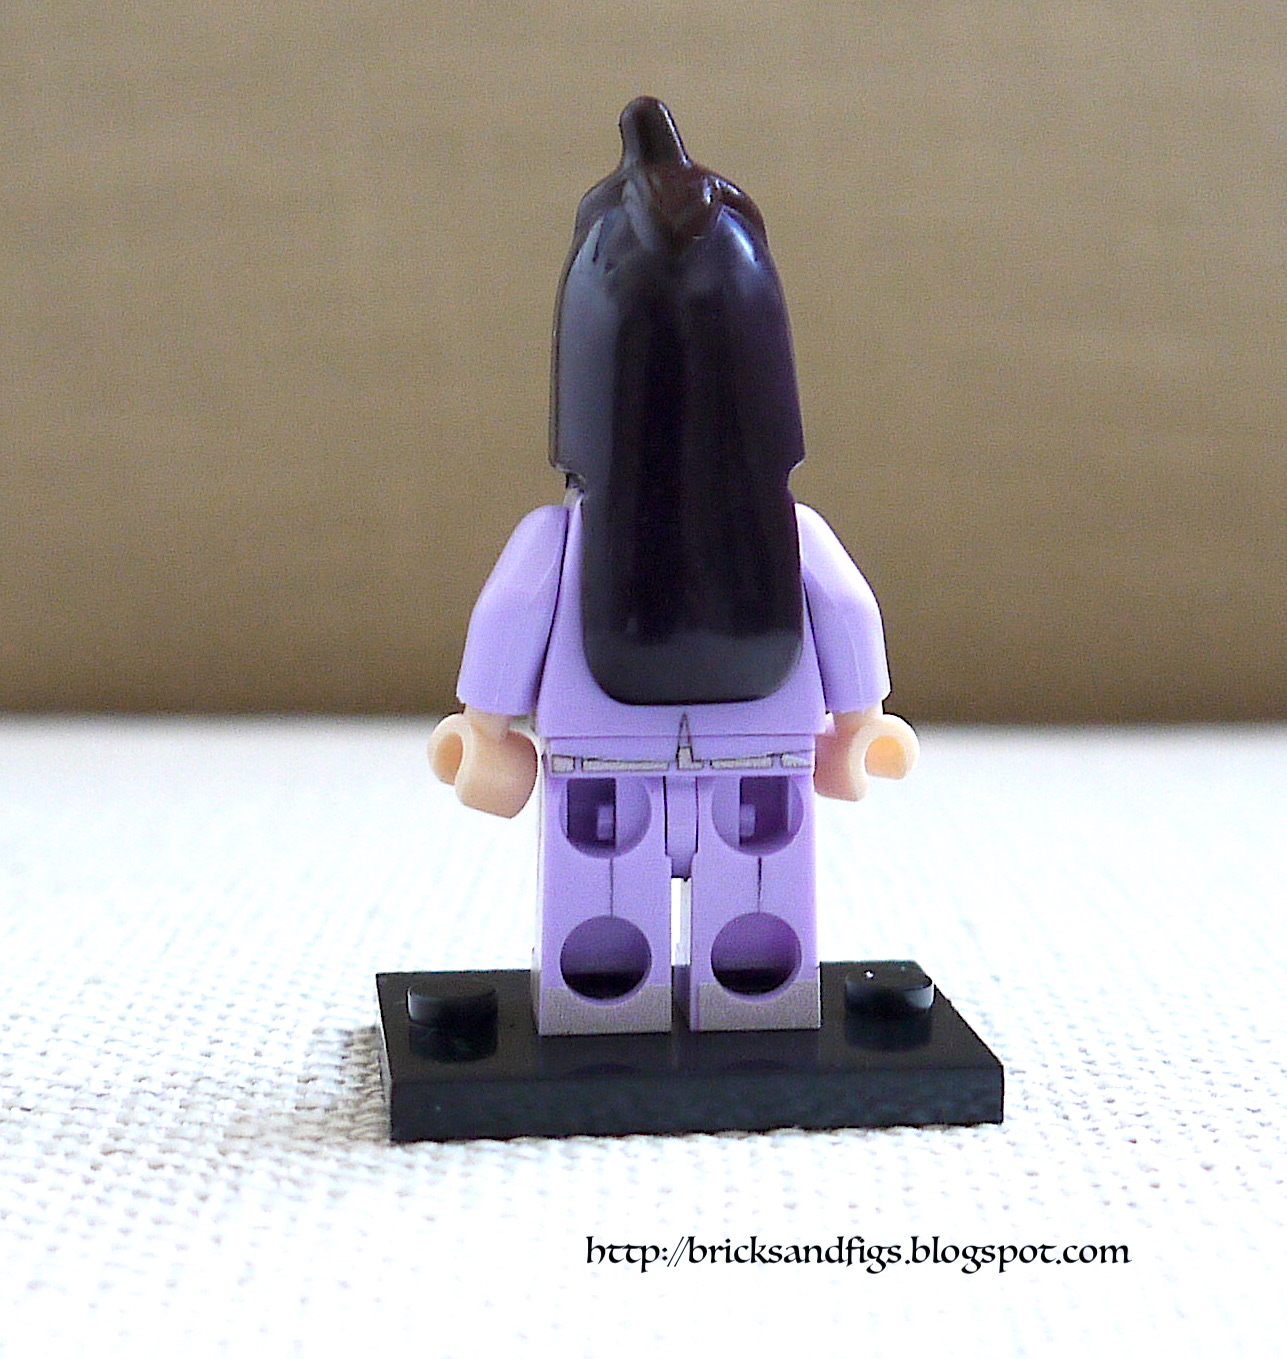
This is how Eggplant dude looks from behind with costume on.

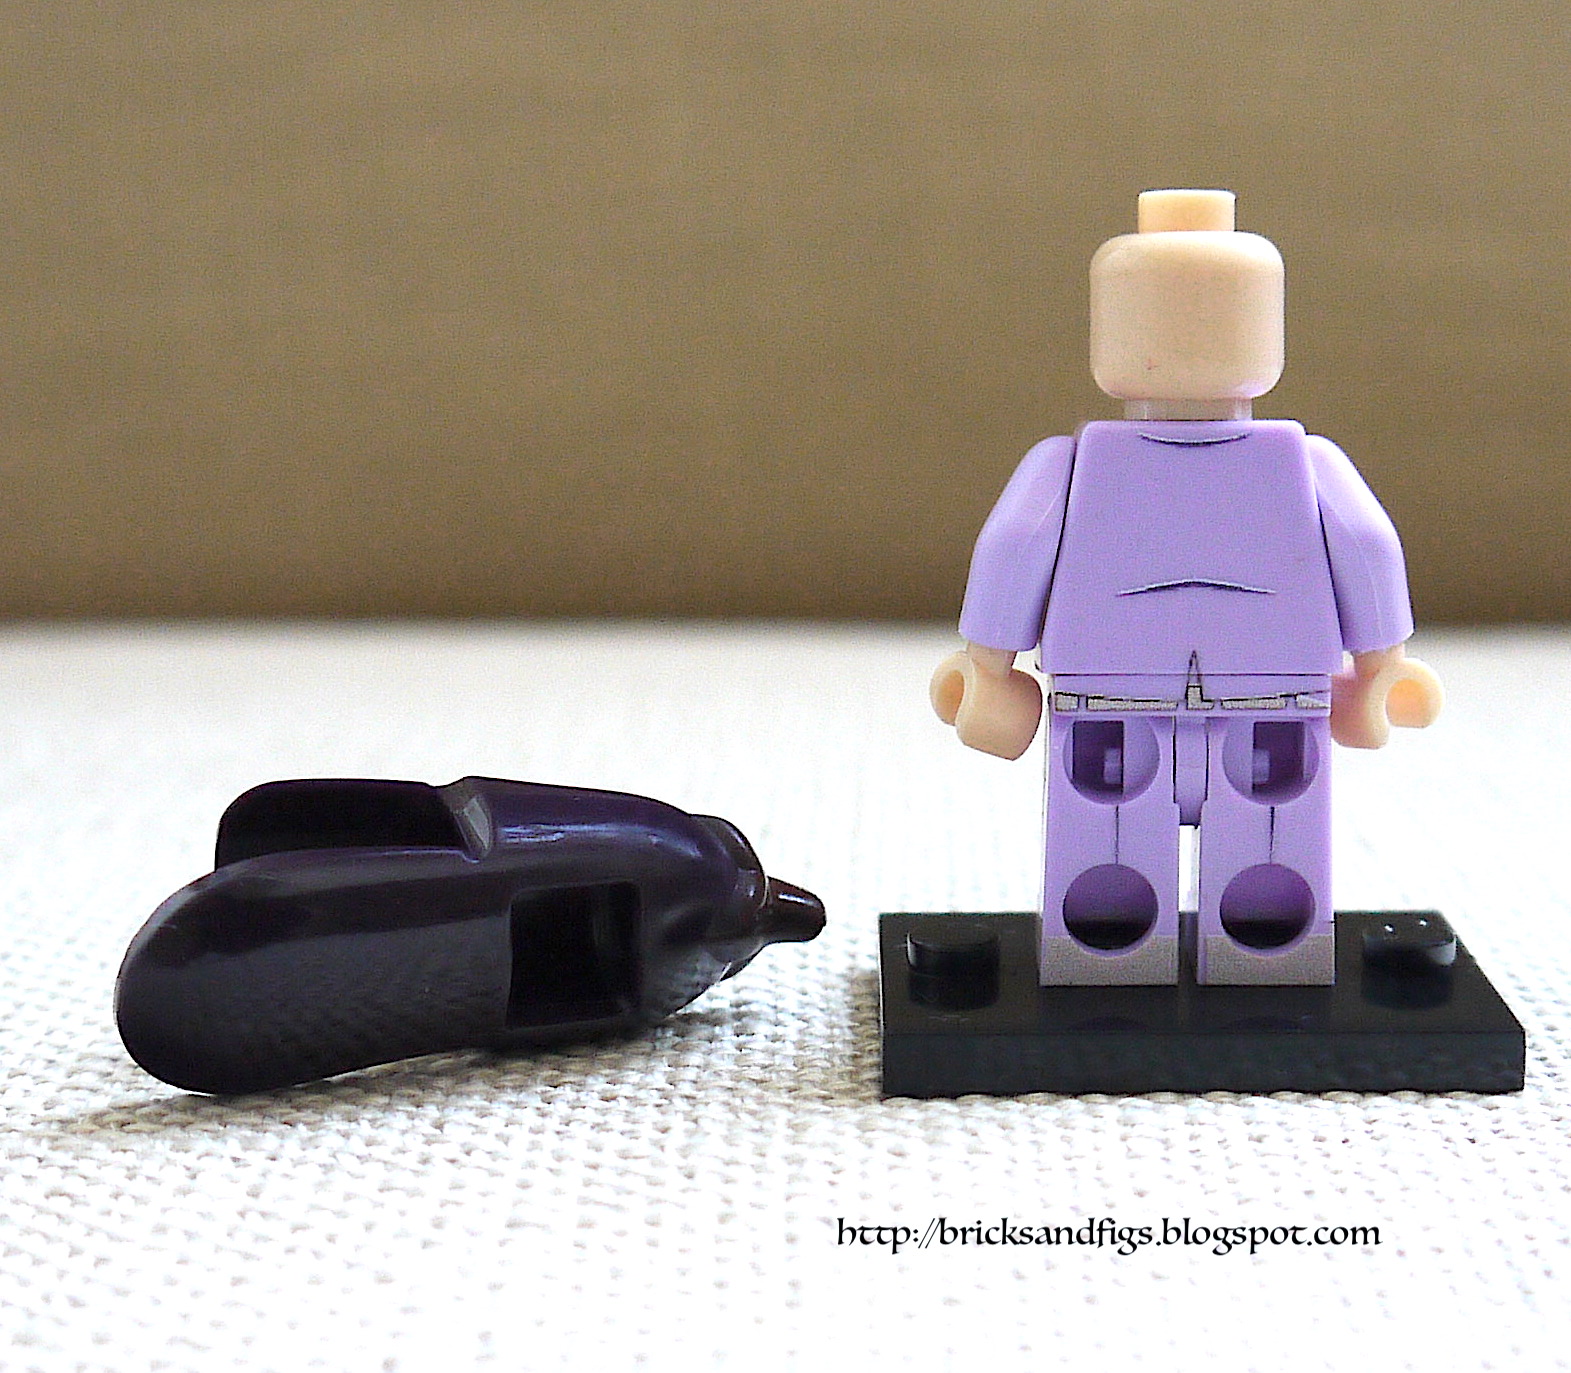
Here we can see Eggplant dude without his costume on.  I wasn't expecting this level of detail on the minifigures since most time, you will display them with their costumes on.  We will see that all the other minifigures are equally detailed.  Eggplant dude has a lilac coloured suit with white shirt and tie and belt.  You can even see the pockets on his trousers.  His feet look to be clad with silver or light gray shoes.  His suit even has a little eggplant under the collar.  He's the only figure in this set with glasses on.

 From the rear, eggplant dude has just a bit of detail, his suit jacket covering part of his belt.

Next up is Red Pepper girl, PG1229, with costume on.

Red pepper girl from behind with costume on.  Her red pepper costume has a green stem on top.

Red pepper girl with costume off.  I'm not sure but it almost looks like red pepper girl is wearing some kind of green sleeveless bikini or halter top, and a pair of red shorts with red shoes.  She's got a smirk on her face but not sure if that red blotch is supposed to be there or not.  Oh and there's a small red pepper on her top.

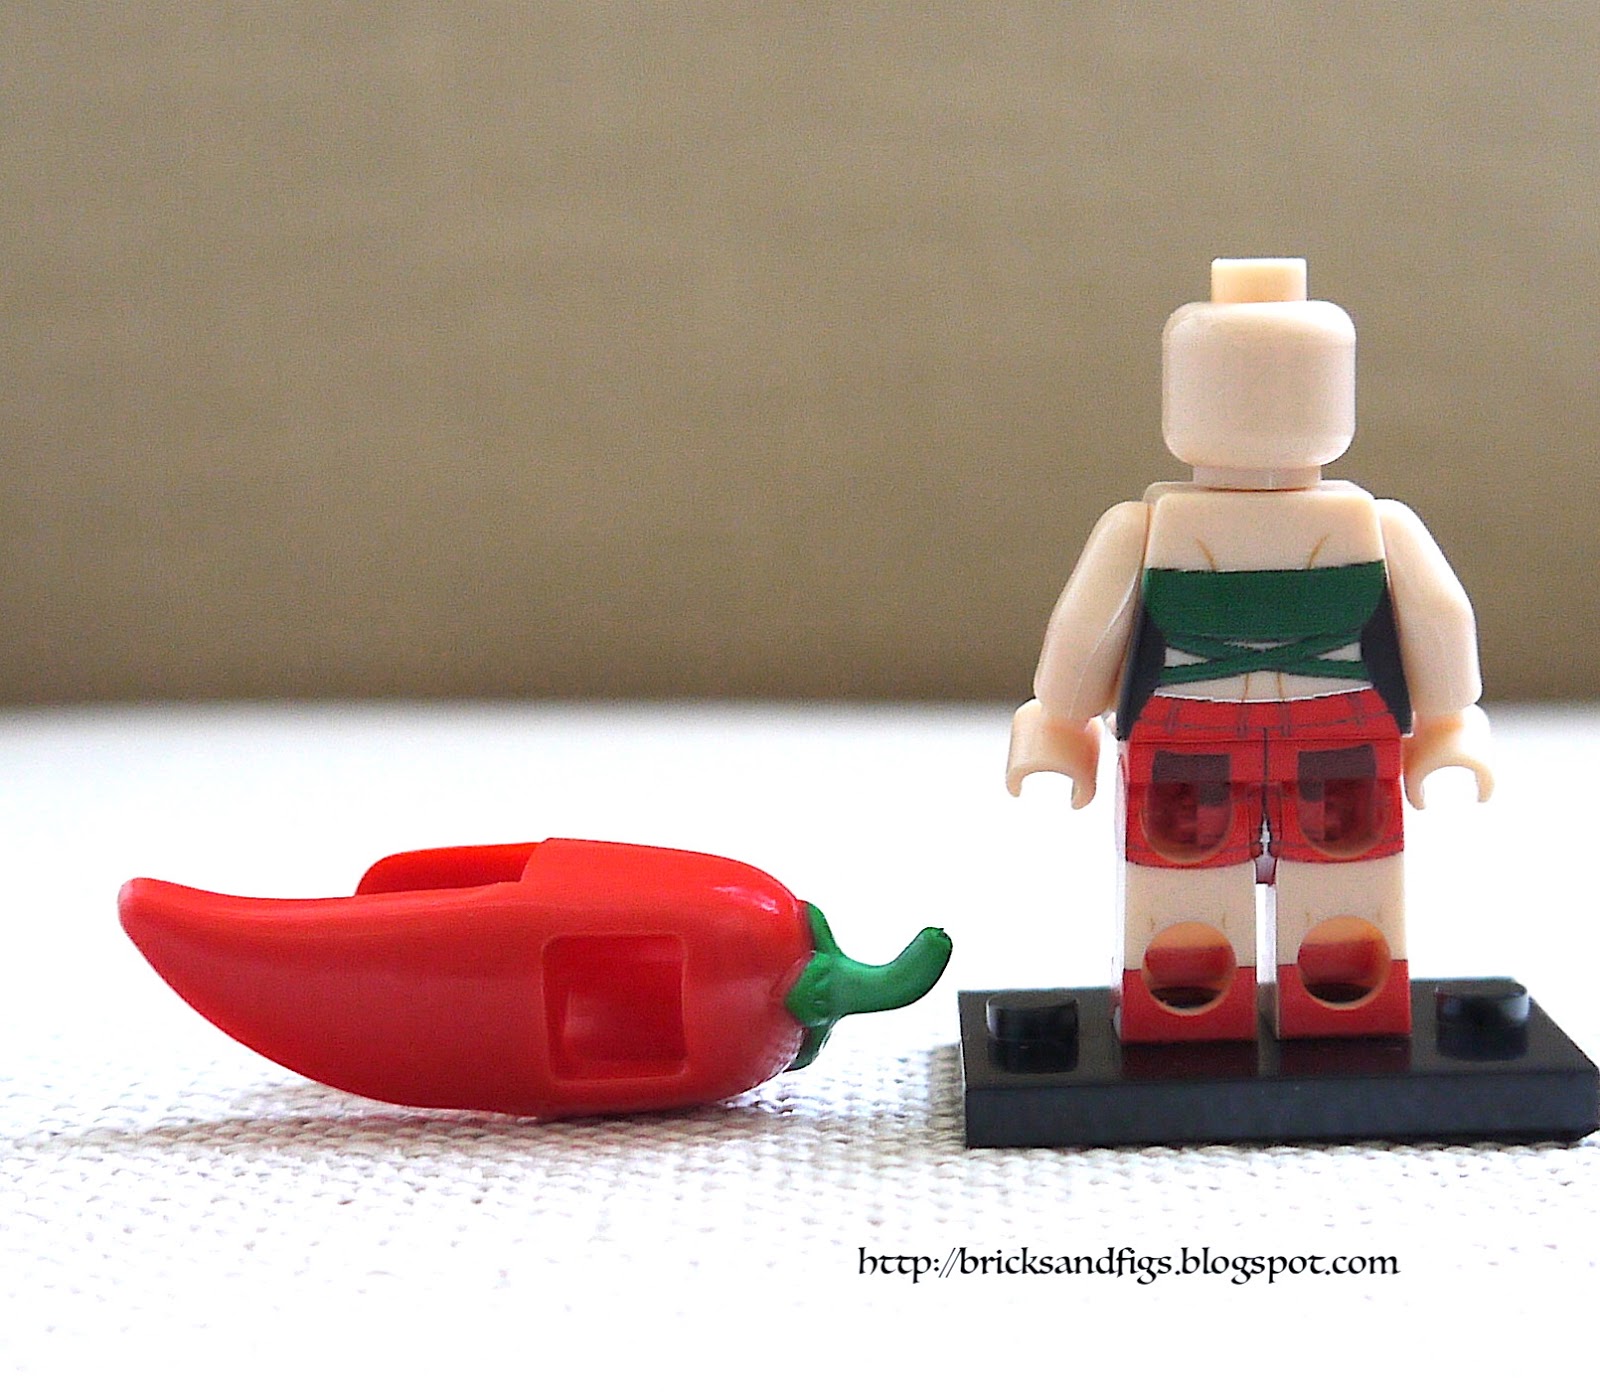
Red pepper girl from behind without costume.  Lots of detail on her red shorts.

Here's Green pepper boy PG1232 with is costume on.  The green pepper has dark stem.


Green pepper boy from behind.

Green pepper boy wears a green sleeveless vest with black shorts.  I think that looks like a green pepper pendant around his neck.  Is he licking his lips or is he sticking his tongue out?  Not sure.

This is how green pepper boy looks from behind.

Here's peanut guy, PG1228.  This was the only minifigure in the set that came with 2 extra hands.

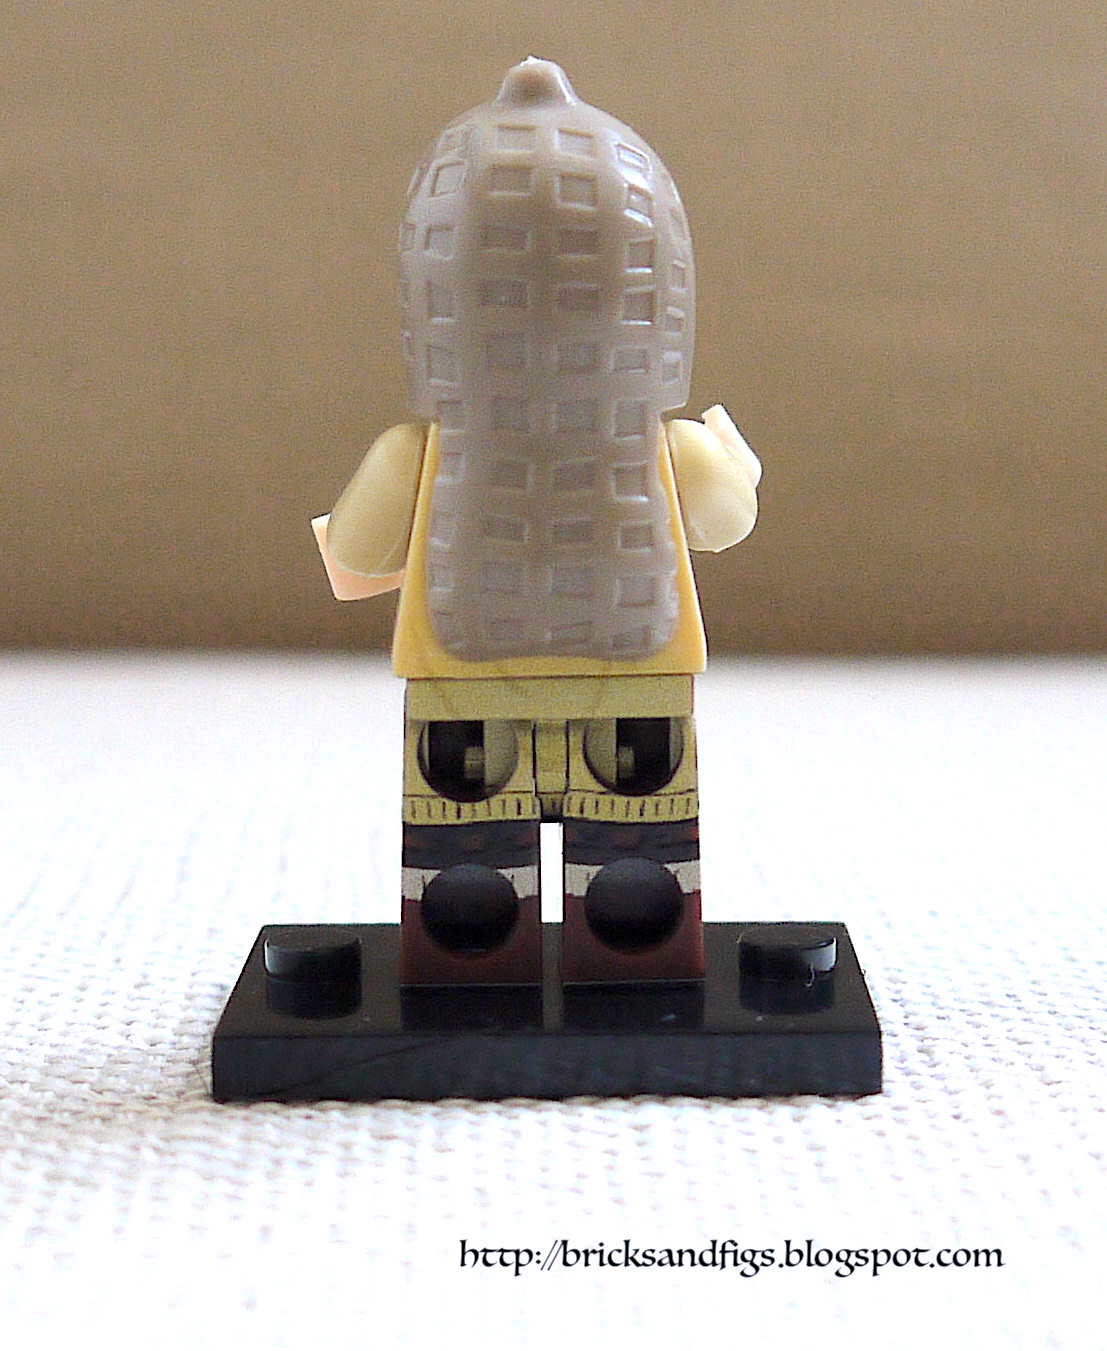
Peanut guy from behind with costume on.  I really like the detailed indentations on the front and back of his peanut shell.

With his costume off, we find that peanut guy is wearing a sweater with pockets.  His brown shirt underneath has 2 peanuts on it.  Can't tell if he's wearing shoes or boots.  His face has a smirk on it.


From behind, peanut guy's sweater appears to be quite long hanging over his bum.  The sweater colour doesn't match between his body and his legs though.

Next up is Mango man, PG1230.  When I first saw him I almost thought he was a yellow pepper.

Mango man from behind with costume on.

We find that Mango man is wearing yellow overalls underneath his costume, and a sleeveless green hoodie.  I can't be 100% sure, but his outfit deviates from the others because he has a red fruit on his overalls instead of a mango.  It looks like he's got green hitops on his feet and he looks pretty happy.


Here's mango man from behind without his costume on.  Here you can see his green hoodie with the word mango on it.  I feel like they could made the pants detailing darker, as his rear pockets looked sketched in, not finished.

The next minifigure is Strawberry girl, PG1227.

Strawberry girl with costume on as seen from behind.

Strawberry girl has a surprised look on her face.  It would appear she's wearing a pink sweater over a red top with white collar, pink socks and red shoes.  Her sweater has a strawberry on it.

Strawberry girl's sweater has a pink, red and white bow on the back.

Pineapple girl PG1226 is next.  Lots of detail on her pineapple headgear.

Here's pineapple girl from behind.

Pineapple girl has a white top with a yellow plaid skirt.  Her top has the obligatory pineapple on it. She's wearing white socks and orange shoes.

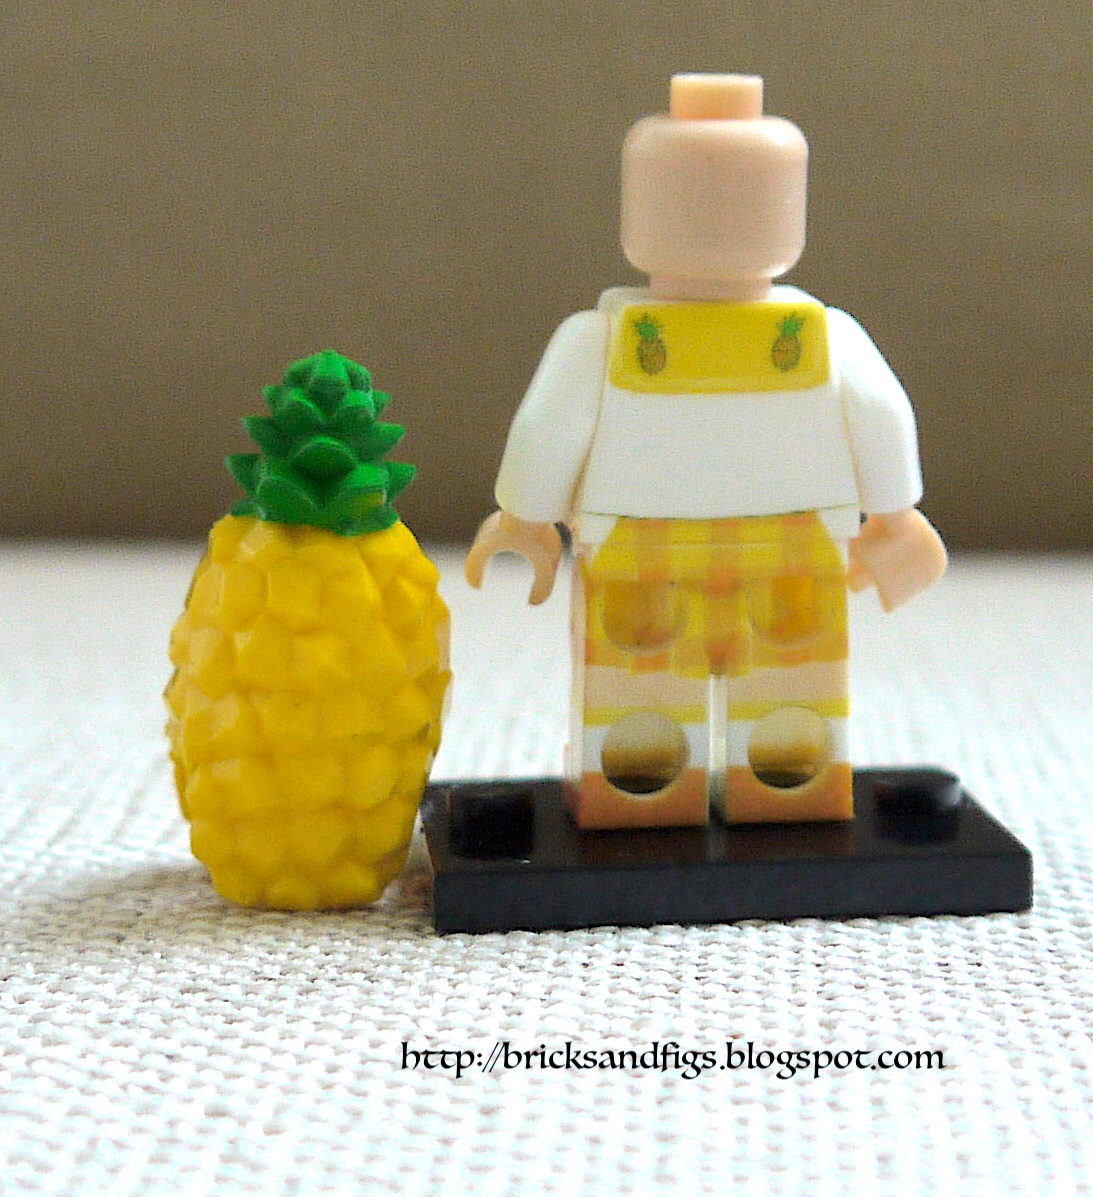
There's two more pineapples on the back of pineapple girl's outfit.

The last minifigure from this Pogo set is Watermelon boy, PG1232.  I like the detailing of the watermelon seeds.

Dark green watermelon head.

Here's watermelon boy with is headpiece removed.  It looks like he's wearing a tan jacket with some army camo on the shoulders and pockets.  He's got dark gray pants and light blue sneakers on.  His jacket has a picture of a round melon on it.

Watermelon boy's jacket doesn't have too much detail from the rear.   I want to mention that I didn't take side view pics of the Pogo figures, but they all have side printing on their pants or legs which is a nice touch.

Here's a group shot of our fruity friends.

And here's a group shot of our veggie friends, is a peanut a fruit or veggie? I dunno.

Here's my review summary of the Pogo set.  I love the detailing on each of the minifigs, from the unique faces to the varied and different outfits.  I like the nice touches of the fruits on each outfit and the costumes and head pieces are also nicely detailed.  

On the negative side, the plastic used felt a bit cheap and the heads and costumes were a bit too tight to put on and take off.  Despite those minor failings, these figures are quite unique and would display well with my other minifigures, so I would give this set a 4 out of 5.  I paid approx $1 each for the Pogo PG8113 set.   Hope you enjoyed this review and see you soon!


Wednesday, March 14, 2018

I modded my Lego Armored Assault Tank 8018 with non-Lego bricks!


Hi there and welcome back to Bricks and Figs!  In case you are wondering, no, this is not a bootleg of the Lego Armored Assault Tank 8018 set.  It's the real deal, except I made some subtle changes and did it using some extra non Lego bricks.

This is  what the original 8018 Lego set looks like, here is a pic of the Star Wars assault tank  I found on the Internet.


And here's my version.  This tank lives in a parallel universe where  Star Wars doesn't exist.  Instead the tank is used by some members of bootleg Hazmat team.   Hey look, it's hovering!

A couple of days ago, I decided to resurrect the Assault Tank and had just about finished rebuilding the original version, when I tried moving it on my carpet floor.  Totally un-satisfying.   I thought to myself, how cool would it be to make the tank look like it was hovering off the ground.


As you can see, I kept about 90% of the original set design.  To make the tank look like it was hovering, I put some small wheels underneath, then proceeded to add an extra layer of skirting to hide the wheels.

In addition to the skirting, I replaced the round shield with a windscreen.  Other changes include changes to the secondary guns and the cladding on the primary gun.


Here's how you board the assault tank from the rear.  The door is in the open position in the above pic.

And here's the door in closed position.  The slope bricks flanking the entrance aren't Lego.


For easier access, you can access the inside by lifting the roof.

Here's a closeup shot of the front.


Side view with the primary gun in raised position.

The turret above rotates.  I'm planning on making the turret a bit wider and deeper so that a minifig can fit inside.

I've flipped the tank over so that you can see the underside.  More non Lego bricks here.  Actually I used some of the Pogo minifigure baseplates here.

These are the three wheels that I've added.

Hope you like my modded version of the Lego 8018 Armored Assault Tank.  See you next time!

Wednesday, March 7, 2018

Bela 10541 Emma's House and Enlighten 1119 Delivery Mashup

Yup, I did it again.  I made another little modular building by using parts from other building block sets.  In this case, I used parts from the Enlighten 1119 QM Delivery set and the Bela 10541 Emma's House set.  Let's do a quick review of the sets individually before I delve into my MOC.


Enlighten 1119 QM Delivery


Pictured above is the Enlighten 1119 Express Delivery building set.  The 337 piece set consists of a small delivery depot, a delivery truck and motorbike.  The set also includes 4 minifigures.  Sticker sheet is provided for the store signage and delivery truck.  Brick quality and clutch is good, consistent with the newer Enlighten block sets.  It's a set that is designed by Enlighten and not a bootleg of a Lego set.

I think this set cost me $16 USD which wasn't really that cheap.  I just checked Aliexpress and you can get this set for 13.75 now.  Here's the link if you are interested:
https://www.aliexpress.com/item/Ilumina-1119-Ciudad-Estacion-de-Entrega-Express-Courier-Camiones-Kits-de-Edificio-Modelo-Bloques-Minifigure-Ladrillo/32743362087.html

Anyways, I built the set and then promptly disassembled it, so I didn't really do a formal picture review of it.  The truck is nothing special and the shop is merely a door with some pillars without any walls or roof.  The minifigs are ok though.


Bela 10541 Emma's House


This set is a bootleg of Lego 41095 of the same name.  I reviewed my set here:
https://its-not-lego.blogspot.ca/2016/10/bela-10541-emmas-house-friends-building.html
After the review, I promptly stripped the set down for parts, and so I had a surplus of lavender coloured bricks which was hard to incorporate into my other building sets and MOCs.

The New MOC


So it kinda occurred to me that the orange and lavender coloured brick pieces might go together without looking too gross.  I followed my standard method of construction for a small modular:  ie.
using a 16x32 stud baseplate and making a little building that has a depth of about 16 to 18 studs.


The pieces that really define the Enlighten Delivery shop are the giant orange sign with uplighting and the orange door and awning.  As I designed my MOC, I decided to retain as much of the original look as possible. Essentially I was supplying the walls and roof that the original building was missing.  I was able to keep the front facade mostly orange and white with just a small lavender accent stripe.

Here's a corner view of my new MOC building.   You can see that the walls make good use of the lavender bricks from the Bela Emma's house.  In fact, because all the bricks are from the same set, there's no colour variations in the lavender, unlike some of my other MOC sets where I use bricks from different brands.

This is another side view of the building.  If you wanted to create a backstory for it, it could have previously been a beauty salon which was then converted into another type of store, maybe an ice cream shop or something.  Now, the building is back up for lease or sale.  That's why it's empty on the inside.

Here's the rear of the building with a back door.  I left a couple of orange bricks in, to make it look like the building has been repainted at some point.

As with all my MOCs, I make sure that the roof can be removed, for interior viewing and access.

 Right now the building is just being used for storage.

Here's the little store MOC placed next to my MOC KFC.   Sally the realtor is waiting for one of her clients to meet her for a viewing at the shop.


Hey, turns out the client was already here and checking out the rear of the building.  Well, there you have it.  Please let me know what you think of this little creation, and what kind of store I should turn it into.  Thanks for looking and visiting my Bricks and Figs blog!   See you next time.