Showing posts sorted by relevance for query japanese style. Sort by date Show all posts

Friday, March 3, 2023

I made a Japanese style modular building from the Not Lego Sembo 601070 Crab Shop


Hello brick fans!  I'm here to show you my latest creation and yes, it's another modular building.

This set started life as the Sembo Crab Shop 601070 which were readily available on Aliexpress about three years ago.  The shop is one of four buildings in a series of Japanese themed facades.  The shops are harder to find these days, with only one or two stores on Aliexpress selling them.

This is how the set came originally before my modifications. It was basically a small building facade with a building that was about 8 studs deep with a minor interior setup.

As soon as I saw this set, I had to get it and turn it into a Lego style modular building.  Well, it's been three long years but I've finally achieved my goal.  

First off you will notice that I narrowed the facade of the shop from 20 studs wide to the standard 16 studs wide to make it consistent with all of my other 16 stud wide modular buildings.  The most challenging aspect of this was trimming off the sides of the fabric awning.  To get a nice straight edge, I used a paper cutter.  


There are four tan coloured arms that hold up the awning and they are attached by pre-made holes in the awning.  To make it fit 16 studs wide, I had to reposition the awning arms and then used a hole punch to put new holes to where the arms attached.

The tiled roof overhangs were originally only 2 studs deep on both the first and second floor. I expanded the roof tiles to be six studs deep.

The vertical sign was moved from the right side of the building to the left.

The entrance to the shop was relocated as was some of the signage.

After losing the one red crab that came with the set, I had to buy some replacement crabs and lobsters from Aliexpress.  That resulted in crab shop expanding its offerings to lobsters and fish as well, hence the new improved seafood setup in front of the shop.  

From the side, you can see that the building's proportions, extending all the way back to use up most of the 16x32 baseplate, which was converted to the MILS system.  To construct the shop building walls, I used a hodge-podge of bricks from various not Lego brands.  Definitely no colour consistency here!  

The first floor side wall can be popped off for picture taking, and the second floor can be removed entirely from the first floor.  The roof also comes off.

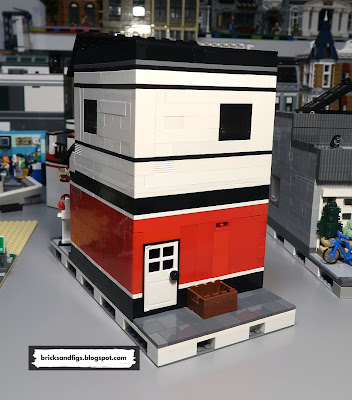
The rear of the building is rather plain looking, with only a door for deliveries and an empty crate to be returned to the seafood wholesaler.  I decided to make all the second floor windows asymmetrical, just because.

More unmatched brick colours, yuck!  The white patch of bricks is the background for one of the fish tanks inside.  Those black squares are actually dark tinted windows, courtesy of some set from Sluban.  The crab shop can be displayed either as a standalone building or part of a row of Japanese themed shops.


Before we tour the interior, I just want to say, this awesome crab is purely the reason why I was drawn to this set.  It reminds me of the actually crab restaurants that can be found in Osaka, Japan.  I had to extend the vertical sign out further from the building to make it more visible.  All of the Sembo stickers that came the set are bit too oversized for my liking.


Ok, here we are inside the shop, looking out.  As you can see we have the shop owner displaying his fresh seafood to anyone who will notice.  He's one of the original minifigures that came with the set and he even has a crab on the back of his uniform, which I didn't notice until just now, lol.

I built this giant tank of seafood for the storefront.  At the end of the day, you can actually slide the front door closed.  I borrowed that idea from the Cada Coffee shop.


As you come into the store you are greeted by a large fish tank on the wall and more crates of crabs and lobsters.  The main floor of the shop is divided into two areas. The front of the shop is where you can buy seafood to go, but also if you want to dine in, there is a kitchen in the back, where they will prepare the seafood how you like it.


The kitchen is comprised of an oversized sink to rinse off the seafood before cooking, a counter with various ingredients, a four burner stove, some kitchen pots and pans and a couple of steamers.  I managed to squeeze in some extra storage above the counter.

The original Sembo set provided a small second floor but no stairs to access it.  That's been resolved in my modifications.  More room for crates and stuff under the stairs plus access out to the back.


The fabric curtain that hangs in the archway is called a noren and it came with the Sembo set.  I've just moved it inside from its original location.


Coming up the stairs to the second floor, we find the dining room.  There's three tables with an entire seating capacity of ten customers.  


This restaurant has the traditional raised platform where you dine, sitting on the black cushions which are on the floor.

This picture was taken before I decided to add another window into building.  Oh, here's that beer that we ordered, Kanpai!   There were two other minifigures that came with the Sembo set, but I've repurposed them elsewhere, I think.  All of the figures shown here are from my own collection.


Here's the shop pictured with all of my Cada Japanese themed buildings.  Please check out my reviews for those if you haven't already.

Well, that concludes our tour of the modified Sembo Crab Shop.  If you want to buy the original Sembo crab shop, you can find it on Aliexpress by clicking the picture below or searching for the term Japanese Streetview.  Thanks for looking and see you in my next post! Bye!
Thursday, June 9, 2022

Cada C66006 Steamed Bun Shop Set Review (not Lego)

Hello brick fans and welcome back to bricksandfigs.blogspot.com, my little space on the web where I review Lego and non Lego brick sets, mini figures and share pictures of my MOC builds.

Today, I'll be reviewing the Cada C66006 Steamed Bun Shop.  The Japanese style building is a design of Tong Xin Jun (ExeSandbox).  It's a small two storey building, and is comprised of 1108 pieces.  The set comes with an instruction manual, a sticker sheet, a brick separator and a USB powered light string.  Please note, that this set does not include any minifigures, however I have included one of my own minifigures for display purposes.


Thanks so much to AFOBRICK.com for providing this set for me to review!  Details on how you can get this set from them at the end of this post.


The Cada bun shop was well wrapped and it arrived in great condition.  Thanks AFOBRICK!

Here's everything I got in this set, in addition to the instruction manual.  There are 7 bags of parts for Step 1, and another 7 bags of parts for Step 2.  There's a few other bags of additional parts.


The instructions were adequate, but I sometimes found it hard to differentiate between clear and light gray pieces, and the same for dark brown vs. black pieces. Below are a few pics that I took during the build process.


People were asking if the Cada Bun Shop was minifigure scale, so I took a few pics during the build and posted them in my earlier blog post which you can find here

Buns for sale at the counter.  Just want to point out that brick quality and clutch is excellent.  You really can't tell that you aren't building with Lego bricks.

Makings of the vending machine.  I haven't put on the stickers yet for the little bottles inside the vending machine.

Here's the completed storefront.   Actually, it's more like a stall with the seating in front.   One of the changes I would make is to put the building on a full 16x32 stud baseplate, and then set the building back a few more studs, so that the accessories like the sign and the pipe don't impede either the patrons seating at the counter or pedestrians who might be walking past.

Although I can't read what all the signage is about, they give a very authentic feel to the Japanese bun shop.  The stickers were not too hard to apply.

Here's the backside of the shop. The stairs to the second floor are pretty steep.  On the second floor, is space for a cabinet, a desk and stool, with ladder access to the sleeping loft (bedding not shown).  On the wall is an air conditioner unit.  

By adding the back wall, the shop has a much more completed look.  The electrical pole, the ducting, the wall mounted ventilation unit, all add to the cool details of this building.   The designer did a great job here, I must admit.  With a deeper baseplate, one could even add a few extra trash bins or some boxes.  That's something I might do in the future to modify the bun shop.

The rear wall of the bun shop is hinged so that you can access the interior, however unlike other modular buildings, you can't separate the first and second floors from each other.


Check out the finished model.  The first thing that catches my eyes are the wooden slats over the windows, so cool.  Then there's the foliage growing near the roof.  The plastic piping needs to flex a little more, right now it pushes on  the electric pole so that it doesn't quite stay upright.  There's even a small light that extends off the electric pole.

With the drink vending machine built into the side of the bun shop, it doesn't take up too much room.  I like the awning over the vending machine too. 

With the provided USB powered LED light, you can make the interior glow!  Looks awesome, doesn't it?  The manual instructs you to weave the LED light wire all through the shop during the building process, but I just shoved the lighting in as an afterthought and it still looks great.  

Please note that I have used my own battery pack which has a USB port to which I can attach the light.  That's not provided with the set, but it would have been nice if Cada had included one.

The bun shop looks amazing all lit up.

Here's how I fed the LED light wire into the back.  You can see the battery pack to which I attached the USB plug and switch into.  Cool, right?

I forgot to mention that there's a skylight on the roof of the building.

So to wrap up, here are some of the extra pieces that I had left over.  I might not have added everything as per the instructions because sometimes I gloss over things.  But it didn't affect the final result.

The furniture that I built but didn't put into the second floor includes a desk with computer monitor and tower, a small stool, a futon bed and a small nightstand with light and potted plant. 

For my rating I give this building 5 out of 5 stars, despite the stickers and the smaller base plate.  Once built, the bun shop just looks amazing and even more so with the LED lighting that comes with the set.  To improve this set, I would use a larger base plate and add one or two minifigures, like a shopkeeper and a customer.


This was my first time building a Cada brand set and I thought that the quality and clutch of the bricks was first rate.  I would love to build more Cada buildings in the future and have them added to my modular building collection.


For those who are interested in acquiring the Cada C66006 Steamed Bun Shop, you can find it at AFOBRICK.com.  They are a newer seller of Lego compatible brick sets.  Feel free to check them out, if you like.   Click on the picture below to take you to Cada bun shop on the AFOBRICK website.

For a limited time only, get a further discount by using code ITSNOTLEGO at checkout for extra savings.  Don't know how long the discount code will last.

Also on Aliexpress, find it using the term Japanese Streetview.


Thanks for sticking to the end of this long post.  Hope you enjoyed all the pictures and the review of the Cada C66006 Steamed Bun Shop.  Let me know how I can improve my content or what not in the comments below.   See ya!


Tuesday, March 7, 2023

My Custom Not Lego Initial D Fujiwara Tofu Shop (using the Cada C61033W building block set)


Good day brick fans!  Today's blog post goes out to all you Initial D manga and anime fans.  I hope you like my highly modified Japanese themed Fujiwara Tofu not Lego shop that I made  from the Cada C61033W scenic diorama set

Cada recently held a contest on their Facebook page and I won the gift pack which includes both the Tofu shop facade and the Initial D C55018W Toyota Trueno AE86 car.  I made some changes to the AE86 which I reviewed in my blog post:


*If you are thinking about buying anything off the Cada website, check out my discount code at the end of this post.

In this blog post, I will review the process of transforming the Tofu shop small diorama scene into a complete modular building. However, I must note that Cada offers a Lego style modular version of the Fujiwara Tofu shop (set number C61031W) that I highly recommend purchasing to save significant time and effort. This set includes 1908 pieces and features a complete interior on both floors, which my own creation currently lacks.

This is what I started with, the Cada C61033W set.

My decision to build the modular Tofu shop from scratch was based on the fact that I already possessed the building's front portion. With this in mind, I wanted to test if I could fashion the rest of the building using my collection of non-Lego bricks. 


To construct my own modular building, I first had to decrease the width of the front facade from its original 20 studs to 16 studs. Then, I had to locate all the necessary bricks for the side walls, back wall, floors, and roof, as well as acquire windows, railings, sidewalk tiles, and other accessories for the building's exterior.

While I managed to retain the front windows and doors, I had to downsize the awning. The Tofu shop's name, which is displayed on the awning, is a large sticker that spans the entire width of the shop. I have not yet affixed the sticker as I am trying to determine the best way to do so while achieving a pleasing Japanese themed aesthetic result. 

From the above picture, you can see the entire length of the newly modified Tofu shop.  The box-like roof structure has been extended further back and a new sloped roof has been added to replicate what I've seen in pictures.

I added two sets of windows on the second floor and two smaller windows at the rear of the main floor, one on the side wall and one on the rear wall.

I included three portable wall mounted A/C units, which the original tofu shop doesn't have.  Don't mind the shitty bricks that form the roof back wall, I ran out of bricks.  :(

More windows here too.

This is one of the plainer wall surfaces.  Luckily, I have all these beige masonry bricks to serve as accents on the otherwise plain walls.


Coming around the front again, I stole the utility pole from the Cada Japanese Bun shop which looks a lot nicer than the one that comes with Cada's full modular version of the Tofu shop.  Wires from the utility pole attach directly to the shop.

The tree is one I borrowed from the Funwhole Wood Cabin set.  I was going to make a tree but this one looked pretty good, so maybe I will copy it again one day to replace the Funwhole tree.

The back fence is my own creation, which I copied from the rooftop box structure. 

My modified AE86 sits on the attached parking pad.  I also added some extra bins and boards to my setup.


These minifigures are supposed to represent Takumi Fujiwara and his dad Bunta Fujiwara.  What do you think, yes or no?

Here's a drone shot from above the shop.  Oh wait, drones hadn't been invented yet back in 1998!

Let me know if I should make interiors for both floors of the Tofu shop.  Right now, there's nothing inside.


All three of the Initial D sets are available for purchase on the Cada website. Use my coupon code ITSNOTLEGO to save 5% at checkout.


Initial D Fujiwara Tofu Shop Modular Building C61031W

Well, that's all for now.  Please let me know in the comments what you think of my version of the Lego compatible Fujiwara Tofu shop.  Did I miss anything important that needs to be added or changed?

Thanks for looking!  Bye!