Showing posts with label sembo 601065-601068 japanese shops. Show all posts

Saturday, March 25, 2023

My Custom Not Lego Japanese Machiya House


Hello brick fans!  I recently made a Japanese style Machiya style house made from not Lego.  It's a continuation of my Japanese building series that I've been obsessed with lately.  

It started with the Japanese Crab/Seafood restaurant, followed by my custom Fujiwara Tofu shop.  Also in my collection are the trio of Cada brand Japanese shops designed by exesandbox.

You can find all my reviews for those buildings by the using the term "japanese style" in the search box of my blog.

The machiya house sits on a raised 16x32 stud baseplate and is two storeys tall.
In case you're not familiar with Japanese architecture, a machiya is a traditional townhouse with a narrow frontage, with earthen walls and baked tile roofs.

The front of the machiya traditionally served as a retail space with sliding or rolling shutters that could be opened to display goods and wares.  See the wikipedia entry for machiya if you'd like to learn more about this topic.

I looked at a lot of pictures of Japanese shops and machiyas so I tried to replicate some of the key design elements for my modular building.

I chose natural earth tones such as gray and brown for the machiya.  The black accents and highlights gives the building a modern vibe.  There is a takoyaki shop on the main floor.  I plan to add a kitchen and for the second floor, living quarters later on.  


I'll provide more details about the takoyaki shop a bit later.

Just like the inside, the rear of the building is still a work in progress.  I'm thinking about relocating the back door to the right hand side to put it under the stairs.


I might also refine the roof structure a bit, but it's sturdy enough and provides a decent looking slope, so I dunno, maybe, maybe not.

In modular form, the rooftop, second floor and first floor are easily accessible.  I have installed a staircase to the second floor but as mentioned earlier the interior is empty at the moment.

Here is the Takoyaki shop.  The front door has a very contemporary look with the wooden slats.  It provides access to the inside of the shop and also to the second floor via the stairs.  I put a small planter and a frog statue on either side of the doorway.  The fabric banner attaches to the underside of the awning.

In lieu of regular windows like in all of my other modular buildings, I used a rollup garage door for the front of the shop.

I bought the roll-up doors from Aliexpress.  They come with all the hinged door panels as well as the tracks on either side so that they can be opened or closed.

If I ever finish the interior, I'll put some minifigures behind the shop counter.   When the shop is closed the takoyaki would be moved inside.  There's room on the counter to  install a display case.

Most of the signage is stickers with the exception of the fabric banner and they all come from the small Sembo Takoyaki stall building set 601065 that I bought back in March 2020.  Even the takoyaki are stickers.

I took the set apart a couple of years ago, but luckily I still had the banner and stickers.  Here's my original Sembo Takoyaki set review.

I replicated the upper window design from the Fujiwara tofu shop but put blinds in the windows instead of glass.  The wooden slats on the right side of the second floor serve to protect the fan/ventilation unit.  I wanted to keep the sidewalk more open so I put the takoyaki sign on the wall of the second floor.

Here's the new machiya building next to the Fujiwara tofu shop on my ever growing Japanese street.


Let me know what you think of my latest creation, thanks for looking!  Bye!
Saturday, April 4, 2020

Honey, I Shrunk the Sembo Japanese Shops (Not Lego)!

I modded my Sembo shops!


Hi brick fans, thanks for dropping by!  In case you are new here, my blog BricksandFigs is about reviews of not Lego minifigure I find on Aliexpress and showcasing my custom brick builds or as sometimes referred to, MOCs.

In today's post, I will show you the three changes I made to the recently acquired Japanese shop sets made by Sembo brand.   For my initial build pics of these shops you can find that post here.   Ok, let's go!

Change #1 - Adding a roof to the sushi shop


In this before picture of the sushi shop, you can see it has no roof, whereas all the other three shops do have roofs.  To be consistent, I wanted to add a roof to the sushi shop.  The easiest way to do this is to put another post on the right side and then attach a cross beam across the top.  This will then provide support for a new roof plate covering the entire shop.

Change #2 - Adjust the counter heights

Sembo made the shops bigger, so you can appreciate all the little details but one thing I noticed is that they are slightly bigger than minifigure scale.

 In the case of this before picture of the takoyaki shop, you can see that the counter height is nearly the height of the girl minifigure.  If that was in real life, the counter height could be close to 5 feet tall.

 The counter height of the ramen shop is ok, until you realize those ramen bowls will probably be too high to eat out of, while sitting on the stools.  This is also a before picture.

Lastly, the shaved ice shop is also way too high.  There's no way the girl minifigure is going to reach the kakigori without her wearing it in the before picture.

 On most of the shops the counter is 3 studs high, so I'm going to reduce it to 2 studs if possible.  This should make the shops more minifigure friendly.

 Change #3 - Adjust the shop widths


All of the shops presently sit on a 16x8 stud plate, so when you display two of the sets besides each other they take up 32 studs, which is the size that is occupied by a normal modular building.   This would be fine, except I want to add in sidewalks to make the appearance consistent with my other modular buildings. Pictured above is how the shops looked before I modified their widths.

My sidewalks are about 8 studs deep.  If I subtract 8 studs from 32, I get 24 studs remaining.  So the challenge is to get 2 shops side by side within 24 studs.

The results


Here are the Japanese themed Sembo shops with all the changes applied.


The sushi shop underwent the most changes, but I still couldn't get the counter height as low as I wanted.  I was able to add the roof and move the signage to the front.  The width was significantly reduced from 3 seats to only 2 seats.  The ramen shop counter height was reduced and the shop width was only slightly decreased.  The red lantern of the ramen shop was shifted from the side to the front.

Here's how the shops look around back.


Here's the newly modified Takoyaki shop and shaved ice shop.  As you can see, the counters are much more accessible.  The biggest challenge on these two shops was preserving the fabric banners.  They take up a lot of room, so there's a bit of overhang.  The red lantern on the takoyaki shop was also moved from side to front.

Here's the rear of the two aforementioned shops.

For most people, they would probably stop here, having accomplished the ambitious challenges, but I decided to go one step further and placed the shops on 16x32 baseplates complete with sidewalks and a brick wall.

 Some WIP pictures


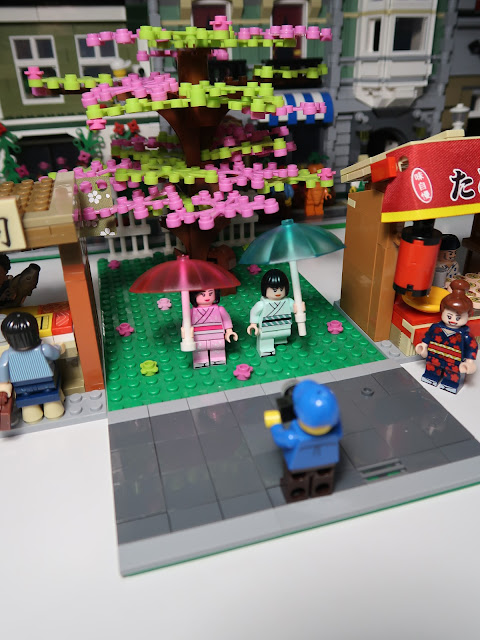
I really wanted that Asian feel, so I completed the display with a large cherry tree placed in a central courtyard.

The entire display is comprised of 3 16x32 baseplates, two for the shops and one for the parkette/courtyard.

I don't have the baseplates permanently attached, because sometimes I'll want to display it this way.


Well, that's it!  I hope you enjoyed looking at how I modified my Sembo shops and made a display for them.   Please note that you cannot simply take the shops as they are and downsize them.  I had to pull a lot of bricks from my brick stash and basically re-design and re-construct each shop from scratch.