Sunday, December 29, 2024
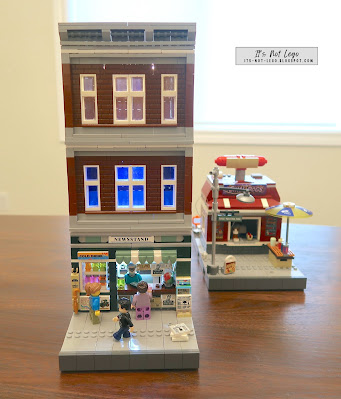
Welcome to my custom Lumibricks/FunWhole Newsstand Modular Building
I made another Lego compatible modular building and I call it the Newsstand Modular. On the ground floor, I used the FunWhole Newsstand set F9023 and the top two floors are modelled after the design of the FunWhole Record store F9058.
You can get both of the FunWhole sets here: https://www.funwhole.com/?ref=tN9EBQmQ
I mounted a crossbeam over the interior to attach a ceiling mounted light fixture.
Here's the Newsstand modular building next to my other custom FunWhole set, the Chili Dog Stand.
I retained as much of the original FunWhole Newsstand as I could but I had to sacrifice the ornate parisian style roof design in order to convert it into a multi-level building. You can find my review of the original Newsstand set here: https://bricktoyreviews.blogspot.com/2023/11/i-got-to-preview-new-lego-compatible.html
I sourced the coffee brown bricks from Aliexpress to make the upper floors.
For visual interest, I added some masonry bricks, also from Aliexpress, around the windows.
Each of the floors and the roof can be removed if desired. I used random third party lighting elements to light up the interiors of each floor, however the top two floors have yet to be furnished (future project).
I've misplaced the original FunWhole minifigure, I probably used him in another set, so I just grabbed this older Stan Lee lookalike to takeover the Newsstand.
Being a FunWhole inspired set, I should at least include one Funwhole minifigure in my pictures.
A stack of newspapers sits on the curb. Can you find the easter egg?
I'm just using plain old lighting wires for each of the floors. I wish I had some of those nice wireless contact pads that FunWhole uses in all their newer sets.
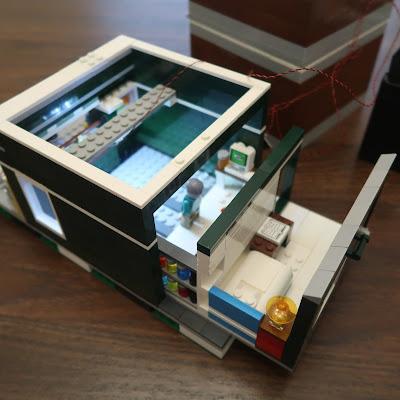
At the rear of the building, it's quite plain, with only a door and window, but there is a surprise.
Yup, I took a page out of the FunWhole Record Store design and turned the interior into a sliding compartment.
So you can view the interior from above and if you want a closer look, you can pull it right out. In this custom interior of the newsstand, I've added a computer workstation with mouse keyboard and seat. On the wall I have some other newsworthy items. There's also a table with a chili dog! and tunes from a sound system.
There are sliders on the floor to allow easy insertion of the interior tray.
A few more random shots.
Simply insert the tray back into the building.
I added an extra drink stand on the side, it will get lit up by the interior lights and will be visible through the side window.
More easter eggs! There's enough room to squeeze a bed and night table behind the newsstand.
Saturday, December 28, 2024
How to make a Raised Baseplate (MILS) for the Lumibricks/FunWhole Record Store
Hi brick fans,
Now that we have laid the perimeter of the main building, picture #5 shows you the size of the plates needed to support the swing-away part of the building. This portion should measure 8 studs wide by 23 studs long. It's best if you have larger plates to use to provide better structural integrity and stability. If you can find pieces of the same colour, it would be best as this part will be exposed when it is swung away from the main building.
In picture #7, I've placed some smooth tiles down just to demarcate where the front sidewalk will be placed. Recall I have offset the building backwards by two studs, so you will need additional smooth tiles to fill in the empty sidewalk space that results from the shift.
After I posted my review of the new FunWhole Record store, I've had a number of requests across my different social media platforms, inquiring on how to construct the record store on a raised baseplate (some refer to this as a MILS baseplate).
I'm assuming you are here because you already know what MILS baseplates are and how to make them. If not here's a link that describes the MILS system: https://www.abellon.net/MILS/.
The foundation baseplate I'm using is not technically MILS, which is why I refer to mine as simply a raised baseplate. Too see how I make my specific type of baseplate, see my blog post here: https://bricksandfigs.blogspot.com/2024/08/how-i-make-raised-baseplates-for-my.html
Caveats
Before we begin, the techniques used here are of easy to medium difficulty, but you need to have the right parts in your extra brick stash to effect the necessary changes. You cannot make the desired changes with only the parts that come with the FunWhole set.
Next, make sure that you carefully review the instruction manual book 1 , pages 10 through 29 to understand how your raised baseplate changes affect the main structure. Review pages 29 thru 38 to understand how the raised baseplate changes impact the swing away portion of the record store. The remainder of the FunWhole instructions should be followed as normal after page 37.
Lastly, I want to point out that my customisations to the Record Shop are not endorsed nor authorised by FunWhole, so please don't reach out to them if you run into difficulties regarding the raised baseplate and resulting impacts to the structures. Just hit me up on my social media, and I'll try my best to help you.
Alright, let's get started!
Step 1
You will need to provide a combination of studded and smooth plates to place the FunWhole Record store onto.
I will be placing the Record store on a standard 32x32 baseplate. In this first picture, I'm laying out the studded plates and smooth plates into the required configuration. Know that the smooth plate area encompasses 10 studs wide by 23 studs long. You can choose whatever sizes of studded plates and smooth plates you have and the colour of the plates doesn't matter either. Just make sure that whatever you use, the plates are fully supported underneath by the center layer of bricks.
In picture #2, this is how the baseplate area should look like. Again you can use whatever size plates you have but make sure you have covered the smooth and studded areas precisely as I have done in the picture.
Before we move on to picture #3, I need to explain what we are doing. We are raising the record shop higher by the height of 1 plate. This is because the swing away part of the building needs to placed on it's own baseplate, so it will be one plate higher. We are adjusting the static part of the building just to make sure both parts of the building (swinging and non-swinging) are level.
In picture #3, I'm laying out the perimeter of where the main part of the record store will sit. I'm planning on having more sidewalk area in front of the shop, hence, the store will only sit 2 studs from the back edge of the baseplate. The length of the individual pieces you use doesn't matter as long as you match the layout shown in the picture. Use whatever colour pieces you have on hand. There should be 5 studs width of sidewalk on the righthand side of the record store, which is as per the original instructions.
The front of the Record store has two protrusions, one is for the window display and the other is for the supporting pillar. Picture #4 shows the extra pieces you need to accommodate for the protrusions. I'm deliberately using contrasting colours of plates to make it easier for you to get an idea of the layout.
Now that we have laid the perimeter of the main building, picture #5 shows you the size of the plates needed to support the swing-away part of the building. This portion should measure 8 studs wide by 23 studs long. It's best if you have larger plates to use to provide better structural integrity and stability. If you can find pieces of the same colour, it would be best as this part will be exposed when it is swung away from the main building.
In picture #6, I'm demonstrating how the swing portion will come away from the main structure, once you follow the normal steps to build the Record shop.
In picture #7, I've placed some smooth tiles down just to demarcate where the front sidewalk will be placed. Recall I have offset the building backwards by two studs, so you will need additional smooth tiles to fill in the empty sidewalk space that results from the shift.
Other key items to note as a result of the changes:
1. the height of the front steps may need to be adjusted if desired (page 26).
2. I relocated the DJ turntables from the back of the building to the front, you may want to do same.
Tuesday, December 3, 2024
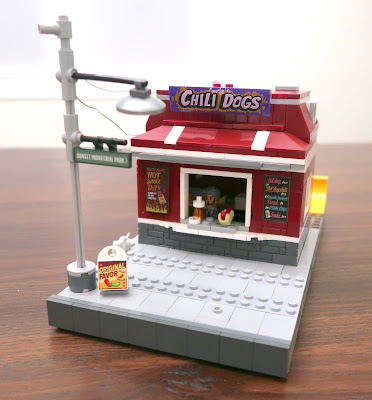
My Custom Lumibricks/FunWhole Chili Dog Stand
Hey brick fans!
I posted my custom FunWhole Chili Dog stand on the FunWhole Facebook group page and it got a great response, thank you! Some of the members asked if I had instructions for the Chili Dog stand, but unfortunately I have no skill in using the software that makes the instructions.
Instead, I'll just try to post as many pictures as needed so that people can get a detailed look at the setup and hopefully can copy some of the techniques and ideas I used to create the Chili Dog stand from the original FunWhole Chili Dog trailer set. Here's the review of the original set: https://its-not-lego.blogspot.com/2024/11/the-funwhole-free-gift-chili-dog.html in case you missed it.
So let's get right into it!
There were of a number of issues that I wanted to address with the original set. The first was that I didn't really like the umbrella and chain that were clipped to the front. I discarded the chain and thought that the umbrella would look better stand-alone.
So the first thing I did was to remove the base and wheels of the trailer. Converting the trailer to stand/building meant that it needed a foundation, so first I needed to put it on a baseplate, opting for a 16x32 footprint. In order to display minifigures with the stand, I wanted enough space in the front to accommodate not only them but also for the condiment table.
I set the stand back approximately 11 studs from the front edge. Oh BTW, my standard for any new modular buildings that go into my not Lego city means they must all sit on a raised baseplate. If you want to know more about how I make them, here's the link to that little tutorial: https://bricksandfigs.blogspot.com/2024/08/how-i-make-raised-baseplates-for-my.html
After placing the stand I decided to make it 14 studs wide, allowing for 1 stud for spacing on either side.
As you can see the original window design has been retained, as well as the signage. I reversed the location of the two signboards, putting the smaller one on the right side. The larger sign originally hung off the side of the trailer, but I wanted to incorporate it onto the building to balance out the signs. It's attached using a snot (studs not on top) brick.
I used a 1 brick height band of white around the top just to break up all of the burgundy red.
The trailer door and the big printed sign that says Sizzle On! Breads was also transferred from the Chili Dog trailer to the stand. Note that the spotlight, which was originally located on the front of the trailer has now moved to the back of the stand, to light up the rear entrance.
One could probably use all of the spare white tiles that come with the trailer to cover the roof. I opted to go with burgundy tiles, while using the printed 4x4 piece from the set for the roof. Vent details were also kept, except for the small skylight. The ladder has been mounted on the rear of the building to provide roof access.
The roof comes off as one unit to provide access to the interior. I tried to keep most of the trailer's interior details as well, such as the sink, counter, grill and cooktop hood. I might add some extra stuff later like a cooler for drinks, which I could place by the unoccupied space of one of the windows.
You'll notice I placed some skateboard ramps to the back. I wanted to carry over some of the details from the FunWhole Skate shop which is the second set in the Street Fusion series (the Chili Dog trailer being the first). I hope to have a review of the FunWhole Skate shop out soon!
The Chili Dog trailer set comes with three key lighting elements. The street lamp, the spotlight and the interior light. As per my review of the Chili Dog trailer set, the street lamp is a separate display accessory that includes a signboard, a trashcan and a rat. One of the lighting components used is a wireless light adapter.
The streetlamp wire feeds into the building. Interior lighting stays pretty much the same, and you can see the wiring for the spotlight. There's just enough length that I can reach the back, but not enough that I could run it against the interior wall. As mentioned previously, the wireless adapter is fitted into the building. The USB plug leads runs back out the side.
Here's that side view again paying particular attention to the wiring.
This picture shows the underside of the roof.
The Chili Dog sign is attached via a snot brick replacing the silver pipe attachment from the trailer (but you could still incorporate it back into your own building).
Since the original colour of the trailer was burgundy red, I decided to retain the colour scheme, however my selection of extra burgundy bricks was limited, so I knew I couldn't make the chili dog stand extra deep nor put another level on top. What I did have was a lot of sloped bricks, so that's how the roof design came about. If you want to create your own, you could simply just do a square and flat roof and that would do nicely as well. If I didn't have the burgundy bricks, I might have used light gray or white bricks for the building walls instead.
Here's the profile of the Chili Dog stand. I created an overhang just to give it some detail in the front. I've incorporated the A/C unit from the trailer set and placed it into the roofline. The white windows were reused on both sides of the building, but only one has glazing in it.
You'll notice I placed some skateboard ramps to the back. I wanted to carry over some of the details from the FunWhole Skate shop which is the second set in the Street Fusion series (the Chili Dog trailer being the first). I hope to have a review of the FunWhole Skate shop out soon!
Now that we've examined the structure, let's talk about the lighting.
Initially I had the adapter at ground level just like the original display, but I found the wiring distracting, so I later moved it and incorporated it into the building structure instead. The streetlamp is now part of the baseplate, as well as the little signboard that reads "Original Favor". The trashcan as shown earlier is now placed at the back of the building.
What I discarded from the original trailer set: The propane tank, the ghetto blaster, the wheels, the chain, trailer hitch and the HotDog and lightning bolt wording.
I hope the pictures will help you and inspire you to create your very own Chili Dog stand if that's what your goal is. Was there anything I missed? Let me know in the comments! Enjoy the build!
And in case you weren't aware, the new version of the FunWhole Chili Dog Trailer has been released:
Thanks for looking, bye for now!
Subscribe to:
Comments (Atom)


