Saturday, February 4, 2023

Review of the Cada Japanese Tea Shop C66010 Building block Set (not Lego)


Hello brick fans!  Welcome to the Cada C66010 Japanese Tea Shop!  That's the set we are reviewing today.  It's the third in a series of Japanese style buildings designed by Tong Xin Jun aka ExeSandBox.  The other two buildings in the series are:

Cada C66006 Japanese Steamed Bun Shop 

Cada C66007 Japanese Coffee Shop

If you loved those little buildings, you are most certainly going to want to include the Japanese Tea Shop to your collection.  The shop has 1200 pieces with full interiors within the two floors of the building.  

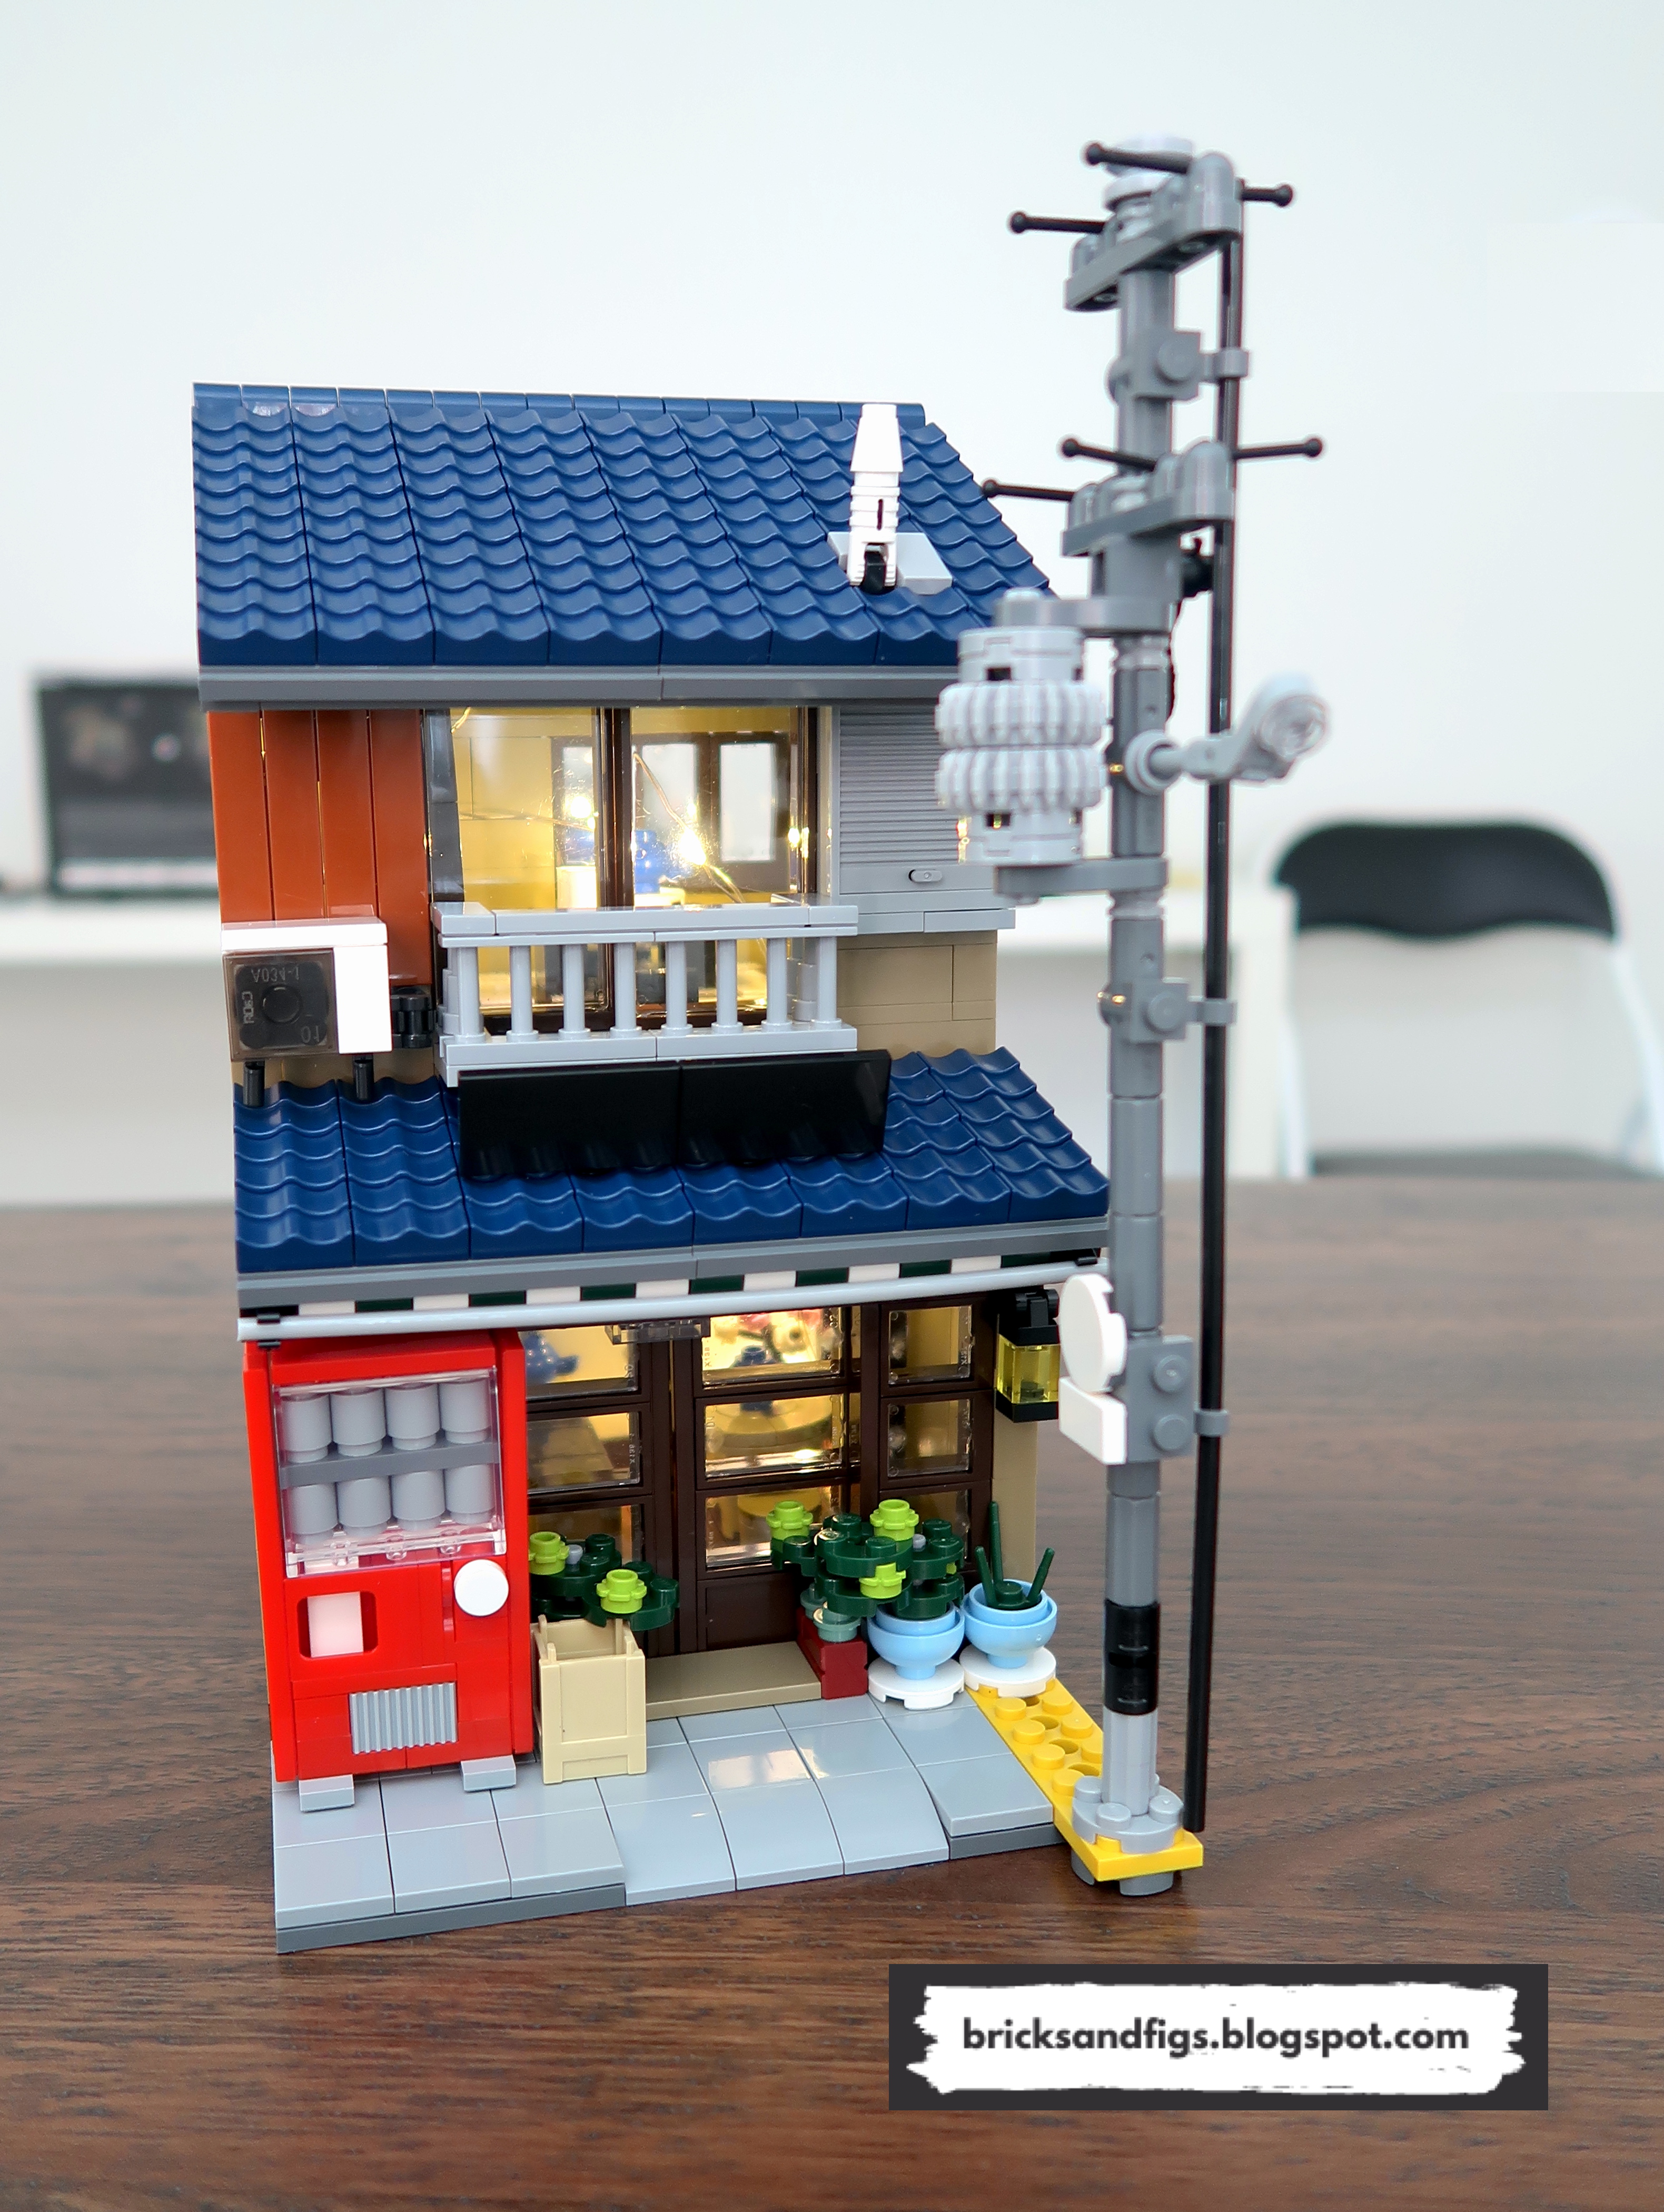
The exterior looks like a very authentic Japanese shop, complete with vending machine and little bonsai plants on the shop's doorstep.  There is a large utility pole right outside with transformer and street lamp.

Around back, one can view the interior of the shop by ingeniously sliding the whole back wall.  We will look at all of the interior details below.

Where to get it


Afobrick.com has all three of the Japanese inspired buildings on their website.  They have kindly provided today's set for me to review.


Feel free to check out their store, they have over 700 competitively priced building block sets, available in all sorts of themes. Free worldwide shipping for most orders.  Please use my discount code itsnotlego to save a further 5% off their already low prices.

The Set Details

  • Brand: Cada
  • Set: C66010 Japanese Tea Shop, designer: Tong Xin Jun
  • Piece count: 1200pcs
  • Numbered bags? Yes
  • Stickers or printed parts? Stickers
  • Missing or deformed pieces: No
  • Extra parts: Yes
  • Minifigures: No
  • Lighting kit: included
  • Brick Quality and Clutch: Excellent
  • Measurements (approx): 
  • Age Rating: ?+


Unboxing


The Cada Japanese Tea Shop arrived in a brown cardboard box from Afobrick.com. Inside were several bags of building blocks, two sticker sheets and two instruction booklets.  There are 57 pages on the first booklet and 115 pages on the second booklet.  I wonder why Cada just didn't print one booklet instead of two?  Same with the sticker sheets. They are small enough that they could have simply used one larger sheet of stickers.

Here's a closer look at the stickers, some with Japanese wording and the majority of them are for the canned drinks inside the vending machine.

Here's the breakdown of the bags for parts corresponding to each step of the build.

Step A consists of 6 bags
Step B consists of 6 bags
Step C consists of 5 bags

Also included are three individually wrapped transparent window pieces, a bag containing special parts for the utility pole, a bag containing the LED light string, and an assortment of baseplates.


The instruction manuals are well printed and easy to follow.  The last few pages of the second instruction manual features a complete visual parts list just like Lego manuals.


As you can see the building process has three different steps.  Step A builds the foundation and first floor of the tea shop.  Step B adds the second floor and sliding rear wall, and Step C builds the roof, and remaining accessories.  Let's dive in now!

Building Step A


The baseplate is 16 studs wide but shorter than the standard 32 stud depth of other Lego modular buildings.

Flipping it over, we see the structure of the base.  I would have much preferred that the tea shop was built on a regular 16x32 stud baseplate.  It would add so more space in the front and back of the shop.

I really like how storage was incorporated into the bottom of the staircase.  I need to do this more in my other MOC buildings.  The tea is stored in several containers and shelf drawers and fronted by a long counter.  For tea tasting there's a round table with two stools.


The front doors to the tea shop can be conveniently opened and closed by sliding each one.

Front awning installed.

You get one long LED light strip with USB plug included with the set.  You simply thread the wires around the interior of the building's first and second floor.  I used a battery pack from one of my Funwhole branded building sets to provide power for the lighting.

Building Step B


Here you can see that step B  completes the interior of the second floor.  It looks to be a tea tasting room that has a raised floor with tatami mats.  A low table and seats adron the room.  The lighting is a bit of a mess but it's been installed in the second floor.


On the front of the second floor, there is an air conditioner mounted next to the balcony.  On the other side of the balcony is some kind of utility box. It opens but there's nothing inside.  One can access the balcony from the inside via the sliding door.

The instructions for building the rear wall are split between the first and second instruction manuals.  It slides open as we will see later.  It's interesting how the designer uses the ladder piece for the rear window grill.

Building Step C

The roof is attached to the building through a series of clips.

With the roof attached, we test out how well the rear wall slides.  Pretty smooth!


The vending machine and utility pole really enhance the look of the set.  The dark blue roof tiles provide a nice contrast to the tan bricks walls.

I'm not sure why there is a rear notch in the baseplate.  I ended up removing the piece when I rebuilt the base.

Here are some of the leftover/extra pieces afterwards.


I think the Cada Japanese Tea shop is a very nice model.  Fit and finish of the bricks was excellent.  Too bad it doesn't come with any minifigures though.  I've added a few of my own for display purposes.  That little pink bike isn't included either, sorry!

The lights don't seem quite as bright as my other Cada sets, maybe my batteries are low in juice?

I'll probably see if I can replace the lighting with some from Lightailing/Briksmax in future.


Here is the Cada Japanese Tea shop pictured with the other two Japanese shops. They certainly make a nice little street scene altogether.

Also on Aliexpress, find it using the term Japanese Streetview.

I had a great time building this set, and it took me less than a day.  The only improvement to the set would be using a standard 16x32 baseplate, oh and add some minifigures!  I'm going to give this set 4.8 out of 5.  The look and the price of the Japanese Tea shop really beats out any similarly priced Lego set.  Highly recommend!

Thanks for looking, bye for now!

Saturday, January 28, 2023

Review of the JMBricklayer Medieval Observation Tower 30105

Intro

Today I'll be reviewing the Medieval themed JMBricklayer Observation Tower building block set.  It is a Lego compatible building block set which has over three thousand pieces.  

This will be my second medieval themed set as I also have the JMBricklayer Ancient 3-in-1 Weapon which I reviewed not too long ago. You can find that review here.  In fact, JMBricklayer has eight different medieval themed sets for you to choose from on their website. Please go and check them out if you get a chance.


Huge thanks go out to JMBricklayer.com for providing this set to me for my review! 

The Details

  • Brand: JMBricklayer
  • Set Name and Number: Medieval Town Observation Tower 30105
  • Number of Pieces: 3061+
  • Numbered bags: Yes
  • Minifigures: No
  • Missing or deformed pieces: No
  • Extra pieces: Yes
  • Stickers or Printed parts: Printed
  • Age Rating: 14+


Where to get it


Here's a screenshot of the Medieval Observation Tower set from the JMBricklayer website store with the current pricing in USD of $119.  That's an excellent price for so such a large set.  They offer fast and free worldwide shipping and provide replacement parts for missing or damaged pieces.  You can contact them either through their online store or their Facebook page for queries or support.

Save 15% on all your purchases from the JMBricklayer store by using code ITSNOTLEGO15%!


Unboxing


JMBricklayer were very kind to send me the large boxed set depicting the Medieval tower on a matte black background.  As the box indicates, the set is rated for ages 14+  and has 3061 pieces.

Inside the box of the JMBricklayer Medieval Observation Tower set, we find the instruction manual and several numbered bags of parts.  The numbering of the parts bags corresponds to each section of the build and in this case there are 5 different sections.

The JMBricklayer model 30105 looks to be a rebrand of the Urge Medieval Guard Tower set based on the set number on the manual and the parts bags which say 50106.  If you search brick4.com for set 50106, it will say that the observation tower set is from Mork, not Urge.  All quite confusing.

Here are the five different sections of the build as outlined in the instruction manual.

  • section 1 has 13 bags of parts to build the base and the farmhouse
  • section 2 has 10 bags to build the horse stable and staircase
  • section 3 has 11 bags to build the farmhouse upper level and roof
  • section 4 has 12 bags to build the lower part of the watch tower
  • section 5 has 11 bags to build the upper part of the watch tower, observation deck, and roof.

There are also two additional un numbered bags; one containing baseplates, a horse, a brick separator and another bag of extra pieces.

There are some wooden planks and shield parts that are printed as well as a fish tile that is also printed. No stickers, yay!

In total, there are 59 bags in this set.

Parts bags for sections 1 and 2.

Parts bags for sections 3 and 4.

Parts bags for section 5, baseplates, brick separator, and extra pieces.  Ok, let's build this thing!

Build Pics


From section 1, here's the base and some interior shots of the farmhouse.

Some exterior shots as well.  Lots of stone foundation details, and I like the torches too. Plenty of windows for good air circulation.  The staircase is nice and sturdy.  On to section 2 ...


The horse stable gets added as well as some more exterior details.  Inside the stable is a trough for water.  Gotta keep the steed well hydrated. The covered roof looks good.

The minifigs don't come with the set, but I couldn't wait to add some of my own to see if the medieval tower was minifig scale or not.  The guard just might have to duck his head to get through the front door.  The doorways could be taller to accommodate guard helmets in my opinion.


Around back, there's a rear entrance and the makings of another staircase to the second level.  Decent height for the back entrance.  Check out the vermin that lives under the stairs.  Section 3 awaits ...

On the second floor of the farmhouse, we find a barrel of swords and a table and stool.  On the table, there is a brush and what looks to be a picture of a fish.  Is one of the tower guards artistically inclined?  In lieu of the table, the placement of some cots for the soldiers would be better suited, methinks.

The roof pieces are now ready to be assembled.


This vantage point of the farmhouse looks perfect.

This side not so much.  This is the side where the observation tower will be built. It's too bad that the tower and farmhouse couldn't be separate, stand alone buildings.  I would have loved to see each being displayed on their own.  The tower build continues in section 4.

In section 4, this level of the tower has a cache of weapons and it can be accessed via the passageway to the farmhouse or from the outside staircase.  From here, the tower guards can climb up the ladder to the next level.


Section 4 builds not one but two levels of the watch tower. Here's another level with a wrap around staircase and flag pole.


Tower guards can continue to ascend the tower from the inside ladders or from the exterior stairs.  Weapons can be found readily at every level.

Whoa, the tower looks massive, but we aren't done yet!   Let's move on to section 5!


Section 5 completes the top of the observation tower.  There's a large lookout platform and a crossbow that can actually be turned using the gray knob.  It's a neat play feature.  Just need to make sure you don't take out any of the guards when you turn the crossbow!


With the final section built, we just need to finish assembling the tower.


And here it is from every angle!  It looks absolutely stunning!

Gallery


Once you have finished building the observation tower, the set looks fantastic from every angle, no matter which side you look at it from.  I found that I couldn't stop taking so many pictures of the observation tower.

Quick Recap

The building is rich with details, for example,  the small horse stable, complete with carrot and pail.  There's lots of weapons such as spears and axes scattered throughout the inside and outside of the building.  

On the ground level, there is a village farmhouse and stable that has been converted into a military outpost.  The interior of the farmhouse is used to store armament such as weapons and armour, complete with interior passage ways to get to various levels. I really like the beige walls and brown timber accents used.  The blue, black and dark blue roof tiles provide an excellent contrast.

The adjoining watchtower rises over the farmhouse and looks like it might have been constructed at a later date, with it's gray stone foundation. The winding staircase on the exterior wall leads to the five different levels of the tower.  Soldiers can quickly traverse all the levels using ladders on the inside as well.

High atop of the tower is an expansive lookout that provides a strategic vantage point.  There's lots of room for guards and archers.  As mentioned during the building phase, one of the cool play features of this set is the rotating crossbow that is operated by a knob on the side of the tower.

Pros and Cons

Frankly, I cannot find any fault with the look and feel of this set.  The observation tower simply looks amazing.  The size and height of the observation tower impressed me and the clutch, quality of bricks used and the colours were all excellent.  I think it makes a great display model.

Despite this set being a rebrand of the Urge 50106 set, I was disappointed that it didn't come with the four minifigures that are included in the Urge set.  

Interior wise, I would have replaced the small table and stool on the upper floor of the farmhouse with cots or bunks for the guards.  

Structurally, the farmhouse and tower held together really well, but I didn't like the semi circles attached to the baseplate in front of the doorways.  If you try to move this set around, those particular pieces might fall off so I would recommend adding additional baseplates underneath for support.

I happened to have two spare 32x32 baseplates around, so I placed them under the observation tower and farmhouse to make it easier to carry.  You could probably just use one 16x32 baseplate and one 32x32 baseplate also.

Summary and Rating

The medieval observation tower is an impressive set and would make a nice central focal point for any medieval village display.  This was my first medieval village building set but I'm now wanting to add a few more medieval style buildings to my collection.  Because this set was lacking minifigures, I would recommend adding your own medieval themed figures. Medieval minifigures can be readily obtained individually or in lots from Aliexpress.

I would have given the JMBricklayer Medieval Observation Tower set a perfect score, except that it didn't come with the minifigures that Urge provides in their set and the base of the set could have been better supported.  My rating is therefore adjusted to 4.8 out of 5.  Other than that, it's a fantastic set!  You really have to build it and see for yourself.

Don't forget to save 15% on all your purchases from the JMBricklayer store by using code ITSNOTLEGO15%!