Sunday, June 6, 2021

I tried improving the Lego Ideas Garbage Truck MOC C5333


Hi brick fans, thanks for stopping by my blog Bricks and Figs!  Hope you enjoy today's post!

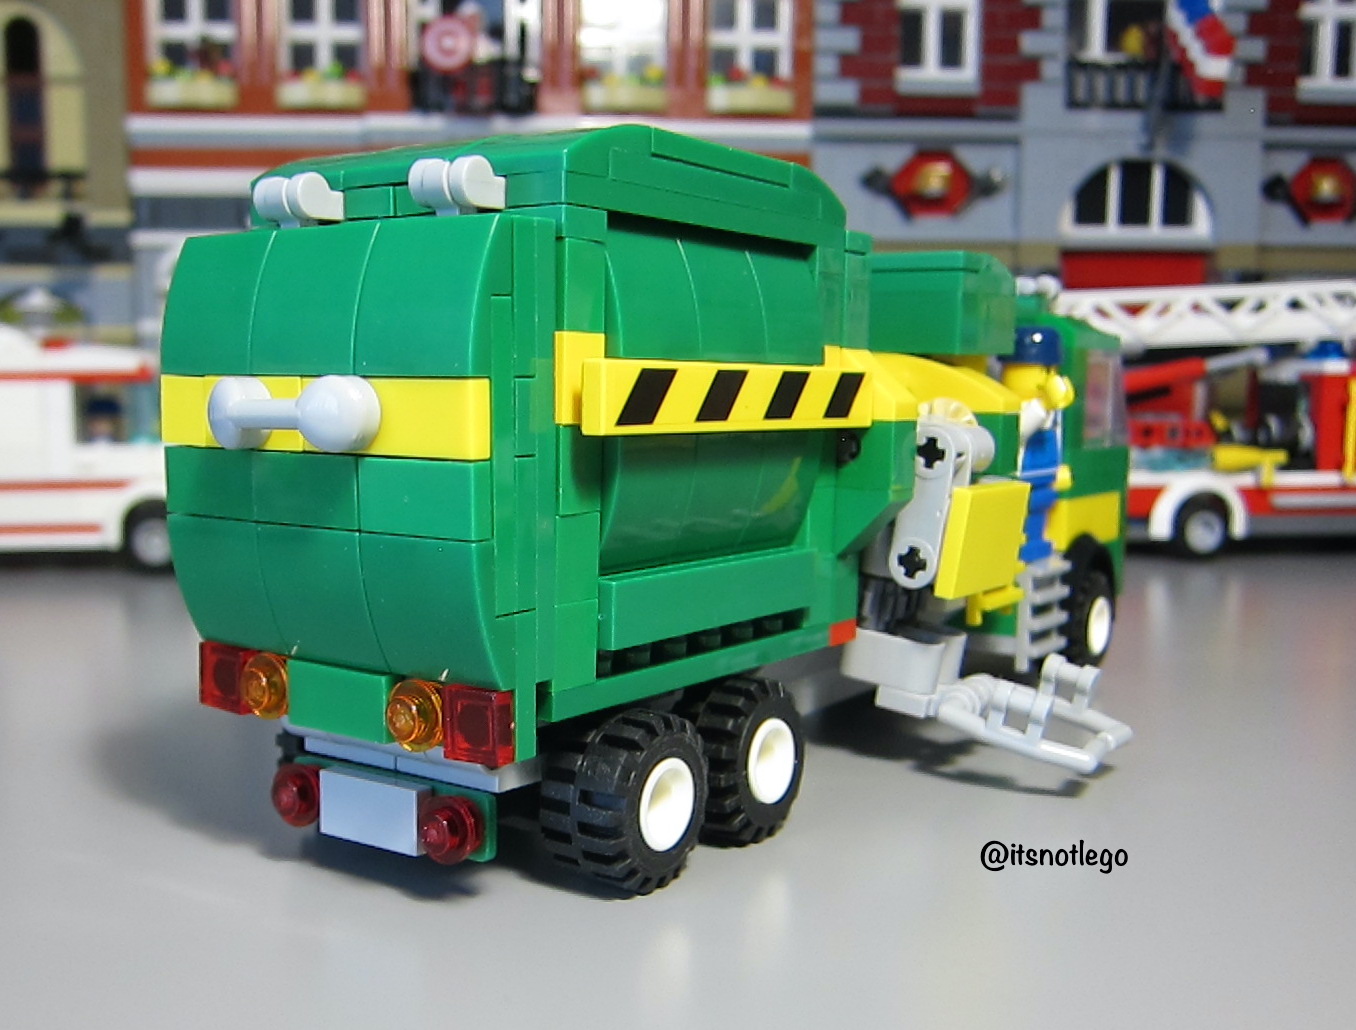
The other day, I acquired and built the Garbage Truck MOC C5333.  I posted some pics and a review on my other blog Its Not Lego.

I wasn't very happy with the inferior bricks that were used in the set, so I wanted to see if I could make this set better.  Let's take a look and hope you can let me know if it was a success or not.

The original set had a white cab but a lot of those bricks were yellowing.  I thought about simply replacing those white bricks from my own stash, but got to wondering if I should make my version of this MOC a bit more unique so I made it entirely green.  There's still a few colour inconsistencies in the green bricks I used vs. the ones from the set, but not much I can do there.  I don't have a lot of green bricks in my parts stash, so thankfully I had enough to modify the cab.


The original cab from MOC C5333 didn't have an interior.  I don't believe that the original model, from which this MOC is based, had one either.  I ended up rebuilding the entire cab so that I could include a steering wheel, a dashboard, and two seats.  I added a driver's side door so that the driver can get in and out.   

A couple of bonus items I added to the cab include the obligatory red mug that you see in most Lego truck sets, and a dog who happens to be the driver's pet.  The dog likes to come along when his master is on the job.


I also extended the cab so that the garbage man had a place to stand instead of hanging off the side of the truck.  In case of inclement weather, he can duck inside the cab.  Unfortunately I only had one green cab door part, so this side gets no passenger side door, but you can still get inside via the ladder.  I realize that I have no side mirrors on the cab, so this is something I'll have to fix in the future.


As a result of the extended cab, I also had to lengthen the truck chassis.  In the original garbage truck model the designers included a broom and shovel but the C5333 MOC only had a stick and an axe (don't ask me why).  My version restores the original tools to the truck.


To further differentiate my re-MOC of the C5333 MOC, I used decided to use yellow as an accent colour instead of making the truck only green.  The yellow accents can be found on both sides of the truck, on the back door and also inside the truck as well.


I replaced all of the axles and wheels and now my truck rolls freely.  I also replaced some of the technic pieces so that the garbage can loader now works more consistently.


My version of the garbage truck includes a driver minifigure and a garbage man minifigure.


Anyways, that wraps up my custom modifications to the Garbage truck C5333 MOC. Let me know what you think of the changes and any other improvements you can think of.   Thanks and see you in my next post, Bye.


Friday, May 21, 2021

My Custom Gudi Ice Cream Monster Truck!


Hi and thanks for visiting Bricks and Figs, my blog about my custom not Lego creations and minifigure reviews.   In this post, I will show you my latest custom build, the Ice Cream Monster Truck!


Just a bit of background, Lego recently released their Burger Monster Truck set31104 and it looked really cool.  Then, when I was checking out the latest not Lego brick sets on Aliexpress, I happened to see more Monster food trucks.

Lego Monster Ice Cream truck 31104
Lego Burger Monster Truck 31104

Sembo 5000 - 5003 Food Trucks

There are four different food trucks in the Sembo series: A burger or sub truck, an ice cream truck, a fried chicken truck and a coffee truck.  They all look great and I wanted to buy them all.  

I had narrowed my choice to the ice cream truck and was ready to buy it.  But at the last minute, I held off because I already have two ice cream trucks in my brick collection, the Enlighten 1112 Ice Cream truck and the Gudi 9603 Ice Cream truck.  

Then it dawned on me, that instead of spending another $30 on the Sembo monster food truck, I could simply make my own.  I already have a set of giant balloon tires and rims, and I could use and convert one of my existing ice cream trucks for it.

Gudi 9603 Ice Cream truck

For this monster truck project, I decided to use the Gudi Ice Cream truck.  As you can see it's a pretty bland truck, but has lots of windows and is easily modifiable.  The original wheels are begging to be replaced.


I pulled off the existing wheels and spindles and replaced the original 2 piece chassis with this long thicker 4x16 Megabloks part.


Next, I used 2 16 stud long technic beams and attached a couple of right angle brackets to them.  I also mounted 2 exhaust pipes to the frame. Those are real Lego balloon tires and rims.  


Here's the wheel assembly.


Here we have attached the frame to the body of the ice cream truck.


I typically don't use stickers in my builds but made an exception in this case.  Did I over do it?

One thing that I'm still missing is a ladder to get to the window.  Right now, you would have to throw your money at the ice cream lady and then catch the ice cream cone when she throws it to you, lol.
 

Rear view of the truck.

In addition to the stickers, I made some minor roof enhancements, nothing too noticeable.  I added an awning on the street-side of the truck.


More pics for your viewing pleasure.


Had those funny eye pieces, so figured I'd use them here.


Monday, April 5, 2021

Carter Baldwin's Blade Runner 2049 Spinner (with mods)


Hey brick fans!  Welcome back to Bricks and Figs, my blog dedicated to showing you my latest custom (MOC) creations and minifigures.   Don't forget to visit my other blog It's Not Lego to see the latest alternative Lego sets that I've added to my growing brick collection.

I'm a huge fan of the Blade Runner movie franchise, so I was really happy to see someone make a model of Officer K's spinner from the Blade Runner 2049 movie.

The instructions to create this Lego replica belong to Carter Baldwin and can be found here: https://bricksonthedollar.wordpress.com/spinner.


As you can tell from the pictures, I used a mish-mash of different Lego compatible bricks in my collection.  Who knew there were so many variations of dark gray bricks?  

Anyways, I followed Carter Baldwin's instructions and this is pretty much how it looked after completion.  I found the rear end of the model to be very fragile and it would pretty much collapse when I tried to pick it up.  Don't get me wrong, it looks great, but I move my models around a lot for picture taking and whatnot, so I don't want pieces falling off whenever I handle it.

I went through a number of rebuild iterations, and finally the latest version of my alt Lego spinner can withstand a lot of handling. 


My changes on the rear of model deviate from Carter Baldwins and the movie version of the Blade Runner 2049 spinner.  I switched to a smaller rear wheel to give me the room I needed to make the upward slope.  The movie version of the spinner has the rear lights below the black vents.  I added the red marker lights on the rear quarter panel but the movie version doesn't have them.


Carter Baldwin's door mechanism works really well, so I retained that design element.  If I had to make more changes, it would be to sub out the 1x1 trans blue piece with trans black colour.  The leading L brick, I would change from trans black to dark gray.  For some reason this picture makes the front end quite stubby looking.
Wonder if I should try elongating it by a bit?


Here's the view from the front.


Here's the side view.  The smooth triangle piece toward the underside is a from a Megablocks set if I recall correctly.  Not sure if Lego makes this piece.


Here's the spinner next to the Sembo Wandering Earth Troop Carrier for scale comparison.   The Sembo dark gray bricks are super dark compared to the regular dark gray bricks.  The spinner looks like it's made from light gray bricks instead.


Releasing the drone.


Two spinners are better than one.


Just a couple more shots before we go.


What do you think of this spinner version?  Let me know in the comments below.
Thanks for looking and see you in my next blog post, Bye!