Hello, brick fans! Welcome back to Bricks and Figs, my blog about LEGO-compatible sets, MOCs, and minifigures! Today, I'm excited to present another modular building MOC: a Japanese-style two-story building with a rooftop garden. As with all modular buildings, the roof and floors can be removed for easy access to the interior.
The Inspiration and Objectives
This new creation is a teardown and rebuild of the Panlos/Inbrixx 880018 Kumamon House, which I reviewed last fall from Afobrick.com. The original building exudes the charm of an old Japanese akiya house, complete with a traditional garden. However, it didn’t quite fit into my LEGO-style Japanese cityscape, as my other modular buildings are either 16x32 or 32x32 studs wide, while the Panlos Kumamon house is 32 studs wide but only 16 studs deep.
My primary goals were to rebuild the Kumamon house to match my other modular buildings and to retain as many of the original features as possible. This includes the exterior and interior accessories. I listed the unique features of the Panlos Kumamon house that I wanted to keep:
- Roof design
- Windows
- Japanese garden with bamboo plants
- Color scheme
- Kotatsu (dining table)
- Ikebana (flower display)
- Interior furnishings and wall hangings
- Lighting
The New Design and Layout
Like my other modular buildings, the redesigned Kumamon house is situated on a raised baseplate. My challenge was to incorporate as many original features as possible while adding a sidewalk and new front entrance.
The Japanese garden, featuring a stone lantern, small bridge, koi pond, and bamboo plants, has been relocated to the backyard. This allowed for a decent footprint for the building structure while still providing a staircase to the second floor. There are two access points: a front entrance and a rear entrance leading to the backyard. The unique windows are now a focal point at the front of the house. The two-story house also includes a rooftop garden accessed via another staircase from the second floor.
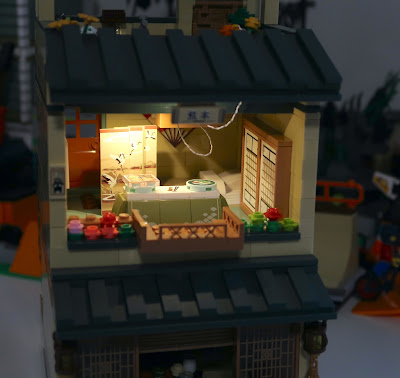
The main floor interior is dominated by an ikebana display wall that also hides the staircase. The center of the room features a low table with a teapot and mugs, along with a TV, radio, and a small console table. The second floor includes a bedroom with a decorative shoji screen, wall closets, and a colorful fan above the bed. The kotatsu table is set up with food offerings in front of the bed. The rooftop garden, accessed by an outside staircase from the second floor, includes a partially covered area with gardening tools and various plants.
The finished model
Here’s how it looks after the rebuild:
- The unique windows, two lanterns, and small balcony on the second floor have been retained.
- New flowerpots adorn the front facade.
- Tan-colored bricks construct the walls, while dark orange accent bricks and a teal blue-green roof have been maintained.
- Roof tiles were reworked to fit the new building.
Here's the small balcony on the second floor.
I think he wooden screen is really cool and this was a must have in the new building.
I didn't want the extra windows to go to waste, so I placed on the side of the building. You won't normally see these however, if all of my Japanese themed buildings are placed side by side.
Here's a view of the back and right side of the building.
Full view of the new building rear elevation.
I tried to keep as much as I could of the Japanese garden from the Panlos set.
The rooftop staircase.
I managed to keep both of the wooden screens. The smaller one is used in the garden.
Some views of the rooftop garden. I have a large collection of Lego compatible flowers and shrubs, so I put some of the to use here. I put a sink with water tap to facilitate watering the plants.
Removing the roof, we can now see the interior of the second floor. The fan decoration, the shoji screen, the bed and the wall closets have been rearranged to fit into the new second floor layout.
The kotatsu dining table was reduced in size by 50% to fit into the bedroom area.
The wall calendar was saved and put into the new bedroom.
Here is the overhead shot showing the layout of the second floor. The new sand green floor tiles were chosen to represent tatami mats and not part of the Panlos set. BTW, the underside of the roof is where I've attached a light brick. It's used to light up the second floor as we will see later.
Here's the interior of the first floor with the rest of the building removed. The first floor light brick sits on top of the ikebana display.
Here are a few more views of the first floor layout and furnishings. The center table and freestanding fan was not part of the OG set, it's just my creation, but all of the other accessories are from the Panlos set. There weren't enough of the tan coloured floor tiles, so I added some extra ones to complete the flooring.
Here you can see that this is indeed a modular building.
Lighting
The light brick on the first floor has three light strips attached to it. I used one to light up the rear stairwell, one over the flower display and the last one under the front awning.
The second floor light brick has 2 light strips attached to it. I use one of the light strips to illuminate the centre of the room and the other light strip is affixed to the underside of the awning.
Rearview of the building with lights on.
And here is the front elevation all lit up.
Just in case, you were wondering if the new Kumamon house is minifig scale or not, here's Murakami-san watering the plants in the rooftop garden.
Mrs Murakami is setting up the meal in the bedroom.
So the short answer is yes, you can display minifigures with the new Kumamon house MOC.
Converting the Kumamon house into a modular building was challenging, requiring the addition of many extra tan-colored bricks, floor tiles, and flowers. However, the result is a beautifully integrated modular building that fits seamlessly into my Japanese cityscape.
Please feel free to check out the wide variety of building block sets on sale at
Afobrick.com. And don't forget to use my coupon code ITSNOTLEGO to save an extra 5% off all your purchases.
Thank you for joining me on this build journey. Please let me know what you think of the new building. Bye!


