Saturday, January 7, 2023

Set Review: Leyi LY-76030 Iron Hero MK 26 Steel Armor


Intro

If you're a fan of the Hulkbuster suits from the Avengers movies, but you're looking for a more affordable alternative to the official Lego set, you might want to consider the Lego Compatible Hulkbuster Mecha building set from Leyi.  

The set is Leyi LY-76030 Iron Hero MK 26 Steel Armor.  The code name for the Mark 26 Armor is called Gamma and is one of the few Iron Man suits not to have a chest mounted ARC reactor.   Here's a wiki page that describes the Mark 26 Iron Man suit in more detail.

I didn't have any great looking Mechas or Hulkbusters in my brick collection and was looking for an inexpensive yet displayable set.  I got this particular set on Aliexpress for around $30 CDN.  It came with free shipping but no further discounts.

There's a few other similarly priced Hulkbuster models on Aliexpress.


What's in the set

This set includes 768 pieces and is fully compatible with Lego bricks. 

I got my set after about 2 weeks of ordering right after Christmas and was surprised at how small the package was for 768 pieces.  The set came with a thin instruction booklet, a sticker sheet and 2 bags labelled #1 for the lower portion and #2 for the upper portion of the hulkbuster.  As you can see on the instruction booklet, this set is rated age 6 and up.


After opening the bags, there were other bags packaged inside.  Overall there were a total of 9 parts bags with the majority of pieces being small 1x1 and 1x2 bricks.   It makes it quite challenging because of all the small pieces.

The instructions were clear enough for the most part, but I do recommend checking each step to make sure you have all the right pieces.   Check twice, build once!

Here's a closer look at the sticker sheet I didn't use.


Building the Hulkbuster lower half


These are the sub-assemblies built from the pieces in bag #1.

The lower torso, hip sub-assembly.

Upper thigh sub-assembly.

Lower leg sub-assembly.

The feet sub-assembly.

Lower body, front side.  Knee joint flaps are adjustable.

Lower body, back side.  Gotta adjust those jets.

A closer look at the Iron Man MK 26 suit.  Here is a battle damaged (ie. defective) piece from the set.

And these are the extra pieces leftover from bag #1.

Building the Hulkbuster upper half

Tony takes a breather, as he moves on to all the pieces from bag #2.

The upper body, shoulder and arm sub-assemblies are ready for attachment.  With a few extra pieces leftover.

Upper body assembled.

The Completed Hulkbuster


The cockpit is extremely spacious.  Would have been nice if there was a control panel inside.


Ready for battle!

The view from behind.

The side view.

The jackhammer hand.


The Pros

Once completed, the Hulkbuster suit stands over 7 inches tall (180mm) and just as wide, making it the largest mecha in my collection.  

Here is the MK 26 Hulkbuster next to my Ant-man and Mr. Freeze mechas.  As the majority of Hulkbuster models are red and gold, I liked the dark green colour scheme of this particular model.

When I was looking for a mecha set, I found that many of the lower priced Hulkbuster models had very thin legs and a small waist.  I wanted an affordable mecha but still wanted it to look substantial and this hulkbuster fits the bill perfectly. 

At approximately $30 CDN, this set was one of the less expensive Hulkbuster sets and thought  this was a good balance of parts vs. price. This set is significantly more affordable than an official Lego Hulkbuster set making it a great choice for budget-conscious builders like me.

The Hulkbuster suit features  movable joints and a cockpit that opens to seat a minifigure.  It features articulation at the ankle, knee, hip, elbow and shoulder joints.  The torso can also rotate at the waist.  The hulkbuster mecha helmet is hinged above the cockpit for easy placement of the included minifigure.

The model seems sturdy enough and doesn't lose balance so I can display the Hulkbuster in a variety of poses.  I'll probably take a picture of the Hulkbuster with all of my Iron Man minifigures in the near future.  I think it will make an awesome display.

The Cons


 The Aliexpress illustrations show a slightly metallic sheen to on all the green pieces, but the actual dark green pieces were rather flat.  For example, look at the upper arm just above the silver dot, it looks shiny to me. 

I'm not a huge fan of stickers, so I didn't use the provided sticker sheet.  I was hoping that there would be many printed brick pieces but this wasn't the case for this set.


I got about 20 extra parts with the set, but there was one deformed piece (right side) which I had to replace with one of my own pieces (left side) from my own stash of parts.

In terms of design, the arms reflect the Iron Man's Mark 26 Armor which has jackhammers instead of hands at the end of the arms. So this Hulkbuster can't really hold anything.

After posing the Hulkbuster a few times for my pictures, I found the shoulder ball joints to be a bit loose. I don't know if the other ball joints will loosen over time or not.  At the moment it still displays well and I can make a few poses with the set.

Summary and Rating


Here's the quick recap of the building set:

Brand:  Leyi 
Set Number and Name:  76030 Iron Hero MK 26 Steel Armor
Piece Count:  768 pieces 
Minifigures included: Yes, 1
Stickers or Printed parts:  Stickers
Size: approximately 7 inches in height and width
Cost: around $30 CDN with free shipping

My rating for this set is 3.75 out of 5.  

The Hulkbuster is an affordable and displayable set, but I think it's tad too small and I worry that the ball joints will loosen over time with use.  I would have liked to have seen a more metallic sheen on the pieces as illustrated with printed parts instead of stickers.  

My first reaction to seeing the set for the first time was that it had a lot of really small parts, I expected larger parts for the set.  The included Iron Man minifigure is a nice touch though.  At the price of around $30 CDN, I would still recommend this set, but wouldn't want to pay any more for it.  

Thanks for visiting and let me know what you think of this set in the comment box below.


Thursday, January 5, 2023

Review of the Briksmax LED Light Kit BX483 for Boutique Hotel


Hey brick fans, welcome back to Bricks and Figs!  Today I'll be reviewing the Briksmax LED light kit for the Lego Boutique Hotel.   As you can see from the picture above, the hotel looks amazing with all of the interior and exterior lighting.

Briksmax provided me with this awesome light kit to review so I wanted to share with you some behind the scenes shots of what goes into lighting up a modular building.   Check out their huge assortment of light kits on the Briksmax website.

Power Supply

If you've never lit up a Lego set, you might be wondering where the power comes from.

Briksmax provides a USB plug and battery pack (3 batteries required, but not included) to power all the lights in the kit.  If you don't want to use the double A battery pack, you can attach the USB plug directly into a USB power source.

The boutique hotel has an unused area in the corner, so I took the opportunity to make a small cubby to hold the provided battery pack and one of two first floor expansion boards.  This isn't required by Briksmax, but I thought it would make all the wires look less messy.  

Hotel Lobby, Art Gallery and Outdoor Bar

On the lower level I used a total of three 6 port expansion boards:

1.  for the streetlamp, hotel lobby ceiling and the upper floors of the hotel.  
2. for the room keys light and front entrance lights

3. for the adjoining art gallery and outdoor bar lighting

I placed one expansion board under the stairwell inside the first floor and the other sits outside behind the art gallery.  The boutique hotel came with a dumpster behind the art gallery, but I decided to remove it from my set so that I could accommodate the battery pack and expansion board.


Briksmax provides step by step instructions in the provided manuals, but I decided to freestyle my lighting runs.  In the pic above, I used my own 1x2 technic hole brick to feed the connecting wires from the power supply into an expansion port inside the building.  I did this to avoid crimping the wires under the bricks.

At this junction, power is distributed three ways:

1. Feed wire to the El cubo Art gallery expansion board and hotel main floor lighting expansion board (see the powers supply pic).

2. Feed wire to the wireless contact point between the first and second floor (see pic above).  I deviated from the instructions by placing all of my wireless contact pads for each floor in the hotel stairwell.  The wireless connectors supplies all of the power to light each floor of the hotel.

3. Exterior street lamp connection.


Briksmax provides a light-up streetlamp to replace the standard one that comes with the hotel.  The wiring for the street light is connected to the expansion board under the stairwell.

The wireless contact pad provides power to the art gallery ceiling light and it's dedicated expansion board.

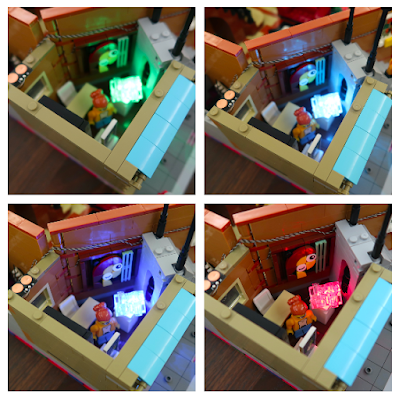
See how the colour changing LED light transforms the static sculpture into a vibrant work of art.


The lighting for the El Cubo sign is a bonus add-on by Briksmax.


Here's the ceiling light strip for the art gallery ceiling. All the wires to light the outdoor bar terminate at the expansion board pictured above.

Here's the underside of the first floor ceiling.  The wireless connector feeds power to the light strip and then upwards to the next floor.

Hotel Second Floor


In their lighting kit, Briksmax provides LED lights for the desk lamp and bedside lamps (see orange circles), but I chose not to apply them, since my focus is just having the general interior lit up from the ceiling lights.


It's not pretty but here is the ceiling lighting for the second floor of the hotel.  Power from the wireless connector goes to an expansion board that connects the main LED light strip and three other LED dot lights.  In addition to the light strip, I put a dot light in the stairwell, the small bedroom and in the entrance to the larger bedroom. A wire feed will forward the power to the third floor.  I used my own circular gray pieces to hold the wires in place, but it's probably a cleaner look if you hide the wires under the long white plate pieces as per the Briksmax instructions.

Hotel Third Floor


The third floor wireless connector will power the ceiling lights and the light in the spire on the roof.


Briksmax provides led lights for the TV and bedside tables but again I chose not to use them opting only to use ceiling lighting.

For the third floor, I've placed dot lights on the ceiling bathroom, in the ceiling rotunda and in the stairwell, and the larger strip light all terminated to the expansion board.  The spire light on the rooftop also feeds down into the same expansion board.

The orange pointer shows you where the LED light is situated.

Summary


So here is a complete list of all the Briksmax components I used to light up the boutique hotel modular building.

- battery pack
- usb plug
- 5 expansion boards
- 4 strip lights
- 13 dot lights
- 1 colour changing dot light
- 1 light standard
- 4 sets of wireless connector pin/pads

Briksmax provides some substitute Lego parts to use as well.  I also supplemented these parts with my own to make it a bit more custom, but you can achieve the same results by just following the Briksmax instructions.  I can make use of the unused lighting parts in future building block sets.


As you can see, there's not a lot of exposed wires showing for the viewable areas.


Here's a few more shots in the dark around the hotel.


I didn't have any defective parts in my kit but if you did, Briksmax will send you free replacement parts if required.  I've used other LED light kits before Briksmax, but find that they give me the most flexibility in choosing what I want to install.  Their instructions are easy to follow as well.

If you missed my Briksmax lighting kit unboxing post, you can find it here.

Well, that's it, hope this post helped you to decide whether Briksmax is the right kit for your Lego lighting needs.  Bye for now!

Monday, January 2, 2023

Unboxing the Briksmax BX483 LED Light Kit for the Boutique Hotel


Hi brick fans!  Here's a quickie unboxing post about the new Briksmax BX483 LED light kit for the Lego Boutique Hotel.  Let's see what we get in the box that Briksmax has kindly provided to us to review.

Opening the light kit for the Boutique Hotel, everything is packaged and wrapped up nicely.

There are two instruction manuals, one user guide and a customer service card.  The manuals provide the detailed step by step instructions on how to integrate the light kit into your set. The user guide describes some of the components and how to attach them together.  The customer service card has contact information for assistance and if you need replacement parts for missing or damaged items.

All of the lighting apparatus is packaged in these static free pouches.

Pouches with the letter A contain the different LED lights, differentiated by the length of the attached wire.  Wire lengths typically come in 15cm and 30cm lengths.

Pouches that start with the letter B contain the brighter LED light strips which come in different lengths, either 4 stud or 6 studs long.

Pouches starting with the letter D contain the connecting wires and expansion boards for the LED lights.  There are different sizes of expansion boards and different lengths of connecting wires.  In my kit, the shorter 6 port expansion boards were incorrectly labelled as 8 port expansion boards.  The pouch should have said D01 instead of D02.

Pouches labelled with the letter F contain the wireless contact pieces which supply power to each level of the boutique hotel building without wires.


There is a pouch containing all the spare pieces you might need to modify your set to adapt the light kit to it.  If you are a Lego purist, you will be pleased to note that Briksmax provides real Lego pieces for the kit.   The pouch labelled D09/G01 contains the USB plug and adhesive pads for attaching the expansion boards to the building walls or ceilings.

Finally, pouch C02 contains the custom street lamp.  Pouch E06 contains the battery pack (uses 3 double As, not provided).  And also included in every light kit is this useful set of tweezers to handle small and delicate parts.

The Briksmax LED light kit is available through their website or their affiliated retailer Lightailing.com.  Use my discount code ITSNOTLEGO to save an extra 10% off your entire purchase.

In my next post, I'll review the installation of the Briksmax BX483 LED light kit into my boutique hotel.