Hey brick fans, I'm excited to show you another new not Lego building
block set!
Who is JMBricklayer?
Today's set is brought to you by JMBricklayer, whose sets are
manufactured by the Shenzhen Aifu Network Technology Co. Ltd.
According to their website the company was founded by a group of
"building set freaks" who wanted to create their own brand of bricks of the
coolest products.
You can find so many of their unique building block sets on the
JMBricklayer.com website.
You can also find their products on the
JMBricklayer Amazon store. This store is targeted towards U.S. customers.
Just in time for Thanksgiving, this and certain other sets are 30% off
between Nov.24 and Nov 28.
👉 Regarding the details of the JMBricklayer promo, I've just been provided more
information which you can find on my
Alt Brick Deals blog site.
Big thanks to JMBricklayer for providing this set to me and as always, I aim
to provide a thorough and unbiased review. Ok, let's get into it!
The Brand: JMBricklayer
Set name: 30001 Remarkable Ancient Machine 3-in-1
Theme: Civilization Medieval Times
Number of Pieces: 568
Age rating: 8+
Stickers: None
Printed parts: None
Minifigures: None
Missing or deformed pieces: None
Cost: $39.95 USD
Where to get it:
👉 JMBricklayer Online Product Link: https://www.jmbricklayer.com/product/3-in-1-medieval-weapon-30001/
👉 JMBricklayer Amazon Store Product Link: https://amzn.to/3UXXXN8
About the set, it is a adaptable mobile weapon one would find during the
medieval times. It's sheer size would strike terror in the hearts of
those who would choose to get in the way of the advancing army.
You can build it three different ways depending on your weapon of choice. The
options are:
1. The Catapult
2. The Projectile Cannon
3. The Ballista or Giant Crossbow
In this review, I will build all three versions and provide my opinion on
which weapon I like the best. See if you agree!
What's in the box?
The sealed boxed set arrived in fairly decent condition all the way from China.
Inside the box, one finds a colourful 153 page instruction booklet comprising
316 steps in total, eight large bags of bricks and technic parts and four
gigantic wheels. While the bags are numbered, they don't correspond
directly to any steps in the instructions. You basically have to open
all of the bags up at the beginning to start your build.
The most important pieces of the set in my opinion, because without the rubber
bands, the 3-in-1 models would not function properly. There are four
different sizes that control the amount of tension each weapon needs to
operate. While only two rubber bands of each size is ever used per model,
JMBricklayer.com has included one extra rubber band of each size in the event of
breakage. More details about the rubber bands below.
Also the proprietary brick separator proved to be indispensible when
separating the parts to build the next version of the model.
I want to mention that the brick quality and clutch is excellent. I've
included a pic for your reference so you can examine the quality for
yourself. Despite building and re-building the different versions, the
bricks and technic pieces held up well in my opinion.
I started building the weapons in the order listed in the instructions but you
may choose to build them in any order you want. Here's the breakdown of
the pages and steps for each weapon you may want to build:
V1 Catapult: pages 1 thru 54, steps 1 thru 116
V2 Projectile Cannon: pages 55 thru 109, steps 117 thru 229
V3 Ballista/Crossbow: pages 110 thru 150, steps 230 thru 312
Besides building the weapons, there are also instructions to build the target:
Target: pages 151 thru 153, steps 313 thru 316.
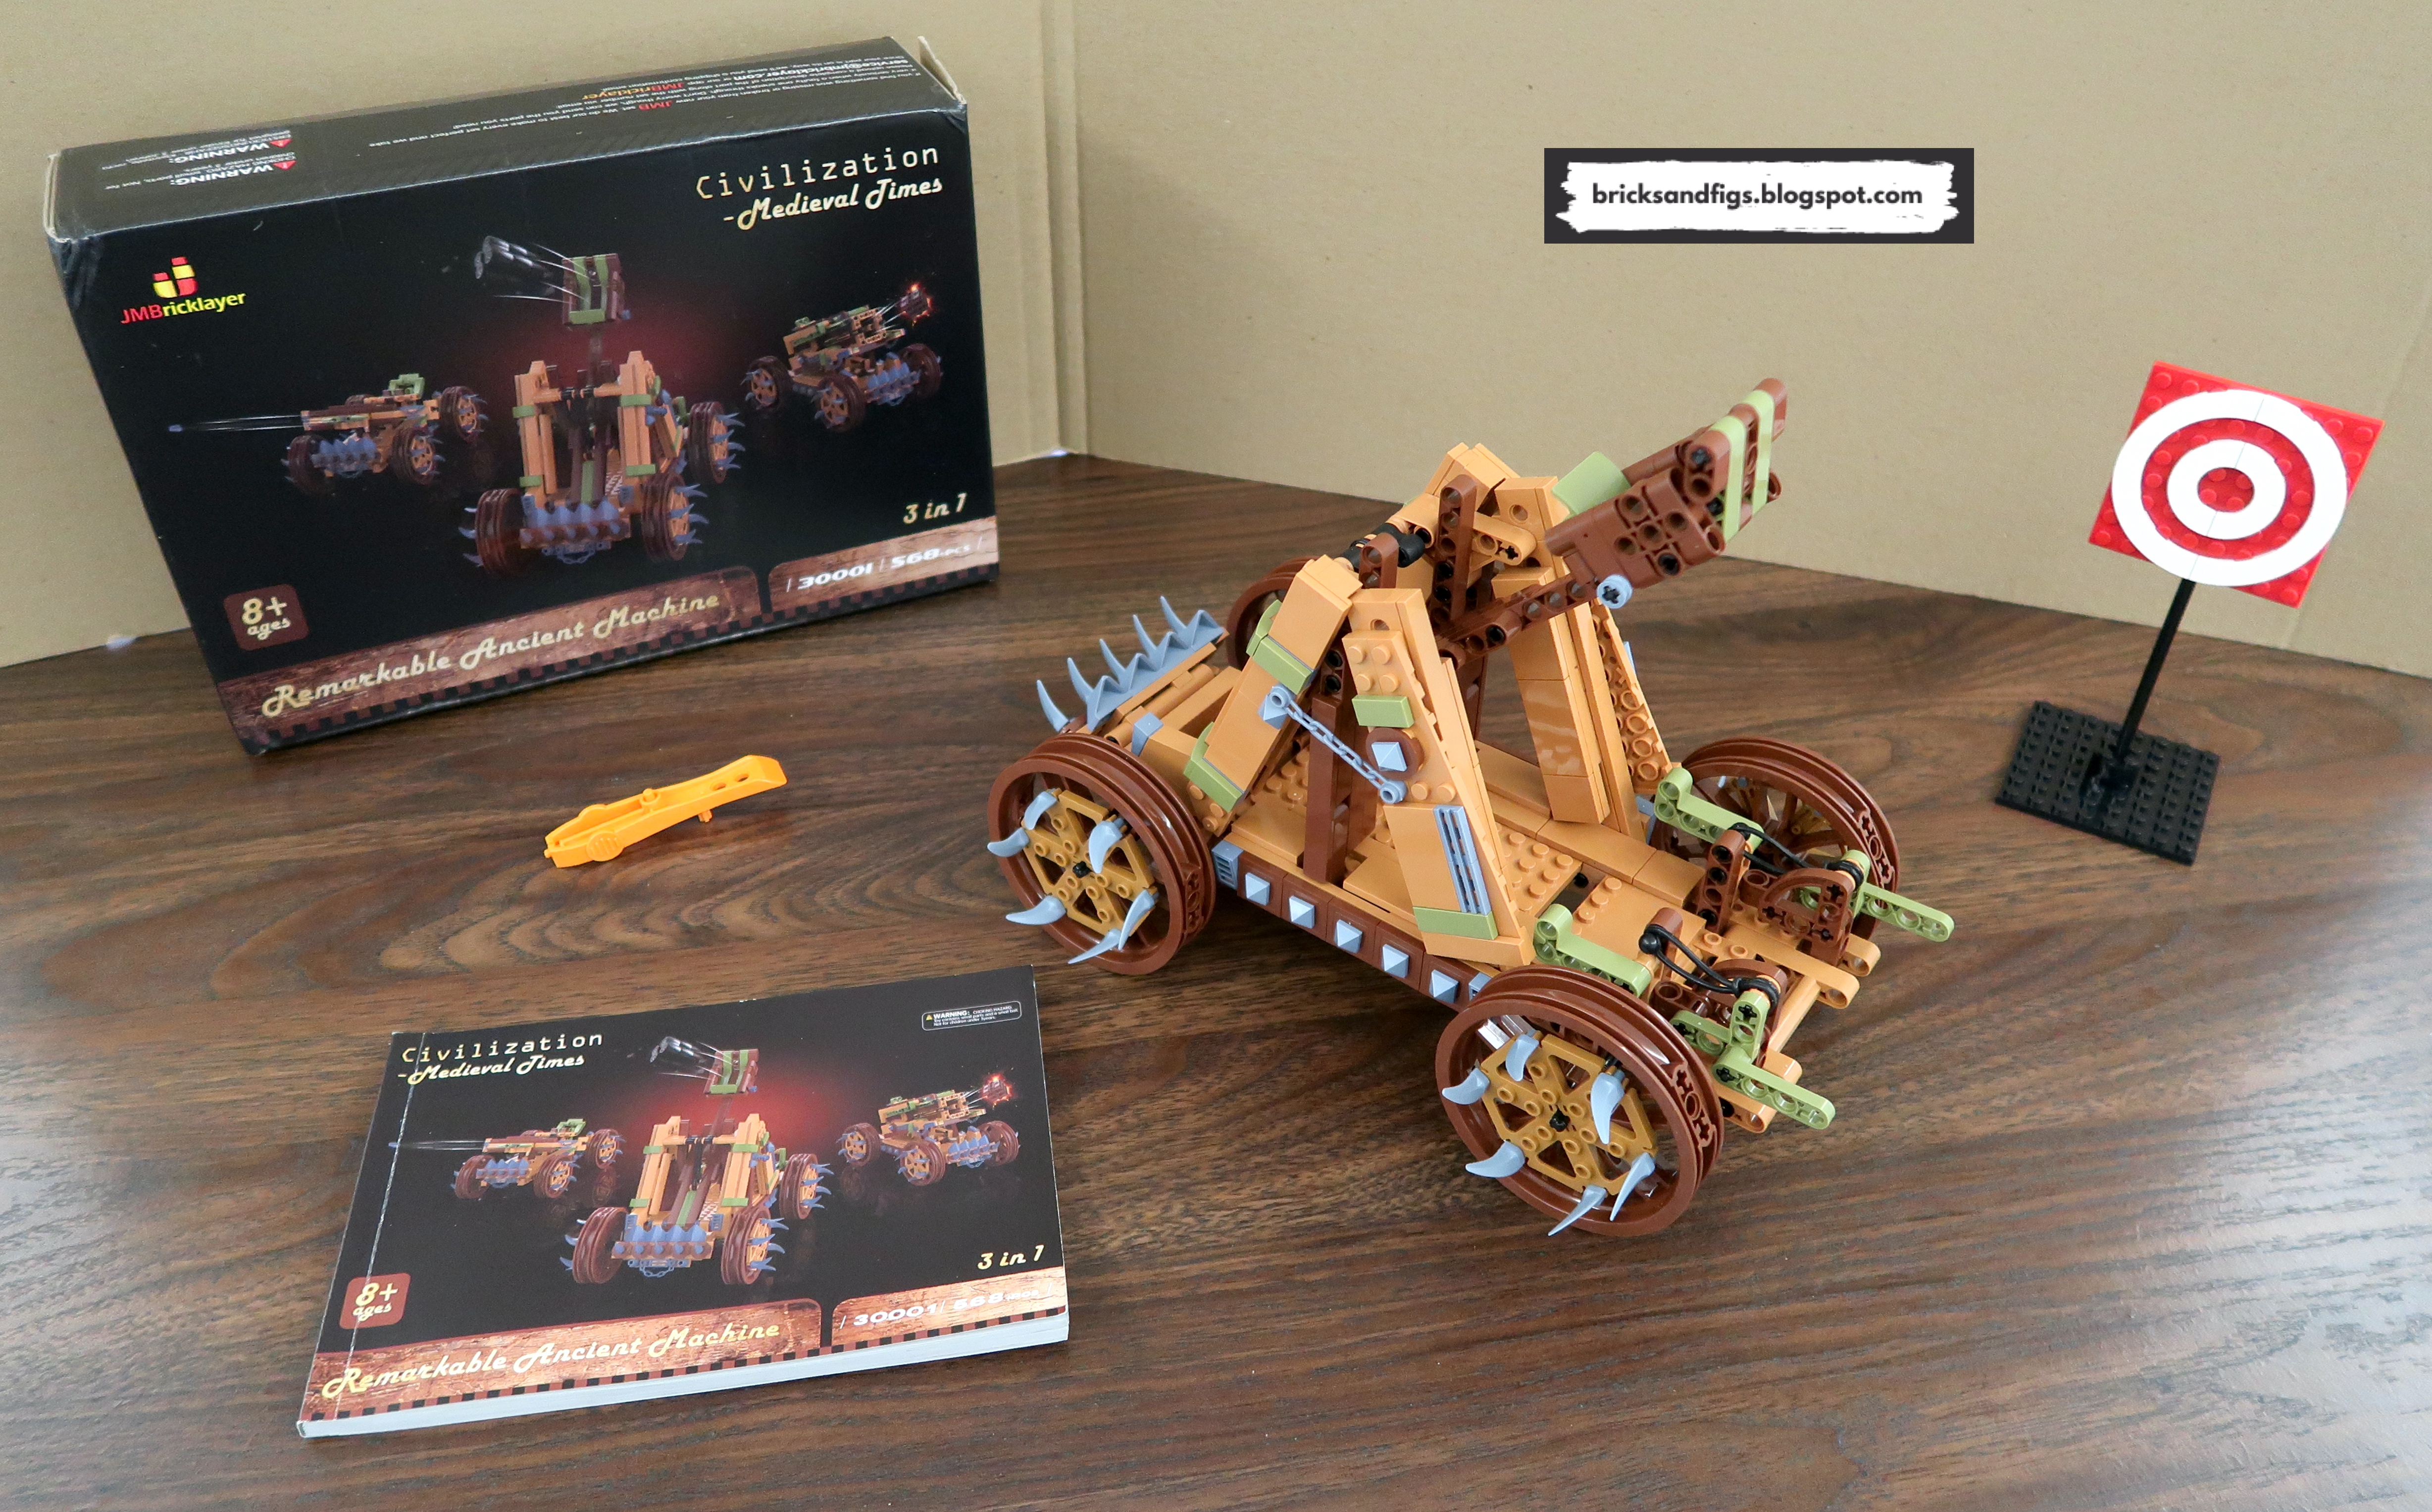
Version 1: The Catapult
So first up is the Catapult, which will be used to launch projectiles. I
believe the technical term for this medieval device is called an onager, which
is a torsion powered sling with a bucket at one end.
Here is the base and the sling arm. Because this was my first version of
the build, I think I ended up inadvertently using the larger sized rubber
bands which did not propel the projectile as far as I would have liked.
As mentioned earlier, there are 4 different sizes of rubber bands, ranging
from the smallest 1.6 cm to the largest 4cm in diameter. I've provided a
list of the rubber bands used for each weapon below.
Catapult (V1): page 27, step 64 - 1.6cm x 2
Catapult (V1): page 50, step 112 - 2.4cm x 2
Projectile Cannon (V2): page 85, step 179 - 3.2cm x 2
Projectile Cannon (V2): page 104, step 224 - 2.4cm x 2
Ballista/Crossbow (V3): page 146, step 308 - 2.4cm x 2 / 4cm x 2
Here's a close look at the bucket with black projectile in the "sprung"
position.
Here's is the projectile ready to be catapulted. Pushing down on the green
levers will release the tension and fling the arm upwards. As you can see,
I probably used the wrong size rubber band, as there doesn't seem to be enough
tension. It still worked, mind you, it just didn't lob the projectile as
far as I wanted.
The pictures on the JMBricklayer website do not truly portray the size of this
gigantic rolling medieval weapon. Here is a look at one of the
wheels. I made this stopper from the extra parts to prevent the catapult
from lurching forward whenever I tried to launch a projectile.
And here is the completed catapult complete with spikes and chains!. The
sand blue and light green accent pieces go nicely with the brown and nougat
brick and technic pieces.
To give you a sense of scale, I've placed some of my minifigures interacting
with the medieval weapon.
Those soldiers and civilians unlucky enough to be captured will have their
severed heads hurled back to the enemy! Yes, I had too much fun building
and playing with the catapult.
It's too bad the set doesn't come with some medieval themed minifigures, because
it's a lot more fun to pose (and launch) them with the gigantic weapon.
Here's all the extra parts left over after building version 1.
Version 2: The Projectile Cannon
Before you can build each version of the weapon, you have to pretty much
disassemble the entire model. That's where that brick separator is
really needed.
The structure of the projectile cannon has a different layout and therefore
the base needs to be rebuilt.
Projectile cannon is firmly attached to the base.
A projectile is placed inside the cannon. When the trigger is pulled back
and released, the projectile is fired from the cannon.
Here is the projectile that you build for the cannon. Unfortunately, it
kept getting stuck in the muzzle every time I pulled the trigger.
The good thing about having a large army is that the soldiers are
expendable. Here's a good volunteer practising to be a human cannonball.
During testing the vehicle kept rolling forward as I pulled the trigger, so
like the catapult, I had to put the stoppers on the wheels to prevent the
forward momentum. Also I found that the trigger would not stayed locked down,
so you pretty much had to hold the machine in one hand and operate the cannon
sling with the other.
We seem to have lost our volunteer soldier after his unfortunate ejection
test, so here is his replacement, the Executioner.
Version 3: The Ballista (Giant Crossbow)
Once again, we have completely disassembled the projectile cannon and are
moving on to building the Ballista (crossbow).
With the Ballista/crossbow completed, it's time to load in a deadly projectile
spear.
You definitely do not want to be in this position when the projectile is
launched. The giant crossbow was clearly the winner over the other two
weapons in terms of effectiveness. The projectile arrow could be loaded
and cocked, ready to fire. When launched, it easily shot across the
room. And I didn't have to lock down the wheels to fire the projectile.
There is no way Lego would ever make this deadly crossbow, but boy it sure is
way more fun than shooting those puny Lego stud shooters.
Clearly the nobles and foot soldiers have found their favourite weapon.
Time to raid, pillage and loot!
Final thoughts!
I tried to take videos of me launching the projectiles for each version of the
set, but found I really suck at it. That and the machine kept rolling
away on me. Also, I was a terrible shot and missed the target every
single time. So, yeah, sorry no videos this time.
I thought that this Medieval weapon set was very unique as I've not built
anything like this before. It would really look great in a Lego castle
diorama , protecting the fortress. The bricks are top notch and brick
clutch is excellent. The choice of colours really enhances the set as
well.
The weapons machine rolls too well, so much that I had to put stoppers in
front of the wheels to stop it from rolling forward while trying to launch the
projectiles.
The wheels, front and sides didn't change too much over the three versions of
machine. I would have liked to have seen a common rolling platform,
where you only needed to build the desired projectile weapon and attach it on
top. Oh, and add in a braking mechanism to park the vehicle, as it were.
From a weapons effectiveness perspective, I had the most fun with the
Ballista/Crossbow, then the Catapult, followed by the Projectile
Launcher. Maybe it would have been better if I had used the right
rubber bands, I dunno.
How to improve this set? Throw in some minifigures, of course!
But, yeah I know that most sets are not including the minifigs, because they
don't want to incur the wrath of Lego.
How awesome would it be to have all three versions of this set instead of
having to build and rebuild? Even better with 30% off!
The limited sale is only from Nov 24 thru Nov 28th 2022, so act fast if you want your
3-in-1 Ancient Weapon machine! Other selected products are also
reduced by 30% during the sale period.
So which weapon version did you like the best and why? Please let me
know in the comments below.
And thanks again for visiting Bricks and Figs, see you next time!