Sunday, January 20, 2019

Hsanhe 6411-2 McDonalds gets a new interior (not Lego MOC)


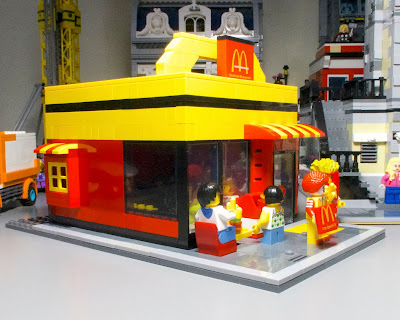
Hello again!  I'm back to show you my latest mods to my Hsanhe 6411-2 McDonalds restaurant.   The last time I changed this Lego style MOC modular building was about a year ago, when I extended the back of the restaurant from its original design.  Let's take a look at the latest changes.

Two new minifigures welcome you to the McDonalds;  Ronald and the Fry guy.  

Minor modifications to the exterior of the building include relocation of the trash can to the outside, some patio tile adjustments and an additional row of yellow bricks under the roof line to accommodate the interior signage.

The takeout window has been raised a bit since last year.

 Not much has been done to the rear of the building.

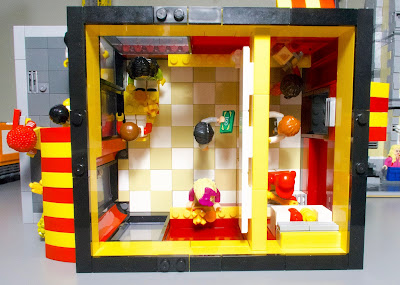
The Hsanhe McDonalds with the roof removed.

 The most significant change to the interior is the addition of new flooring.  It really lightens up the inside of the restaurant.

I added a cross beam along the top to allow for the menu signs, now I just have to find some images and stick them to the white signboards (future project).

 In addition to the outdoor seating, a new table has been added on the inside.  There's two minifigure patrons enjoying their meal.

There were already two eating counters before, but one used to be longer than the other, so now with the inclusion of the new seating, they are both symmetrical now.   Another two minifigure patrons are featured above.

Here's another look at the sign board which I mentioned earlier.  There's a mustard and ketchup dispensers next to the order counter.   Looks like he ordered all the expensive items on the menu.

The store manager minifigure is new.  He used to be the old Fry guy but he got a promotion.

 The serving counter is now configured in an L shape.  There's one of the employee minifigs getting the takeout order ready.  I made the order counter bigger to allow two minifigs to work together comfortably.

Not much has changed in the cooking area.  That's the original minifig that came with the set cooking the food.  I gave him a spatula so he could flip the burgers.  I added some vents above for better air quality.

 Your takeout order is ready now.

Just peeking in the back door.


Hope you have enjoyed looking at the latest changes to the Hsanhe Mcdonalds restaurant.  Let me know what you think!   Thanks for looking and see you soon.
Monday, January 14, 2019

Got the Fry Guy for my McDonalds MOC - PG1235


Hi there, I added a new minifigure to my Hsanhe MOC McDonalds.  It's the Fry guy on the left.  He's manufactured by Pogo - PG1235.  He joins my Kopf branded Ronald McDonald minifig KF947.
If you're looking for this minifig on Aliexpress, you can either search for the lone figure using PG1235 or you can search for the set of three minifigs (Fry guy, Pizza guy and Ice Cream guy) using code PG8114.

I changed the minifig to use a yellow torso and red pants that matches the mascot outfit.  I also used a different head on my minifig.  

Saturday, November 10, 2018

Making a modular building from the Lepin 01011 Friends Pizzeria


its-not-lego.blogspot.com

Hi bootleg brick fans, today I wanted to show you my latest project, which is turning the Lepin 01011 Friends Pizzeria into a full fledged modular building.  I reviewed the Lego bootleg set back in the fall of 2017 and you can find the original pics and build here.

its-not-lego.blogspot.com
So I wanted to retain the look of the original building but wanted a multi-storey building which would integrate into my Its-Not-Lego town.  This modular building has three floors, the lowest floor being a pizza takeaway shop, and a pizzeria restaurant occupying the second and third floors of the building.

its-not-lego.blogspot.com

We will look at each floor in detail later, but for now we will tour the outside.  The building depth is 20 studs deep with the building centered on the 16x32 base plate.  That leaves 8 studs for the front walkway and similar amount in the back.  I've used a variety of bricks to construct the modular.  From the side of the building, you can see that I've got a few colours happening.  Mostly burgundy on the main floor, tan and beige on the second, and mostly beige on the third floor.

its-not-lego.blogspot.com
I managed to retain the windows and awnings on the second floor.  On the original Lepin/Lego design this would have been the first floor with a door separating the windows.  I've added some detailed bricks  to the front of the building, both on the first and second floor.  The third floor also retains the outdoor terrace and arched windows.  Even the foliage and awnings were maintained.

its-not-lego.blogspot.com
Since the original Lego/Lepin design didn't have a backside to the building, this is where I had to make it up as I went.  On the main floor, I added a back door for deliveries.  The second and third floors get some protruding windows sourced from an old Wange 34052 villa set.  The burgundy wall panels on the fist floor are from the Sluban building that came with the Building Tower set M38-B0555.  The tan bricks on the second floor were sourced from the Sluban City School building M38-B0333.  Additional beige bricks for the third floor also come from the Wange 34052 set.


The First Floor


its-not-lego.blogspot.com
The first floor pizza takeout shop has a big picture window next to the front door.  Inside there's a stair case that goes up to the second floor for patrons who want to dine in.

its-not-lego.blogspot.com
 For express take-away service, customers  place their order at the counter.  At the counter, there is a display for pizza slices (currently empty) and a cash register.  Over the counter is future signage for the menu.

its-not-lego.blogspot.com
In the picture above you can see a pizza cooking in the pizza oven.   There's a small counter by the front window for those who want to eat there.  It's hard to see but there is also a prep table by the rear wall where pizzas are prepared.

The Second Floor


its-not-lego.blogspot.com
The staircase leads up to the open kitchen on the second floor.  There's another prep table and another pizza oven dedicated for the third floor pizzeria restaurant. 

its-not-lego.blogspot.com
 Right now I have a huge counter where the pizza orders are prepared and ready to bring upstairs.
Only one problem though, I haven't added a second staircase going up to the third floor, doh.  Soon!

its-not-lego.blogspot.com
 The mixer and rolling pin have been saved from the original set.

The Third Floor


its-not-lego.blogspot.com
 So here is the top floor of the pizza restaurant.  On the terrace, there are two tables with dishes and mugs.  Need to add seating for four people out here.

its-not-lego.blogspot.com
For inclement weather dining, there's an indoor area, with another two tables adorned with pizzas and table lamps.  If I want to maximize the seating, my future staircase to the third floor might have to be on the outside rear of the building.  Still designing it in my head.

its-not-lego.blogspot.com


its-not-lego.blogspot.com
Here's the pizzeria with the roof added.  I'm not sure if the red roof is going to be permanent or not.  I might switch it to gray or black instead.  What do you think, should I keep the red roof?  I'll provide a future  update once I add the staircase between the second and third floor.


its-not-lego.blogspot.com

And finally, here's the the Lego/Lepin modded pizzeria situated between my Lepin Fire Brigade and Lepin Town Hall.    Reddit user /u/tarataqa suggested I feature the Bela 10648 Pizza Van and scooter from Lepin 07057 Scarecrow Delivery with the Friends Pizzeria, so here it is!

Hope you've enjoyed this look at my custom pizzeria made from spare bricks and the Lepin 01011 set.   As always, thanks for visiting Its Not Lego and See you next time!