Showing posts with label aliexpress. Show all posts

Sunday, June 6, 2021

I tried improving the Lego Ideas Garbage Truck MOC C5333


Hi brick fans, thanks for stopping by my blog Bricks and Figs!  Hope you enjoy today's post!

The other day, I acquired and built the Garbage Truck MOC C5333.  I posted some pics and a review on my other blog Its Not Lego.

I wasn't very happy with the inferior bricks that were used in the set, so I wanted to see if I could make this set better.  Let's take a look and hope you can let me know if it was a success or not.

The original set had a white cab but a lot of those bricks were yellowing.  I thought about simply replacing those white bricks from my own stash, but got to wondering if I should make my version of this MOC a bit more unique so I made it entirely green.  There's still a few colour inconsistencies in the green bricks I used vs. the ones from the set, but not much I can do there.  I don't have a lot of green bricks in my parts stash, so thankfully I had enough to modify the cab.


The original cab from MOC C5333 didn't have an interior.  I don't believe that the original model, from which this MOC is based, had one either.  I ended up rebuilding the entire cab so that I could include a steering wheel, a dashboard, and two seats.  I added a driver's side door so that the driver can get in and out.   

A couple of bonus items I added to the cab include the obligatory red mug that you see in most Lego truck sets, and a dog who happens to be the driver's pet.  The dog likes to come along when his master is on the job.


I also extended the cab so that the garbage man had a place to stand instead of hanging off the side of the truck.  In case of inclement weather, he can duck inside the cab.  Unfortunately I only had one green cab door part, so this side gets no passenger side door, but you can still get inside via the ladder.  I realize that I have no side mirrors on the cab, so this is something I'll have to fix in the future.


As a result of the extended cab, I also had to lengthen the truck chassis.  In the original garbage truck model the designers included a broom and shovel but the C5333 MOC only had a stick and an axe (don't ask me why).  My version restores the original tools to the truck.


To further differentiate my re-MOC of the C5333 MOC, I used decided to use yellow as an accent colour instead of making the truck only green.  The yellow accents can be found on both sides of the truck, on the back door and also inside the truck as well.


I replaced all of the axles and wheels and now my truck rolls freely.  I also replaced some of the technic pieces so that the garbage can loader now works more consistently.


My version of the garbage truck includes a driver minifigure and a garbage man minifigure.


Anyways, that wraps up my custom modifications to the Garbage truck C5333 MOC. Let me know what you think of the changes and any other improvements you can think of.   Thanks and see you in my next post, Bye.


Sunday, August 16, 2020

Parts came in for my not Lego Jerac Tie Bomber - Update


Hey all!  Welcome back to my Bricks and Figs blog where I show you my latest minifigures, mods and MOCs.  Today, I wanted to give you an update on my not Lego Jerac's custom Tie Bomber MOC 13952.   A couple of weeks ago, I posted my fixes to the address the poor brick clutch of the model.   As you can see from the picture above, I still had issues with wrong colour body panels as well as missing hinge parts for the engine cowling corners.

I'm pleased to report that the extra parts I ordered from Aliexpress finally arrived and I was able to replace the deficient panels and hinges.   Here's how the ship looks now.  The only thing I still need to replace is the cockpit windscreen (I'm using the round skylight from the Sanctum Santorum set, temporarily).

Here's the overhead view and you can see there's no visible off-colour body panels.

This view is the underside of the TIE bomber.
 There were eleven panels that were dark gray instead of light gray.  I ended up ordering 10 pieces of the light gray panels for $1.  As a result, I have one panel that is still dark gray that hasn't been replaced.  The pic above shows where it is.

 Finally, here is how the rear of the ship looks after replacing all the hinges on the corners where the fuselage meets the engines.   The hinges cost me about $2 for 20 hinges, so the total cost of the fixes for the TIE bomber was around $3 shipped.


Here's the link for the parts I used.  They were the cheapest I could find off Aliexpress, but if you see a better deal, go for it.

Two piece hinge (set of 10).  https://s.click.aliexpress.com/e/_dSixodA

Light gray curved panels (set of 10).  https://s.click.aliexpress.com/e/_dXI0T7e

Well, that's it, just a short little post to let you know that I've fixed most of the issues with not Lego version of Jerac's TIE Bomber.  Thanks for looking!


If you are interested in getting the not Lego set of Jerac's Tie Bomber from Aliexpress, please follow the link below.

AliExpress.com Product - 1494Pcs DIY MOC TIE Bomber Small Particle Building Block Model Compatible Legged 13952

Thursday, July 30, 2020

How I fixed my not Lego version of Jerac's Tie Bomber - Part Two

Hey there, welcome back to the Bricks and Figs blog, where I post about my not Lego MOCs, Mods, and Minifigs.  Don't forget to check out my other blog called Its-Not-Lego where I give you honest opinions about my latest not Lego set acquisitions.

Today, we will take a look at some modifications I made to the knockoff/bootleg version of Jerac's Tie Bomber.  Check out all of the build pics here.

As I previously mentioned during the building of the non branded Jerac's Tie Bomber, there were a number of issues I found.  Most were related to the poor brick clutch of the off brand bricks, and those are easily rectified.  The one area where I tried to improve the design was the angled corner pieces that make up the tapered engine cowling.  I just want to point out that I have absolutely no issues with the look of the engine cowlings, just the method of implementation.

For reference let's take a closer look at the area in question.  The little T-joints at each of the corners of the fuselage are where you clip the curved bricks for the tapering.  Admittedly, there's not enough clutch for the clips to grab onto the T-joints.

The result is that anytime you accidentally touch the curved corners, they fall off immediately as evidenced in the picture above.

To mitigate the problem, I decided to attach the curved corner directly to the fuselage using the two piece connected plate.  The lower part of the pic shows you how the curved piece was originally connected.

Here is the result of the fix.  The curved brick can still tilt inwards, but it's more sturdy and won't fall off.  Note that this solution works perfectly for all four corners of rear engines.  Unfortunately my brick stash didn't have enough of those two piece joiner plates, so I've had to order the extra parts so I can re-work the bottom corners of the fuselages.


There are two more similar connection points at the front of the ship above the cockpit, but those seem to be sturdy enough so I kept the original setup there.

Since we are looking at the cockpit, as I mentioned in the Tie Bomber build post, the provided windscreen of this knockoff set was just a plain 6x6 circular part with no design. I've temporarily subbed in the 6x6 glass from the Sanctum Santorum roof until I can find a replacement Tie Cockpit windscreen.

Another change I made was at the lower hinge that attaches the windscreen to the fuselage.  I swapped out the single clip for a double clip plate, so now the windscreen doesn't fall off anymore.

Speaking of things falling off, the technic plate that attaches the engine flames to the engine would not stay attached.  I added a single round stud in between the connection and that fixed the problem.

One can barely notice the difference.

More bits that fell off include the circular plates attached to the wing detail.  To rectify this, I first attached the circular piece to a 2x2 plate and then attached that to the wing.

This is what it looks like now.


Finally, the last issue I had was also clutch related. There's four triangular sections on each wing that kept falling off due to poor clutch of the stud brick.

 I replaced each of those bricks, eight in total, with a technic pinned brick.

Problem solved!

With all these fixes in place I can display and swoosh the model without the worry of losing any parts.  I've already ordered replacement blue gray curved pieces to replace the dark gray plates that clad the hull of the Tie Bomber.

Please enjoy the rest of the pics!


Thanks for taking time out from your busy day to check out the pics of this knockoff version of the awesome Tie Bomber originally designed and built by Jerac.  What did you think of the fixes?  Did you have similar issues with your non branded Jerac Tie Bomber?  Please let me know in the comment box below. See you next time!

Building Jerac's Tie Bomber using not Lego bricks.


Thursday, April 16, 2020

Modified Enlighten 1120 Happy Camper Truck (not Lego)


Hello and welcome back to another post at Bricks and Figs!  It's mid April 2020 and we are still practising social distancing, which means we shouldn't go outside unless it's completely necessary.  That means we have lots of time to build some brick sets or in this case, we can modify an existing set that we already have.


Let's time travel back to April 2017, four years ago.  That's when I first blogged about the Enlighten 1120 Camper Truck.  In that post I complained that the truck was too wide at 8 studs, instead of my preferred width of 6 studs.  Yup, that's the camper truck above, in all it's 8 stud wide glory.  Ok, now let's return to present day and here is the modified Enlighten camper truck.


I decided that we wouldn't compromise the utility and play value of the set by making the living quarters smaller.  In fact, within pretty much the same footprint, I've managed to add a bed to the interior, but I'm getting ahead of my self. Let's take a look at the exterior before moving to the inside of the truck.


Here's the newly modified front cab of the truck.  I've decreased the width to 6 studs and it kinda has a retro ford econoline look to it.  The eight stud windshield has been replaced by the six stud equivalent, maintaining the transparent blue tint of the original.  I didn't have a 6 stud wide slope brick in lime green, so I opted to use the original roof blocks as part of the hood.  I'd much prefer the cab roof to be match the rest of the truck colour, but white is all I have in my brick stash.


Moving around to the side of the cab, you can see how the profile has changed.  There was a toss up about how big I should make the cab portion. I opted to go for the longer cab and use the side window pillar there.  The other option is to shorten the cab by one stud, which will necessitate a different roof over the cab.


Behind the cab, everything else is pretty much the same.  The axe is still there and so is the window.  I added some amber lights where the cab roof meet the rear box.


I got rid of the roof mounted shovel and antenna and moved the solar panel array from mid roof to as far forward as I could.  This gave me enough room to carry two bicycles.  I did manage to retain the roof racks, however.

The bikes are held in place by a clamp, so they don't go flying off during highway driving.  The solar array also helps to deflect the the wind up and over the bikes.


Here's the right side of the truck with retained window and fire extinguisher.


The back of the camper truck sees some significant improvements.  There's a license plate and extra marker and brake lights for safety.  The space that used to be occupied by the bike now has a gas can and spare tire.  The ladder to the roof has not changed.


Enlighten's original concept for the back of the camper was that it was split down the middle and both sides could swing away to access the interior.  In my design I opted to go with the complete removal of the box instead for structural support.

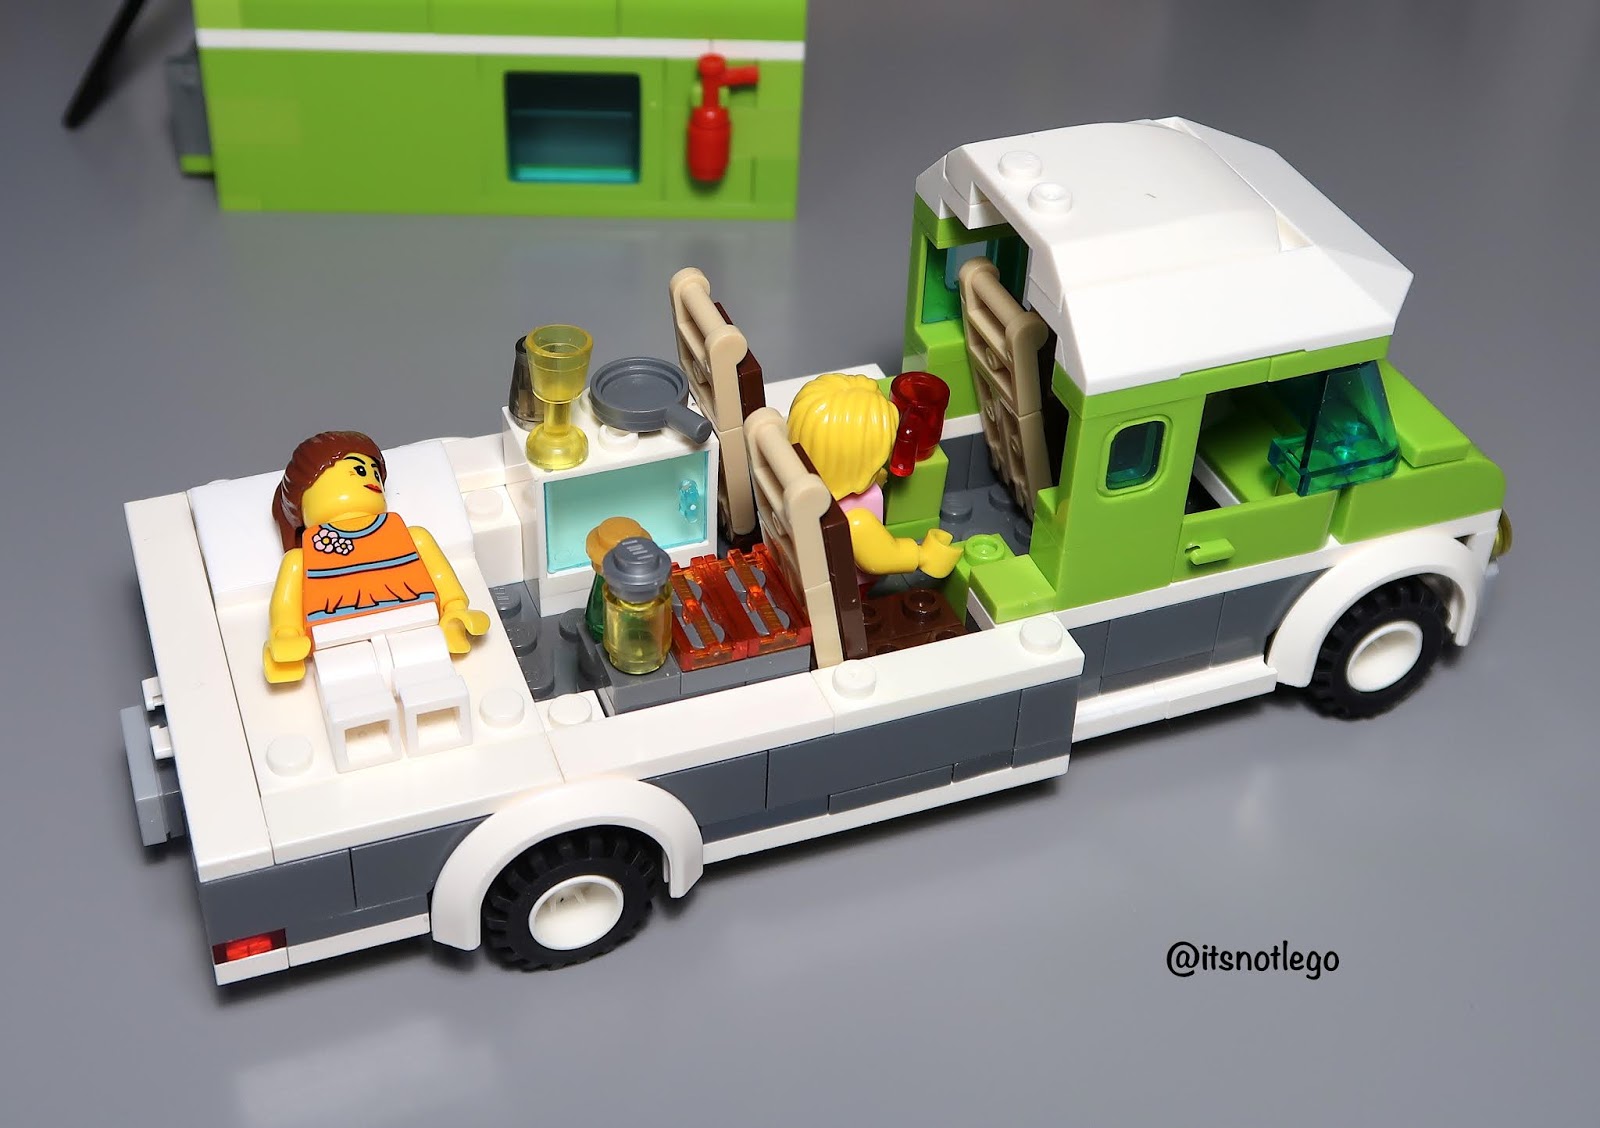
Seating has been reduced from 4 seats to 3, but I did manage to keep the freezer and stove/grill.  Since there's no passenger seat in the cab, I removed the computer screen that came in the original design.  There's now enough room for a decent sized bed and if necessary I could extend the bed width by another stud to comfortably sleep 2 minifigures side by side.

I tossed the minfigures that came with the set into a large box, so I just grabbed some random ones for this photo shoot.

Here's how the camper looks with shell removed looking forward.


As in real life, storage space is at a premium, so I added under the bed storage, accessible by two doors in the back of the camper.

Here's a few extra pictures I took of the modified Enlighten Camper.


Hope you enjoyed the pics!  Thanks for looking!   The original set is available on Aliexpress if you search for Enlighten 1120.