Monday, August 4, 2025

Creating a Blade Runner Style Advertisement using Capcut Dreamina


At some point, I'm wanting to create an animated billboard for my Cyberpunk city.  I created a number of images using Capcut's Dreamina and these were the ones I was most happy with.

Here's the prompt I used:

make an advertisement headshot of a lego version of the japanese geisha minifigure holding a small bottle of coke while looking mysteriously away from the camera. Blur the background of a cyberpunk city .

I will try to use nauknauk.io in the near future to animate the image. Stay tuned!

Sunday, August 3, 2025

Enhancing the Xbert 66055 Ohsojangs Antique Shop (Part Two)


Hello brick fans!  Welcome back to my blog post about enhancing the Xbert Bricks Antique Shop which was designed by Ohsojang (aka shinjungseub).   This is part two and it will focus on the updates to the second floor of the shop.

In case you missed Part One of the enhancements, you can find it here: https://bricksandfigs.blogspot.com/2025/07/enhancing-ohsojangs-antique-shop.html

I got the un-modified set from Temu and you can find the unboxing here: https://bricktoyreviews.blogspot.com/2025/07/unboxing-xbert-66055-antique-shop.html

And here's the build straight out of the box: https://its-not-lego.blogspot.com/2025/07/things-you-should-know-about-xbert.html

As discussed in the part one of the Antique shop mods, I expanded both the size of the baseplate and the building footprint of the main floor in both width and depth.  I will do the same for the second floor  and will document the changes as I update it each day.

Jump to the bottom of this blog post to see the latest updates!


Sun Aug 3

Today, we gathered up all the brown plates in my spare parts collection.

This is the layout I will use for the second floor.

In this pic, I'm checking the dimensions as placed over the first floor.

This is the underside of the second floor as built from the instructions.  There is an opening to allow for a ladder to be propped up against the floor.  Since I have an external set of stairs outside, I will replace this floor with the expanded version.


I have removed all of the second floor furnishings and the original floor plates of the second floor.

I can't decide if I should place the second floor flush to the front or set back.  If I set it back, I could have a terrace.

However, if I place the second floor closer to the front I can have a terrace in behind.  I might have to do some test builds to see which version I prefer.  I guess we will find out over the next few days!

Tue Aug 5

The changes today consists of expanding the second floor walls to match the depth of the first floor.  I've retained the power supply unit and centered the window on the wall.


I've removed the original center design and replaced it with a small balcony and glass door.

For  second floor access, a new doorway has been added.

This is the new second floor space.  I might add some inside partition walls to create a bedroom and washroom.

Here's what the second floor looks like placed onto the lower floor.


I updated the lower floor to add a landing at the top of the stairs.


Next steps is to rebuild the second floor back wall and have it open in the same fashion as lower wall. And create an upstairs apartment that will be where the antique shop owner lives.

Wed Aug 6


Today, we rebuilt the rear folding wall and the roof line.

Heres' the wall in the closed position.
And opened.

There was no floor tiling on the second floor of the original set.  With the expanded floorspace, I repeated the pattern on the second floor to match the first floor.   

In the front corner, I added a small kitchen and dinette.   Don't mind the hole in the wall, that will be put back in later along with a fan hood.  Might do a small shelf on the wall as well.  And the dinette needs another chair.


In the other front corner I reused the couch and added a a desk and computer.  I don't have enough room for a separate bedroom, so I'll just placed the bed in the back corner.

For the next step I need to partition off a small washroom.  Hopefully I can squeeze in a shower, toilet and sink into the remaining space.   That's it for now.

Thursday Aug 7


We are on the home stretch now!  Here's a overhead shot of the furnished apartment over the Antique shop.  

Here's the corner office area with the couch retained from the original Antique shop set, as well as the guitar and the boombox sitting in the wall cavity.  The desk and computer is new, however the coffee cup is from the OG set.  That low table with the lamp was originally located in the shop downstairs.

The bed is tucked away in the corner nook.  Above the bed is a shelf containing some of the books from the original book case.  The larger display shelf is also from the second floor of the Antique shop and it has now been integrated into the wall of the bathroom.  Most of the shelf contents have stayed the same, however, I swapped out the blue toolbox for a red one for visibility.

In the other corner we have the kitchen and dinette, now with a few more kitchen items and a shelf and fanhood.

Bathroom door and clock in the foyer.

The bathroom is fully visible when you open the rear wall. We were able to squeeze in a 3 piece bathroom which has a sink, toilet and shower.  We've got a mirror over the sink, and the gray floor tiles demarcate the shower area.  It's one of those tiny bathrooms where it's all in one.

Is there enough room for a minifigure in the washroom?  Let me know!

Another view along with the bed on the opposite wall.

I was concerned about traffic flow inside the apartment. I wanted to make sure a minifigure could move around so there's about 3 studs width between objects and furniture.  I could probably add another chair to the dinette, but it might intrude into the foyer.

The last thing for consideration is the roof. I basically doubled the size of the roof from it's original proportions. It drops right over the second floor and I can basically pull out the whole roof just by lifting from the chimney.

It's not a coincidence where the chimney is.  It's exactly over the vent above the kitchen stove.  The plumbing vents also sit above the bathroom.

Ok this post is already getting too long, so I will post the final reveal of the expanded Antique Shop in a separate and final blog post!    Oh, btw, I made some more changes to the shop interior too! Thanks for looking!


If you'd like to get your own Xbert Ohsojang designed Antique Shop, you can get it from Afobrick.com: https://afobrick.com/en-ca/products/xbert-66055-vintage-antique-shop?ref=oGOdUj_izrflQ
Don't forget to use my affiliate code itsnotlego to get another 5% off the price.

Thursday, July 31, 2025

Enhancing Ohsojang's Antique Shop Modular Building (Part One)


Hey brick fans, welcome back to my blog!

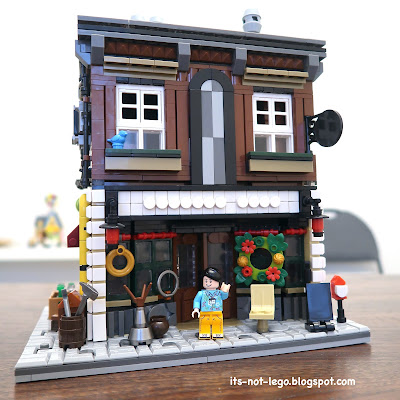
I recently picked up this beautiful modular building from Temu.  It's produced by a new brand called Xbert and the set is designed by one of my favourite MOC builders Ohsojang (aka shinjungseub).

I did a detailed set review on my other blog which you can find here.

Anyways I love the architecture of the set and all of the nice details that the set contains.  However it's a bit small when compared to some of my other modular buildings.   The building footprint is about the same as the Lego Parisian restaurant in terms of width and depth, but the baseplate that it sits on isn't a standard 16x32 or 32x32 stud, which is what all of my other modular buildings are placed on.

So my plan is to rebuild and upsize the shop while trying to preserve it's original design as much as possible.   The purpose of this blog post is to document the changes that I make as I embark on this project.   Think of it as a running journal.   Feel free to pop onto this blog post from time to time to see how things are progressing.   

Updates

Scroll to the bottom to see the latest updates.

Tue Jul 29


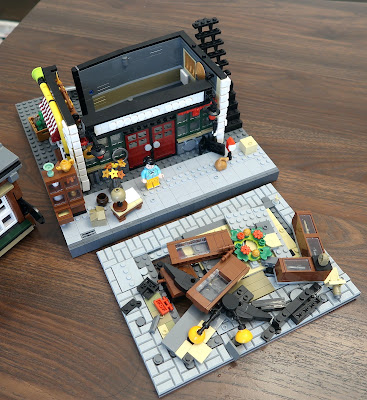
Deconstruction begins.  Basically pulled the building off of it's original baseplate and gutted he first floor interior.   I'm going to use a MILS style 32x32 baseplate on which to rebuild the Antique shop.

Wed Jul 30


Ok, so we have cleared away the mess and have temporarily placed the structure onto the 32x32 baseplate.  I'm going wth my standard sidewalk configuration.  In it's original form you had to climb a ladder to get to the second floor.  I'm going to add an outside staircase instead.

The shop will be widened by two studs and the original inoperable brick built doors will be replaced by Lego style doorways.  For now, I've placed the doors flush to the windows, but I'm considering indenting them to sort of follow Ohsojang's original premise.

I've used some linear plates to define the space of the new building footprint.  The main floor square footage will be almost doubled due to the extra 8 stud depth.

I've offset the building from the edge of the baseplate by 3 studs to allow for the protruding awning.  All of the dark gray area outside of the building will be tiled off.  I intend on preserving the original interiors tiling design as well.   Next steps is to collect some dark gray and dark tan masonry bricks and rebuild the side walls.

Thu July 31


Today, we have expanded the Antique shop's width by 2 studs and we have also inset the double doors.
The side walls have been extended in the picture above.  I still need to redo the yellow pipes.
All of the accessories that used to be on the left side of the shop have now been relocated under the new stairwell.  I've got some stair parts coming from Temu, so I will replace the temp stairs when I get them.

Here's the new interior space.  In addition to the original fixtures and furniture, I will need to add extra furnishings to fill in all of the new space.  Floor tiles need to be laid.   And of course I need to expand the rear wall and realign it to the building.
Fri Aug 1


Today, we updated the yellow piping on the side of the antique shop.  I'm going to replace the black 1x1 rounds with yellow ones in the next update.

Light gray tiling added to the perimeter of the shop.

This is a preliminary placement of stuff inside the antique shop.  I've added a few more knick knacks.

 I didn't throw those brick built doors away, instead they are now part of the antiques. 

Some of the stuff that was placed outside has now moved indoors, like the giant wreath and the sack. Got the first edition print of the Lepin News!

Tomorrow, I'll start re-laying the floor tile back inside the shop.   That's a wrap for today.

Sat Aug 2


Now we have installed the floor tiles.  It's following the original colour scheme and layout, just more of it.


And we have built a new folding rear wall, fashioned in somewhat the same way as the old wall but bigger.

I might have to add some window elements later to break up the plain brick wall.   So the first floor is pretty much finished.

I added an AC unit and meter to the yellow pipe.

Just a minor rearrangement of items under the stairs.


The next task is to start upgrading the second floor of the Antique shop.   Stay tuned for part two!

Feel free to check it out, if you like!

If you'd like to get your own Xbert Ohsojang designed Antique Shop, you can get it from Afobrick.com: https://afobrick.com/en-ca/products/xbert-66055-vintage-antique-shop?ref=oGOdUj_izrflQ
Don't forget to use my affiliate code itsnotlego to get another 5% off the price.